If you’ve ever built a crystal radio, there’s something magical about being able to pull voices and music from far away out of thin air. If you haven’t built one, maybe you should while there’s still something on the AM band. Of course, nowadays the equivalent might an SDR. But barring a computer solution, there are not many ways to convert radio waves into intelligence. From a pocket radio to advanced RADAR to a satellite in orbit, receiving a radio wave is accomplished in pretty much the same way.
There are, however, many ways to modulate and demodulate that radio wave. Of course, an AM radio works differently than an FM radio. A satellite data downlink works differently, too. But the process of capturing the radio wave from the air and getting them into a form ready for further processing hasn’t changed much over the years.
In this article, I’ll talk about the most common radio receiver architectures you may have seen in years past, and next week I’ll talk about modern architectures. Either way, understanding receiver architectures will help you design new radios or troubleshoot them.
Comparing Radios
If you were going to grade a receiver, there are several things that are of prime importance:
- Selectivity – There are lots of radio waves swimming around you. A selective receiver can pull out just the one you want. This is particularly noticeable when you have two strong stations near each other in frequency.
- Sensitivity – The signal coming in from an antenna is probably very weak. Receivers have different levels of sensitivity and a more sensitive receiver will pick up a weaker signal.
- Noise floor – Receivers will have a certain amount of noise that will cover up a weak signal. Obviously, the lower the noise floor, the better reception for weak signals.
That Crystal Radio
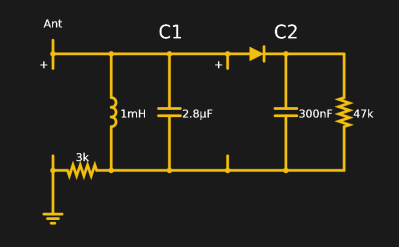
 The crystal radio is one of the simplest of radio designs, operating without an amplifier and getting its power from the radio signal itself. The crystal radio you built as a kid is very similar in design to the earliest radio receivers. A tuned circuit picks the frequency and a detector — usually a diode — demodulates the signal directly. If you do the math, the tuned circuit has low impedance to all frequencies except the one you’ve tuned into. The coil and the capacitor effectively cancel each other out at that frequency, and — if the components were perfect — present an infinite impedance to the signal of interest. That means all other signals will attenuate compared to the main signal.
The original design of these radios date to when there was no good way to amplify signals, so it doesn’t. That means you need a strong signal and a big antenna. You also benefit from a solid ground connection. Never built a crystal radio? My favorite simulator, Falstad, has a crystal radio you can simulate. The simulation relies on the program’s antenna component which has AM modulated signals at 3 kHz, 2.71 kHz, and 2.43 kHz.
While the tank circuit offers some selectivity, it isn’t very good. The sensitivity of this receiver is also not very good. You don’t generally see circuits like this in practical applications. However, some people like to try to push the best possible performance from a crystal radio, like Chris Wendling does in the video below. If you decide to build one, you might want to start with something more modest.
TRF and Reflex
A step up from the crystal radio is the TRF or tuned radio frequency architecture. With TRF, you basically have a crystal radio with some amplifiers ahead of the detector that amplify better at some frequencies than others — essentially filters with gain.
If you’ve ever seen a 1920s- or 1930s-era radio with numerous tuning knobs on the front panel, that’s probably a TRF radio. You had to tune each dial to the correct frequency.
The TRF is not a bad design, especially if you could figure out how to change the tuning of the amplifiers from a single control. But it is on the lower end of the performance spectrum. However, many inexpensive radios still use TRF because a 1972-era chip and its successors cram an entire TRF radio into a small IC package.
The device looked like a transistor and at least one variant had 10 transistors inside. It provided the RF amplification, detection, and even automatic gain control using only six external components. The original chip expected you to have an external coil and capacitor, a few filter capacitors, and a few resistors to both power the device and provide the automatic gain control (AGC) action. Later models also had some audio amplification stages.
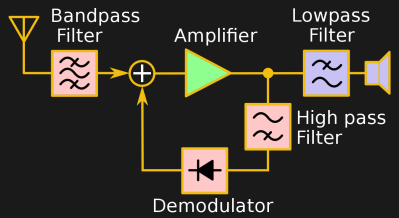
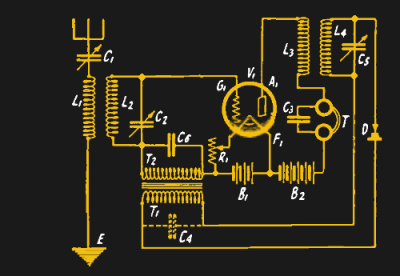
Obviously, one three-legged device appealed to companies that wanted to make small cheap radios. Speaking of cheaper, another old version of the TRF is the reflex receiver. It dates back to 1914, although it was independently discovered at least one other time in the early 20th century.


The idea is to use one amplifier for amplifying both RF and the audio output (see the accompanying block diagram and schematic). This is possible because the radio frequency is so much higher than the audio frequencies and you can use filters to steer the signals through the same tube. These are generally not seen much anymore, but it is an interesting solution to the days when saving a single active device was a major cost savings.
Modern Times
While you don’t see many crystal and reflex radios these days, there are still TRF designs floating around, especially based on the many ICs that work that way. However, the regenerative receiver is probably a better choice if you want to make a very simple but workable radio. There are also direct conversion receivers — you see them a lot with software defined radio setups. The gold standard is the superheterodyne receiver, which is what an overwhelming number of devices use today.
I’ll talk about those architectures, and a few others, in the next article. Meanwhile, see what you can do to build that crystal radio. If you don’t have the right parts, you can make most of them from common items. If you don’t have a diode, you could use a razor blade and a pencil, as [RimstarOrg] — the YouTube channel of Hackaday’s own Steven Dufresne — shows in the video below.
Acknowledgment: Most of the pretty pictures of block diagrams and schematics were adapted from public domain sources on Wikipedia, particularly from [Chetvorno]. What a great resource.
via Radio Hacks – Hackaday https://ift.tt/2W5Qsre
No comments:
Post a Comment