Back in 2018, we covered [Igor’s] Easy-SDR project that aimed to provide open hardware extensions for the chap RTL-SDR receivers. If you haven’t been there for a while, it’s worth a look as there have been many recent updates. According to the author’s Reddit post:
Most of the devices are now prepared for installation in a metal case measuring 80 x 50 x 20 millimeters.
There’s a completely redesigned LNA design. Now, Bias Tee powered amplifiers are housed in a 50 x 25 x 25mm metal case and have N-type connectors.
There’s an added amplifier based on the PGA-103 microcircuit.
Added is the ability to install filters in final amplifiers (a separate printed circuit board, depending on the filter used).
A new device – SPDT antenna switch for receiving antennas.
The upconverter has been redesigned. Added intermediate buffer stage between the crystal generator and mixer.
RF lines in all devices were recalculated to correspond to the characteristic wave impedance of 50 Ohm.
Reduced size of PI attenuator PCB.
There is an emphasis on ease of assembly, so the projects generally have a gerber file and can use through hole or surface mount parts. They are also available live on EasyEDA if you want to make changes. Some of the designs, like the new upconverter, are SMD only, but for some devices these days that’s your only choice.
We were impressed with the instructions included with some of the projects. It should be very possible to duplicate these projects with just a little effort. If you missed our first pass at [Igor’s] great repo, you can still catch up. Since he uses EasyEDA, you might want to read our experience with that, too.
It wouldn’t be October without Halloween, and it wouldn’t be Halloween without some spooky music. There’s no instrument spookier than a Theremin, which also happens to be one of the world’s first electronic instruments.
Leon Theremin plays his namesake instrument. Image via Linda Hall Library
You’ve no doubt heard the eerie, otherworldly tones of the Theremin in various 1950s sci-fi films, or heard the instrument’s one-of-a-kind cousin, the Electro-Theremin in “Good Vibrations” by the Beach Boys. The Theremin turns 100 years old this month, so we thought we’d take a look at this strange instrument.
One hundred years ago, a young Russian physicist named Lev Sergeyevich Termen, better known as Leon Theremin, was trying to invent a device to measure the density of various gases. In addition to the standard analog needle readout, he wanted another way to indicate the density, so he devised an oscillator whistle that would change pitch based on the density.
He discovered by accident that having his hand in the field of the antenna changed the pitch of the whistle, too. Then he did what any of us would do — played around until he made a melody, then called everyone else in the lab over to check it out.
Theremin soon showed his device to Lenin, who loved it so much that he sent Lev on a world tour to show it off. While in New York, he played it for Rachmaninoff and Toscanini. In fact you can see a video recording of Leon playing the instrument, a performance that’s more hauntingly beautiful than spooky. In 1928, he patented the Theremin in the United States and worked with RCA to produce them.
Sales never really took off, partially because of the Great Depression, but largely because it’s so hard to get a nice sound from it. The instrument was touted as being easy to play, because you really do just wave your hands in the air to play it. But the truth is that your hands must be placed precisely to avoid terrible squawking sounds. The Theremin is quite difficult to master, and few have done it.
Inside the Theremin are a pair of circuits — one to control pitch, and the other to control volume. The pitch circuit uses two tuned oscillators to produce sound. One is fixed, and the other is variable and connected to a vertical antenna. Sound is produced when the player’s hand enters the electromagnetic field around the antenna. The frequency produced by the players hand is subtracted from the reference frequency of the fixed oscillator in a process called heterodyning. The difference between the two frequencies is then amplified and sent through a speaker. The volume circuit is a single oscillator connected to a horizontal loop antenna. As the player’s hand gets closer to the antenna, the volume goes down, which makes it easy to chop the sound into individual notes.
Theremins are still being made today by Moog, and many of them have more bells and whistles that make them sound more complex compared to the first Theremin, which had a sine wave sound to it. One of the best and most expressive Theremin players was Clara Rockmore, and Moog is honoring her by releasing a limited edition Theremin this month. That’s Clara in the header image.
Things didn’t work out so well for Leon Theremin. In 1938, he was kidnapped and taken back to Russia by the KGB. He spent time in a prison camp and was later forced by the government to create a bug to spy on the United States. Theremin returned to the US in 1991 at the age of 95 and gave several concerts. He died in Moscow two years later.
Leon Theremin would likely be pleased to see how many spinoffs his invention has spurred. Here’s to 100 more years of spooky, ethereal music. Take a deep dive into how the instrument works and where the art is today with this interview with Carolin Eyck.
Delaware is a state of contrasts when it comes to knife laws, though you might find it one of the more permissive New England states in spite of a variety of restrictions.
Delaware happily allows the open carry of pretty much any kind of knife, and a great variety of knives, so long as one has a concealed weapons permit. Lacking a concealed weapons permit, you will be limited to ordinary folding pocket knives with blades less than 3 inches long.
So far so good, but there are blanket restrictions on switchblades, butterfly knives, gravity knives, any knife with an integral knuckle handguard, throwing stars or shuriken, and any knife that is undetectable, classified as made from a non-metallic material that can escape detection by handheld or installed metal detectors.
We will dig into all the details and the remainder of this article so you can stay safe and stay legal while carrying a knife in Delaware.
What You Need to Know
What Kind of Knives Can I Own?: Any kind of knife except switchblades, gravity knives, throwing stars/shuriken, butterfly knives, non-metallic (undetectable knives) and any knife with an integrated knuckle duster handguard.
Can I Carry a Knife Concealed Without a Permit?: Any ordinary pocket knife with a blade measuring less than 3”.
Can I Carry a Knife Concealed With a Permit?: Any knife except the prohibited classes named above.
Can I Carry a Knife Openly?: Any knife except the prohibited classes named above (in most municipalities).
General Ownership
Delaware specifically bans entire categories of knives, though the restrictions include both specific features, and certain classes of knife.
Specifically banned types of knife include any switchblade, any non-detectable knife defined as a knife which is made from material other than metal, any shuriken or throwing star, any gravity knife, any butterfly knife, and any knife with an integrated knuckleduster handguard, though the statutes are unclear as to whether or not a knife with a continuous, open D-shaped handguard would qualify.
Also note that the state statutes classify a deadly weapon as any kind of knife except an ordinary folding pocket knife. The exact verbiage of the statute, “ordinary pocket knife”, is defined as any folding knife with a blade measuring less than three inches.
This is a fairly restrictive statute when it comes to length, as quite a few knives that are otherwise completely pedestrian have blades measuring at least that long. Take great care when choosing a pocket knife to carry in Delaware!
Also one should be aware of Delaware’s definition of dangerous instrument, which is included in the definition of dangerous weapon. Any knife, no matter its length or features could certainly meet that qualification of dangerous instrument if used accordingly.
You must be sure you are on the right side of the law in Delaware, since the illegal possession of any deadly weapon is categorized as a felony.
Also, there is no statewide preemption in the state of Delaware; local laws might well be more restrictive than the state laws and you must abide by them if you are living or traveling in such places.
Concealed Carry, No Permit
The only kind of knife that is legal to carry concealed without a concealed weapons permit in the state is an “ordinary pocket knife”, defined above and in the state statutes as any folding knife that has a blade measuring less than 3 inches. Small gentleman’s knives, trappers, scout knives and related utility knives will all fit the bill so long as they are compact enough.
There is no other provision for the concealed carry of a knife without a permit unless one is a law enforcement officer, or some other official engaged in official duties.
Concealed Carry, With Permit
So long as you have a concealed weapons permit issued by the state of Delaware or another state’s concealed weapons permit that Delaware recognizes you may carry any kind of knife on or about your person so long as it is not one of the prohibited types listed above.
Note that Delaware makes firearms training a mandatory part of obtaining their concealed weapons permit in the state, and even if you only plan on carrying your knife and nothing but your knife you will still have to attend formalized handgun training and pass the course in order to be issued the permit. It doesn’t make a lot of sense, but then again anything governments do rarely makes sense.
Open Carry
Open carry of all permitted types of knives is allowed in Delaware so long as you are not carrying anywhere that you may not have a knife. See below.
Prohibited Places
Any school defined as a “safe school or recreation zone”. The definition includes any building, sports field, stadium or any other kind of property that is owned, rented, operated or otherwise controlled by a public or private school.
You also may not carry within 1,000 feet of any said property. The definition of “safe school or recreation zone” also includes any motor vehicle similarly owned or operated by any public or private school.
Included in this definition, and specifically referring to “recreation zone” is any building or structure that is owned or operated by the state or any corporation or any private organization, and is used as a center for recreation, athletics, or as a stadium.
Be on your guard: Delaware has a specific state statute declaring that it shall be no defense against prosecution for violating the illegal carry of weapons on school property statute that the person who committed the violation was unaware they were on such a property. You have been warned!
Assessment
Delaware is a reasonably permissive state when it comes to ownership and carry of knives, at least as far as New England states go.
Though some specific categories of knife are banned, you have broad latitude regarding what you can carry and how long it is so long as you are carrying it openly or are carrying it concealed and have in your possession a valid concealed weapons permit.
Lacking such a permit, the only knife you can carry without breaking the law, if you’re going to carry it concealed, is one with a blade measuring less than 3 inches.
Important Delaware State Statutes
Understanding the law as it is written and interpreted is essential for ensuring you don’t run afoul of it. Delaware’s statutes governing knives are intricate and extremely verbose, but I am including the most relevant ones here, below.
Make sure you take the time to read and understand all of them,, and consult an experienced attorney in Delaware if you have serious questions.
Title 11 – Crimes and Criminal Procedure § 222. General definitions.
…
(4) “Dangerous instrument” means any instrument, article or substance which, under the circumstances in which it is used, attempted to be used or threatened to be used, is readily capable of causing death or serious physical injury, or any disabling chemical spray, as defined in paragraph (7) of this section or any electronic control devices including but not limited to a neuromuscular incapacitation device designed to incapacitate a person.
(5) “Deadly weapon” includes a “firearm”, as defined in paragraph (12) of this section, a bomb, a knife of any sort (other than an ordinary pocketknife carried in a closed position), switchblade knife, billy, blackjack, bludgeon, metal knuckles, slingshot, razor, bicycle chain or ice pick or any “dangerous instrument”, as defined in paragraph (4) of this section, which is used, or attempted to be used, to cause death or serious physical injury. For the purpose of this definition, an ordinary pocketknife shall be a folding knife having a blade not more than 3 inches in length.
…
(22) “Physical force” means any application of force upon or toward the body of another person.
(23) “Physical injury” means impairment of physical condition or substantial pain.
…
(26) “Serious physical injury” means physical injury which creates a substantial risk of death, or which causes serious and prolonged disfigurement, prolonged impairment of health or prolonged loss or impairment of the function of any bodily organ, or which causes the unlawful termination of a pregnancy without the consent of the pregnant female.
…
Title 11 – Crimes and Criminal Procedure § 1442. Carrying a concealed deadly weapon; class G felony; class D felony.
A person is guilty of carrying a concealed deadly weapon when the person carries concealed a deadly weapon upon or about the person without a license to do so as provided by § 1441 of this title.
Carrying a concealed deadly weapon is a class G felony, unless the deadly weapon is a firearm, in which case it is a class D felony.
It shall be a defense that the defendant has been issued an otherwise valid license to carry a concealed deadly weapon pursuant to terms of § 1441 of this title, where:
(1) The license has expired,
(2) The person had applied for renewal of said license within the allotted time frame prior to expiration of the license, and
(3) The offense is alleged to have occurred while the application for renewal of said license was pending before the court.
…
Title 11 – Crimes and Criminal Procedure § 1443. Carrying a concealed dangerous instrument; class A misdemeanor.
(a) A person is guilty of carrying a concealed dangerous instrument when the person carries concealed a dangerous instrument upon or about the person.
(b) It shall be a defense that the defendant was carrying the concealed dangerous instrument for a specific lawful purpose and that the defendant had no intention of causing any physical injury or threatening the same.
(c) For the purposes of this section, disabling chemical spray, as defined in § 222 of this title, shall not be considered to be a dangerous instrument.
(d) Carrying a concealed dangerous instrument is a class A misdemeanor.
…
Title 11 – Crimes and Criminal Procedure § 1446. Unlawfully dealing with a switchblade knife; unclassified misdemeanor.
A person is guilty of unlawfully dealing with a switchblade knife when the person sells, offers for sale or has in possession a knife, the blade of which is released by a spring mechanism or by gravity.
Unlawfully dealing with a switchblade knife is an unclassified misdemeanor.
…
Title 11 – Crimes and Criminal Procedure § 1452. Unlawfully dealing with knuckles-combination knife; class B misdemeanor.
A person is guilty of unlawfully dealing with a knuckles-combination knife when the person sells, offers for sale or has in possession a knife, the blade of which is supported by a knuckle ring grip handle.
Unlawfully dealing with a knuckles-combination knife is a class B misdemeanor.
…
Title 11 – Crimes and Criminal Procedure § 1453. Unlawfully dealing with martial arts throwing star; class B misdemeanor.
A person is guilty of unlawfully dealing with a martial arts throwing star when the person sells, offers for sale or has in possession a sharp metal throwing star.
Unlawfully dealing with a martial arts throwing star is a class B misdemeanor.
…
Title 11 – Crimes and Criminal Procedure § 1446A. Undetectable knives; commercial manufacture, import for commercial sale, or offers for commercial sale; or possession.
(a) Any person in this state who commercially manufactures or causes to be commercially manufactured, or who knowingly imports into the state for commercial sale, keeps for commercial sale, or offers or exposes for commercial sale, or who possesses any undetectable knife is guilty of a class G felony. As used in this section, an “undetectable knife” means any knife or other instrument with or without a handguard that is capable of ready use as a stabbing weapon that may inflict serious physical injury or death that is commercially manufactured to be used as a weapon and is not detectable by a metal detector or magnetometer because there is no material permanently affixed that would be detectable by a metal detector or magnetometer, either handheld or otherwise, that is set at standard calibration.
(b) Notwithstanding any other provision of law, all knives or other instruments with or without a handguard that are capable of ready use as a stabbing weapon that may inflict serious physical injury or death that are commercially manufactured in this state that utilize materials that are not detectable by a metal detector or magnetometer, shall be manufactured to include permanently installed materials that will ensure they are detectable by a metal detector or magnetometer, either handheld or otherwise, that is set at standard calibration.
Title 11 – Crimes and Criminal Procedure § 1457. Possession of a weapon in a Safe School and Recreation Zone; class D, E, or F felony; class A or B misdemeanor.
(a) Any person who commits any of the offenses described in subsection (b) of this section, or any juvenile who possesses a firearm or other deadly weapon, and does so while in or on a “Safe School and Recreation Zone” shall be guilty of the crime of possession of a weapon in a Safe School and Recreation Zone.
…
(c) For the purpose of this section, “Safe School and Recreation Zone” shall mean:
(1) Any building, structure, athletic field, sports stadium or real property owned, operated, leased or rented by any public or private school including, but not limited to, any kindergarten, elementary, secondary or vocational-technical school or any college or university, within 1,000 feet thereof; or
(2) Any motor vehicle owned, operated, leased or rented by any public or private school including, but not limited to, any kindergarten, elementary, secondary, or vocational-technical school or any college or university; or
(3) Any building or structure owned, operated, leased or rented by any county or municipality, or by the State, or by any board, agency, commission, department, corporation or other entity thereof, or by any private organization, which is utilized as a recreation center, athletic field or sports stadium.
(d) Nothing in this section shall be construed to preclude or otherwise limit a prosecution of or conviction for a violation of this chapter or any other provision of law. A person may be convicted both of the crime of possession of a weapon in a Safe School and Recreation Zone and of the underlying offense as defined elsewhere by the laws of the State.
(e) It shall not be a defense to a prosecution for a violation of this section that the person was unaware that the prohibited conduct took place on or in a Safe School and Recreation Zone.
A recent writeup by Tom Nardi about using the 6502-based NES to track satellites brought back memories of my senior project at Georgia Tech back in the early 80s. At our club station W4AQL, I had become interested in Amateur Radio satellites. It was quite a thrill to hear your signal returning from space, adjusting for Doppler as it speeds overhead, keeping the antennas pointed, all while carrying on a brief conversation with other Earth stations or copying spacecraft telemetry, usually in Morse code.
The Manual Way
Example of NASA Prediction Bulletin, courtesy of Dr. T.S. Kelso
Pulling this off was quite a production in the pre-Internet days. To begin with, you needed data about each satellite’s orbit. This was obtained by signing up to a real-paper mailing list from NASA’s Goddard Space Flight Center. An envelope arrived about twice a week by mail containing a stack of NASA Prediction Bulletins for the satellites you had requested. These contained the orbital parameters in what’s known as two-line element (TLE) set format, which you had to then type into your computer for processing. When we communicated with Space Shuttles, we would get the preliminary and later actual TLE data from someone within NASA by phone or FAX.
Unlike geostationary communications satellites, Amateur radio satellites are typically launched in polar orbits which take between 90 to 120 minutes to complete one revolution of the Earth. To communicate through one of these satellite, first we needed to know when a particular satellite would pass over Atlanta.
To solve this problem, I wrote a Fortran program on the campus mainframe computer, a CDC Cyber 74, a real computational beast of the day. This program propagated the state vector given by the TLE data, and generated a list of orbits which passed over Atlanta. These passes were characterized by the maximum elevation, the duration of the pass, the AOS and LOS (Acquisition / Loss of Signal) times, and the distance at closest approach. We humans would filter this list even further, ignoring passes that were very short or that occurred when we would be asleep or attending class — after all, the reason we were at GA Tech was to study hard, learn a lot, and graduate with a degree.
Object                  Orbital altitude  Inclination  Orbital period
======================  ================  ===========  ==============
Oscar 8                  900 km circular  99 degrees   103 minutes
Radio Sputnik 5,6,7,8   1600 km circular  83 degrees   120 minutes
Space Shuttle STS-9      250 km circular  57 degrees    90 minutes
Space Shuttle STS-51F    315 km circular  50 degrees    91 minutes
The satellites of the day had two popular modes. Mode A was easiest to use for most Hams, the uplink was in the 2 m band, and the downlink was on 10 m. Mode J also used a 2 m uplink, but the downlink was in the 70 cm band. A typical Ham satellite station would use a stationary horizontal loop antenna for 10 m reception. The 2 m and 70 cm antennas were usually Yagis, mounted on common rotatable elevation boom which was itself mounted on a vertical mast that could be rotated in azimuth. Ten meter reception was simple, no antenna movement required. Steering the Yagi antennas, however, was quite a task.
Typical steerable Yagi Antenna Array, courtesy of Gloucester County ARC, W2MMD
Having selected a suitable orbit, next we had make those Yagis follow the path of the satellite. In Amateur satellite stations, this is a completely open-loop process. You calculate where the satellite will be at a certain time, and drive the antennas to that point in space. If you remember the old home steerable TV antennas, before cable TV and streaming, the arrangement in a Ham shack is very similar. There is a rotator control box for each rotor, with an analog meter indicating direction, modern ones being digital, of course. These control boxes usually had three buttons for steering: Left, Right, and Brake release.
To follow the satellite, we had a couple of techniques available. One method used a graphical overlay of the satellite’s ground track and footprint on top of a polar projection map of the Earth. By rotating the ground track overlay to match the orbit’s position as given by the orbital parameter with the coolest name, Right Ascension of the Ascending Node, we could visually see the satellite’s path over our station. The ground path overlay has time tick marks, and the footprint overlay has azimuth lines and elevation rings. This crude graphical technique provides the basic information needed to track the satellite, within the broad beamwidth of our antennas. We also had to keep our clocks synchonized to WWV or WWVH — no Network Time Protocol back then.
Oscarlocator from the author’s personal collection.
A second technique was more precise, but required a trip across campus. Using another Fortran program, I could print a table of time, azimuth and elevation angles for a desired orbit. The operator wouldn’t have to interpolate angles from the graphical overlays: the numbers are clearly shown on the computer printout paper. Getting this data from the campus computer wasn’t trivial, however. Usually I would visit the computer center building across campus, login to my account at a terminal, and type in the data by hand. Upon execution, the program would generate a printout.
Then I had to wait at the output counter for the operator to separate and distribute the printouts to all of us impatient users. We felt so lucky when the club obtained a portable printing terminal with a built-in acoustic modem. This meant we could dial into the mainframe and run the programs remotely, and get our orbit schedules and tracking tables immediately without crossing campus — at the blazingly fast speed of 300 baud!
While all these machinactions were certainly within our grasp, it took quite a bit of effort and advance planning. And while a lone operator could communicate with a satellite, two people were better — one to operate the radios, the other to steer the antennas. I recall two events from this period which led me to consider a computer controlled project. First of all, we inherited two Commodore PET computers from one of the EE professors. Secondly, we had an ongoing issue controlling equipment up on the roof of the 5th floor from our shack located at basement level. There just weren’t enough wires to do all the things we wanted even for normal HF operations, much less satellite tracking.
Commodore PET to the Rescue
The Commodore PET computers we had were modified from their standard factory condition. They had full-size external keyboards, so you didn’t have to use the Chiclet keys. The internal memory had been upgraded to 32K RAM. My report from 1983 says this expansion memory card also had two general purpose 8-bit TTL output registers, which were used to talk to the outside world.
As shown in this diagram, the PET computer talks to two devices — the Rotor Control Interface selects and operates the rotor boxes, and the Digital Serial Transmitter, essentially just a UART that sent data serially to the roof to remotely control a variety of equipment. Rotor control was fun, because we only had one rotor control cable between the shack the the roof. I had to implement 8P3T switches out of relays and multiplexed the cable between rotors. This means that only one rotor could rotate at a time, but this wasn’t a severe constraint for our purpose.
Besides the rotator control signal multiplexing, there was quite a bit of auxilliary equipment on the roof which had to be remotely controlled. As shown in the diagram, we had RF coaxial relays to switch VHF/UHF antenna polarization, and to switch between 10 m and 70 cm downlink signal paths. In addition, there were preamps, down-converters, and power amplifiers which had to be turned on and off. Except for rotor multiplexing, most of these were static setups for the duration of a satellite pass, although the PET had full control of everything over this interface. We made a UART interface connected to one of the PET’s TTL output registers to send this control data serially to the roof for control. I hand-drew all the schematics and hand-taped the PCB artwork – no KiCad back then.
I very quickly identified a problem having the PET control of all this rooftop gear, which was not related to satellite operations at all. The PET wasn’t running 24/7, and it was slow to boot and load up from cassette tape. Operators who just needed to control relays on the roof for HF operations didn’t want to wait 10+ minutes to boot the PET. In fact they were quite vocal about it. So I added a manual control panel to bypass the PET. This philosophy has served me well over the years — computer control is great, but there are times when you need manual control, if only for testing.
We Don’t Need Closed Loops
There was still one problem with this setup — you might have noticed there is no feedback. There was a method for the PET to read signals, but despite trying a variety of methods we couldn’t get a stable enough feedback within our limited budget and limited mechanical skills. The azimuth rotor, which had an integrated feedback signal, would have been the easiest to monitor. But the elevation rotor we used didn’t have any such feedback.
We tried a long rod with a lead weight at the bottom, attached to a potentiometer. When the boom rotated up and down in elevation, the rod always pointed down. Good idea on paper, didn’t work so well in practice. We briefly played with synchromotors, which were really cool. Turn the shaft of one motor and the other motor across the room also turned the same amount, connected only by a few wires. But even these few wires were too many for our peculiar installation.
In the end, I concluded that for the satellites of interest and the antenna beamwidths involved, running the antenna rotation controls open loop was workable. To be sure, it caused a lot of headaches to procedurally check alighment before a pass, but once the pass began it worked as desired. I was continually tweaking the computer model of the antenna rotation, both the mathematical model and the constants such as dead-time, rotation speed, acceleration, etc. It was a crude solution, but it got the job done within our limited budget.
Aside: Zenith crossing and three axis mounts
You might think that a satellite passing directly overhead would be perfect — it is as close as possible to your station. Well, that’s not necessarily good. The problem is that when the satellite passes overhead, and the elevation angle approaches 90 degrees, the azimuth rotor will suddenly have to spin at an incredibly fast rate to keep pointed. There are ways to mitigate this — one method is to accept some pointing error and steer the antenna in a small circle around zenith — a circle whose diameter is determined by the speed of the satellite and the maximum speed of your rotor.
A more elegant solution, but mechanically complex, is to add a third axis of rotation. Two of the rotors are positioned before the satellite pass so that the antenna boom connected to the third rotor is perpendicular to the orbital plane. This way, only the third rotor is used during the satellite pass, and the other two rotors remain fixed.
Where is OSCAR?
Providing the PET with interfaces to the real world was only half the battle. I still needed a way to calculate the satellite’s position. And while it was great to have a computer in the shack, the PET computer was thousands of times less powerful than the campus mainframe. There was no GUI, no tracking map of the Earth, just updating data fields on a text-based status screen.
Satellite Tracking Screen, courtesy of Sherman Banks.
I remember one major issue in the software development, however. There were several programs floating around the community those days for tracking satellites, and I hand typed one of the popular ones into the PET. I contacted the author of this program to let him know about my school project and get his permission.
But to my surprise, he replied “No, you can’t use my software”. Just a minor setback for a young college student who doesn’t know his limitations — I went to the GA Tech library, checked out a couple of books on orbital mechanics, and wrote my own algorithms. Surprisingly, the fundamental Keplerian laws and equations for orbital bodies aren’t that difficult to understand and calculate. Alas, when you solve for the antenna pointing angles to the satellite, it results in a transcendental equation. Solving that on the mainframe took milliseconds, but it painfully slow on the PET. Over a month or so that followed, I confined myself to programming at home all weekend, developed an life-long addiction to caffeine-laden diet colas, and emerged with a working program.
Upgrades
The manual controls for rooftop equipment were non-intuitive. You were literally toggling address and data bits into a UART. This could have been improved, of course, but a few of us began to question the original “no more wires can be routed to the roof” constraint. It turns out that it was indeed possible, with a bit of effort. A larger cable for signaling was pulled to the roof, and an improved interface panel was made. Furthermore, the PET was showing its age, too, so we upgraded to the Commodore C64 — with floppy disk storage. I made a new, smaller rotor control interface that connected to the C64’s user port and controlled the rotors by relays.
Successful Ops
The system, while a bit finicky, did serve us well for a few years. Not only were we able to communicate over Amateur Radio satellites, but quite proudly we contacted the first two astronauts allowed to operate from the Space Shuttle under a new program called SAREX. In Nov 1983 Dr. Owen Garriott (W5LFL) heard us on Columbia’s STS-9 mission, which was piloted by our own GA Tech alumni Dr John Young. We were also proud of our own recent club alumni, Jim Worsham, W4KXY, who was on the team at Motorola that designed and built the custom radio used by Dr. Garriott.
QSL Card from Owen Garriott W5LFL, courtesy of Sherman Banks.
Again in Aug 1985, we contacted Dr Tony England (W0ORE) on Challenger’s STS-51F Spacelab mission. Videos were made of these efforts, which you can see in the links below.
I challenged myself last year to build a miniature version of this project that fits in an Altoids can. It’s on the back burner for now, until I can track down a copy of the original software. Stay tuned…
Wrapping Up
After couple of years after I graduated, the company I worked with generously let me manufacture and market this C64-based tracking system under the unimaginitive name Satellite AutoTracker. That’s a story for another day.
I can’t overemphasize the impact this project had on me. The act of conversing with another radio station via a satellite pulls together so many engineering and science disciplines, from the physics of orbits and Doppler shifts to the minute details of learning to build PCBs to the overall system engineering efforts to make it all play together. Each one of these were interesting in and of themselves, but it was just plain awesome when it all successfully meshed together and worked.
I learned a lot building this project, but it didn’t seem like learning because it was so fun. That, folks, is the best way to learn.
In order to escape from some disaster, the time may come when you need to bug-out on foot. If that happens, you can’t let any obstacles stand in your way. After all, you are not on a pleasure hike, you’re on a march to save your life and potentially the lives of your family and loved ones.
So when you do come upon something that will halt your forward progress, you’ve got to find a way around it: Over, under, around, through or… across.
You probably guessed right. I’m alluding to rivers. Rivers are a common obstacle for those traveling on foot and as a rule they are long enough you can’t always just go around them.
If you try to do that, you might be hiking for a very, very long time. That means you’ll need a way across. But a river crossing, unless it is especially placid and shallow, is fraught with peril.
A botched river crossing could see you swept away, your gear lost or ruined, your party separated, or somebody drown. The power of moving water is no joke, my friends. In today’s article we’ll give you some tips and procedures for crossing a river safely.
“Why Try to Cross at all?”
Is a common refrain during theoretical discussions like this? The facts are simply these: if you’re bugging out you aren’t out for a fun romp, you sure as heck ain’t camping, and the situation may dictate you get from point A to point B as a rapidly as humanly possible.
If you have a real serious deadline, the fastest route from point A to point B may very well be crossing a river, and doing so at a point where it is possible with an acceptable amount of risk.
Note that I didn’t say “no risk.” I said an “acceptable” amount of risk, and I spoke with precision. Frankly, there’s nothing safe about bugging out. If you’re bugging out, something terrible has driven you from your home or shelter.
It follows that the risks you would face staying in place mean you’re willing to take a lesser risks in transit to a safer location. There’s no other way to square it.
So for those who constantly clamor for finding a safer crossing, or taking your time, or waiting for the height of the water to go down, or any number of other variables that are entirely out of your hands I say this: it may be this way or no way, and it would serve you better to know how to cross a river safely in case you are ever forced to.
You should always try to cross safely if it is possible, but you should not be deluded into thinking that will always be so.
Hazards of Crossing
If you can cross the river splish-splash and you are standing on the far bank, terrific. You’ll get nothing but well-wishes from me.
But Murphy’s Law is very real, and you should count on having some difficulty crossing. these difficulties might be inconveniences, they might make your life and your bug-out harder going forward or they might be serious showstoppers, or even deadly.
Crossing even a gently flowing, shallow river could see you get hurt. Not watching where you step, or not moving consciously may see you twist an ankle or worse. That will make the rest of your journey agonizing and slower.
Faster flowing and deep rivers may see you lose your footing and be swept downstream. This could serve to separate your party and it will certainly dunk your gear and the entirety of your person.
If you do have any sensitive electronics or other delicate items that can survive water in your pack, and they aren’t waterproof, you can kiss them goodbye.
A variation on the above occurrence is losing your pack entirely. For a prepper who is carrying their toolbox, pantry and home on their back this is a devastating blow to your capability and your morale.
Lastly, you mustn’t forget you don’t belong out in the water. The current could sweep you away, upset your balance and then hold you under, drowning you. You could become snagged on debris beneath the surface, or lodged between rocks unable to escape. A grim and tragic fate for someone as prepared as you is.
But you’re here today, so that that doesn’t happen. Read on to see what you should do when it’s time to cross the river.
Understanding the Variables
Crossing the river safely, for all its variables, is really just until some basic risk assessment and understanding your own capabilities.
For our purposes, a quick assessment can be made by analyzing the river and what ourselves and the people in our party are capable of. Certain kinds of gear, if you have it with you, will also make the crossing safer.
You should also weigh all of that against the overall situation: how much time do you have to spend looking for a safer or better crossing? What’s the worst that can happen if you run late, or miss your deadline? Only when you have all the facts should you be ready to hedge your bets.
Let’s consider the river itself. This is fairly easy:
Is it fast moving, or slow?
About how deep do you think it is?
Is it wide or narrow?
What’s the terrain like on both banks?
Are there any special hazards or features in the river that may help or hurt you, things like debris floating on the surface, rapids, terrain features like rocks or log bridges that may be used to cross in a safer manner?
Is the river’s current state influenced by weather like snow melt or rainfall?
Perhaps most importantly, is there a good exit point near where you plan to cross visible from your side?
We have judged the river; now let us assess our own capability and that of our party:
Are you ready physically to cross the river?
Are you tired or exhausted?
Do you have tools that can help us cross, something like a hiking pole or a sturdy branch?
Are the others in our party physically able to cross the river? With or without assistance?
What’s the best across as a group- relying on mutual aid, or sending one person across towing a line that can then be secured to help everyone else?
There’s no surefire right or wrong way. The right way is the way that gets you across safely. The wrong way is the one that gets you dumped on your butt in the water or worse. below i’ll offer a step-by-step guide for crossing the river alone or with a group.
Some steps to crossing a river are universal, and apply whether you’re alone or in a group. those are at the top of this list. For the rest of them, I’ve divided them into two smaller lists, one for solo preppers, and one for those in a group.
Crossing a River Solo or With Group
Take stock of the conditions
Will you be attempting to cross when the river is highest, or lowest? has there been recent rainfall or snow melt this contributing to both the speed and height of the water?
If you can say with some certainty that waiting even a little while may see the water recede and the pace slow, you should wait if you can. Anything that can improve your chances of a safe crossing is worthwhile if it won’t blow your timetable.
Gauge the current
You can use anything that will float to properly determine the speed of the water. It can be deceptive standing on the river bank, especially if the water isn’t choppy. you can use any stick that will float, empty plastic bottle or something similar.
When you chuck your found item out into the water, try to get it far out into the middle of the river where the water is typically fastest so you know what you’ll be facing at the most vulnerable part of your crossing.
Remember: it only takes a few inches of fast-moving water to knock an adult off their feet. Any water that is over your knees is disproportionately likely to bowl you over.
Use sticks or poles
Never underestimate the value of a sturdy walking stick, or a pair of good hiking poles when crossing a river.
These will give you a third and fourth point of contact respectively, and allow you to probe ahead of you to better assess what your feet will meet on the bottom of the river. This is especially important when crossing fast-moving rivers, or water you cannot see through.
Plan your moves
Before crossing, take a good, long look at the river itself, any terrain features in the middle of the river, and the far banks. Look upstream and downstream. what do you see? Is there a lot of debris coming down the river, things that may knock you over or upset your balance?
Are there any rocks or breaks in the river eventually take a rest or reassess if you get in trouble? Does the river get more treacherous downstream, meaning if you slip and get swept away you’ll have diminishing odds of getting out easily? Look on the far bank: are you even able to get out once you get across?
Unlimber your pack(s)
Depending on your assessment of the river and how easy or difficult for crossing might be, you want to unlimber your BOB by releasing its waist belt at the least and probably the chest strap also if it has one.
This improves your chances of ditching if you do get knocked over it becomes a liability, something that can weigh you down. ultimately, if you get in trouble in an unexpected deep spot that is otherwise navigable you can quickly take off your BOB, and hold it over your head to keep it safe.
Move Across at an Angle into the Current
Crossing the river in a fashion that angles you into the current aimed at your exit point, if possible, is generally the safest, and will provide you the best control and a lesser chance of getting knocked over by the water compared to moving with the current.
Crossing a River Solo
Go slow
If you’re attempting a river crossing solo you’ll have no room for error. There’s no one to come look for you if you get swept away, no one to pull you out if you get into trouble, no one to lean on if you get tired or stranded in the middle of a strong current. take things slow so you can reverse out if needed.
Be sure of your footing
Many a hiker who has attempted a river crossing before will have tales to tell of ass-over-teakettle falls into cold rivers due to moss covered rocks and slippery bottoms.
Don’t let that be you. Shuffle your feet to understand where you are stepping on the bottom, rely on your poles or walking stick for greater stability and for assessment of where you’re stepping. Probing ahead with your poles will alert you to sudden drop-offs, or loose or mucky river bottoms.
Avoid deep water if at all possible
If things are going to go bad, it’s going to happen in water that is over your knees and up to your waist or even higher.
As more of your body submerged in the water you weigh less, which means your stability goes down and it takes correspondingly slower-moving water to exert even greater force on you. That’s how people get swept away.
Group Crossing
Try a huddle movement
A group move, or huddle move, consists of all the members of your group leaning in as if a football huddle with arms around each other’s shoulders or wastes. Essentially, you’ve turned into a bigger, heavier creature with more points of contact, and greater stability in the water.
But if you can think back to third grade field day in elementary school when did the three-legged race with a buddy, you can probably remember how difficult it is to coordinate locomotive movements with another person.
This is probably not something you’ll practice ahead of time, so there’s nothing for it except to go slow, take your time, and communicate!
Also, keep in mind that while it does afford a sort of safety net if someone gets into trouble since their friends will be there to catch them, it may also mean you all fall down and get swept away together if someone in a panic latches onto the person next to them to keep their footing.
Use a static line to help others
For less capable members, or just to increase safety, you can send one member of your group across or a smaller group across towing a length of rope if you have some that will reach and it’s sturdy enough. Once they are across, they can anchor it to a fixed point, or hold on to it while your shore party does the same.
Use this technique will make a crossing much safer for those who are less capable, and it even allows you to employ a safety line to tie them off to the main static line, greatly reducing the chance they’ll be swept away.
Conclusion
Crossing any but the shallowest and slowest moving rivers is always risky. That risk can be increased when you’re in a hurry, and are running from something even worse.
Nonetheless, you may not have the time to wait for the water to recede or to look for an ideal crossing when it’s time to bug out. In such an event, it pays to know how to cross a river safely by yourself and with friends.
It’s a common scene: a dedicated radio amateur wakes up early in the morning, ambles over to their shack, and sits in the glow of vacuum tubes as they call CQ DX, trying to contact hams in time zones across the world. It’s also a common scene for the same ham to sit in the comfort of their living room, sipping hot chocolate and remote-controlling their rig from a laptop. As you can imagine, this essentially involves a server running on a computer hooked up to the radio, which is connected via the internet to a client running on the laptop. [Olivier/ F4HTB] saw a way to improve the process by eliminating the client software and controlling the rig from a web browser.
[Oliver]’s software, aptly named Universal HamRadio Remote, runs a web server that hosts an HTML5 dashboard for controlling the radio. It also pipes audio back and forth (radio control wouldn’t be very useful if you couldn’t talk!), and can be run on a Raspberry Pi. Not only does this make setup easier, as there is no need to configure the client machine, but it also makes the radio accessible from nearly any modern device.
We’ve seen a similar (albeit expensive and closed-source) solution, the MFJ-1234, before, but it’s always refreshing to see the open-source community tackle a problem and make it their own. We can’t wait to see where the project goes next!
Chickens are perhaps the perfect survival livestock because they are inexpensive to purchase and raise, reproduce quickly, and can be raised virtually anywhere.
Raising chickens as part of your survival plan offers a myriad of benefits – but only if you can keep the birds alive, safe, healthy, and producing.
Learning how to hatch chicks will be a crucial part of the flock development process. While things are normal in society, you can always order more birds when needed, or hatch your own in an incubator. During a long-term disaster, you will only be able to use an incubator to hatch chicks if you have off grid power.
Even if you can hatch your own chicks with generator power until the fuel runs out (or on solar power), you will still have to time the hatching and maturing process properly to avoid letting flock numbers run too low due to consumption, disease, or predator attacks of both the four-legged and two-legged variety.
When raising chickens for survival, you must develop a sustainable plan to hatch, maintain, and increase flock numbers under the most dangerous and austere of conditions.
Simply buying a bunch of chickens and putting them inside of a conventional coop with a small run will not lead to the hardy and self-reliant type of birds you will need during a long-term disaster.
Chicken Coop And Run
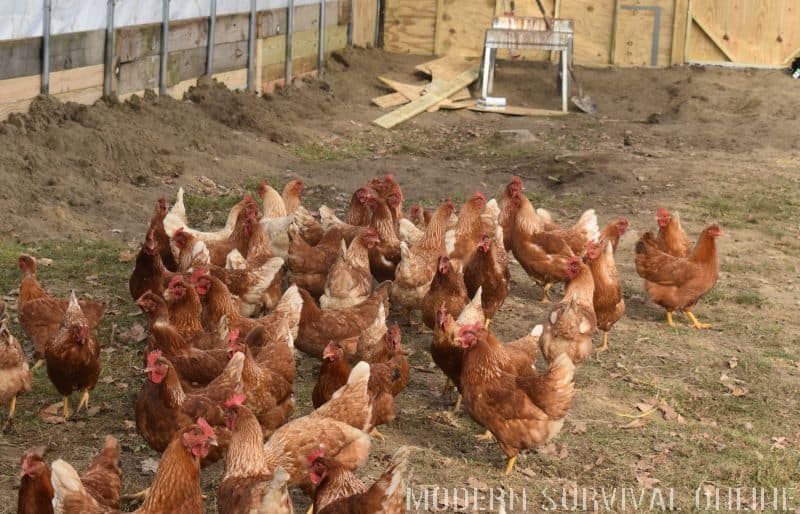
Raising chickens as covertly as possible, and in a sustainable manner (so the flock can embrace their natural instincts) will vastly enhance the survival chances of your meat and egg birds.
Chickens that free-range from the start and sit their own eggs consistently will be much better positioned to fending for themselves when the SHTF.
Free-ranging can be a riskier proposition during a disaster. You could lose birds to both typical wild predators and humans being desperate for a meal. Adapting typical “turn them loose for the day ” free ranging behavior can be a viable compromise to coop and run style husbandry.
Both the coop and run must be designed with all types of weather in mind. The flock must be able to stay cool in the summer, dry and free from dampness when it rains, and warm during even the most frigid days of winter.
On top of these weather considerations, the chicken coop and run must also be constructed of materials from top to bottom, that will prevent even the craftiest of predators from getting inside.
Use only pressure treated lumber and plywood during the construction. Using particle board or lumber and plywood that is not pressure treated call fall apart after just one winter or wet spring.
Mink are the top predator of poultry birds, and can squeeze through an opening the size of a quarter – including weakened wood that is pulling apart from the coop framing.
Never use chicken wire on the chicken run. Chicken wire is only good at keeping birds in, and not predators out.
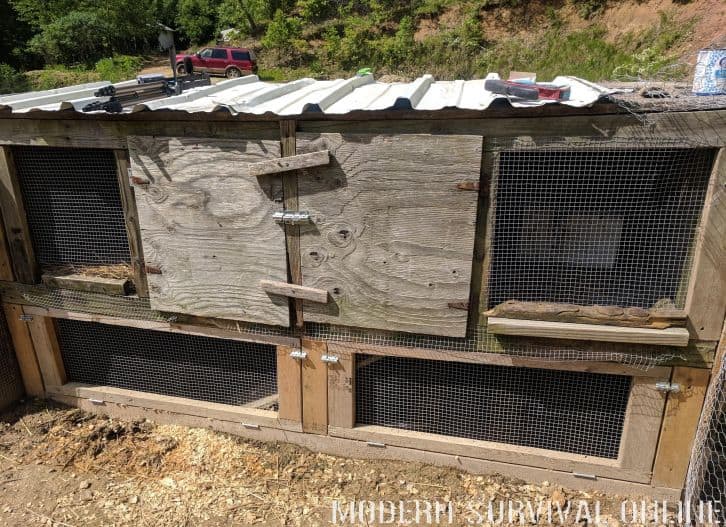
Hardware cloth, the fine mesh wire that is used to construct rabbit cages is ideal for the chicken run, and to cover doors in-between nesting areas and coop exit into run doors:
This is my DIY chicken coop re-purposed from an old rabbit hutch, and reinforced with hardware cloth.
Purchase extra rolls of the hardware cloth in preparation for the time that is has been exposed to the elements so much that is rusts and weakens.
This should not occur for several years unless a coop waterer with interior drinking fountain openings for the birds is placed through it. In such a case, expect to be dealing with rust after one year.
I recommend covering even treated plywood areas of the coop – including doors for egg collection, with sheet metal. This will harden the coop even more from both predators and the elements.
Before building the chicken coop, trench all the way around the perimeter of both it and the run. The trench should be roughly one foot deep and one foot wide. Once the trench is completed, line it with hardware cloth before filling it back in with dirt.
This extra line of coop and run entry protection should vastly help prevent the flock of meat and egg birds from burrowing predators.
Raccoons are clever creatures and have been known to easily flip open a simple one step lock. To best deter easy entry to all exterior doors and flaps on the coop, use at least one slide bar style lock.
I also have a pressure treated 2X4 board that lifts into and out of brackets on either side of the egg collection flaps to further thwart predators.
The run should include a sun and rain protective covering on about half of it to shield the birds from inclement weather. If the chickens do not have such a covering they will be far less likely to leave the coop to forage.
When all of the birds are inside of the coop, the mess you’ll have to clean and the amount of droppings they will transfer onto themselves, their eggs, and the chicks will significantly increase.
Placing solar motion detector lights on the chicken coop and run can silently alert you to the presence of a predator around your flock.
Solar coop lights that hang from inside of the structure buy attach via a cord to a small solar panel that affixes to the exterior wall of the coop are also highly recommended.
Chickens need a minimum of 10 hours a day of sunlight to maintain egg production. The lack of light during the winter months can prompt hens to reduce or stop laying entirely.
The fire safe lights in the coop that hang above the chicks and their bedding can help promote cold weather month laying.
Although these chicken coops have runs that are in many cases far smaller than they type described above – and a few mistakenly used chicken wire, they will give you a good idea of design styles and construction before buying or building your own.
Build a monster of a chicken run so the birds can forage for bugs. This type of chicken coop and massive run setup will also provide the space needed to either plant and/or rotate in planters of nutrient rich “weeds” and plants to feed the flock instead of commercially manufactured feed.
A large run will not only reinforce their foraging tendencies and have ample space for not merely sitting their own eggs, but also provide an area where the hens can teach the chicks how to peck and hunt for their own food.
The more space the flock has to roam, the smaller the chance of the birds contracting and sharing infectious disease.
While diseases could still wipe out any flock, being literally “cooped up” can cause disease to spread more quickly, and increases the possibility of trampling in bacteria ridden droppings and contracting an illness.
Commercially-manufactured coops that are often for sale at agricultural retailers like Tractor Supply, Rural King, or offered for purchase online are too small for a large flock, or even a small survival flock to be sustainably kept.
Each hen should have her own nesting space that is large enough to double for the first week or so of chick raising. It is not uncommon for chicks to get trampled and squished when they are allowed to join the mature flock too soon.
Removing chicks and placing them in a brooder is an option if the weather outdoors is warm enough, or if you have off grid power to sustain a heat lamp, but such a temporary habitat should really only be used as a last resort to keep chicks alive – from a sustainability standpoint.
Chicken Tractors
The valuable foraging skills a momma hen will teach the chicks would be lost if all of the baby birds are secluded into a community all their own without the instructional and protective tendencies shared by the momma hen.
If you are not going to free-range the flock, or if only going to do that in small and supervised amounts, consider buying or building a chicken tractor.
You can find these caged foraging implements that are conventionally pulled by a tractor or ATV or constructed like a rickshaw that have long handles so they can be pulled by a person or even a miniature donkey or pony.
A chicken tractor will allow the flock to forage for their own food, especially for protein-rich insects. Even during the winter months when food will be more difficult to find, chicken tractor sessions will still usually yield some insects for the flock to consume.
You can also make low hoops out of hardware cloth to create chicken tunnels around your growing plots and in between rows for the birds to forage for insects.
Chicken tractors can be backed up to the tunnel opening so the birds can wander into the hoops to feed and back into the tractor where they have protective covering from the sun and where a waterer is hanging, at will.
The survival flock must have a feeder and waterer that are regularly cleaned to prevent bacteria and fungus from growing in them. It’s best to keep multiple feeders and waterers, especially if they are made of plastic, and can (will) crack during the winter months.
Galvanized metal feeders and waterers are more durable ,but will eventually rust and need replaced to avoid the matter from being ingested by the birds, and ultimately the human family they will feed via their meat or eggs.
You should also include boredom busters in the coop run even if the birds will be free ranging for part of all of the day. A bored chicken will peck at itself, other birds, and even the coop itself – causing unnecessary wear and tear of their housing.
Chicken boredom busters are often sold at agricultural supply stores and online, but it takes very little skill, time, and money to make your own.
Something as simple as a sawhorse to use for a perch, some baling twine wrapped around a small branch to make a swing, can do the trick. Hanging some corn on the cob in the chicken run, or filling a plastic bottle with holes poked in it with a snack will keep the flock busy for hours on end.
The chicken run should also include several tires or tubs filled with loose dirt, sand, or a mixture of the two for the hends to use as a “dirt bath.”
The birds consider dirt bathing a social occasion and thus it will divert their mind from destructive behavior. Dirt baths also help to thwart mites and other parasites.
Planting crops that the chickens can forage, be placed inside of their run in planters, or grown in the coop run will also help you to sustainable and cheaply feed the survival flock without the need of commercially manufactured feed.
40 Best Crops To Plant To Feed Chickens:
✓ Amaranth
✓ Jerusalem Artichokes
✓ Sorghum
✓ Lettuce
✓ Blueberries
✓ Pea Shrubs
✓ Jewelweed
✓ Elderberries
✓ Honeysuckle
✓ Blackberries
✓ Olives
✓ Chicory
✓ Currants
✓ Mulberries
✓ Black Raspberries
✓ Buckthorn
✓ Currants
✓ Gooseberries
✓ Grapes
✓ Kale
✓ Plantain
✓ Purslane
✓ Oregano
✓ Chamomile
✓ Thyme
✓ Rosemary
✓ Sage
✓ Basil
✓ Sunflowers
✓ Duckweed
✓ Yarrow
✓ Queen Anne’s Lace – Wild Carrots
✓ Bee Balm
✓ Lemon Balm
✓ Mullein
✓ Comfrey
✓ Dill
✓ Calendula
✓ Echinacea
✓ Ginger
Other ways to provide free and nutrient-rich food for your chicken flock is to place the compost pile inside of their run, or in an area accessible to them, give them the animal waste after butchering other livestock, and sprinkle crushed egg shells into the run for a calcium rich free choice snack.
Safe And Healthy Scraps For Chickens
Any scraps from these types of foods can be given to chickens directly or tossed into a compost pile the flock can access:
✓ Mealworms
✓ Leafy greens
✓ Cooked pasta
✓ Vegetable peels
✓ Crushed egg shells
✓ Cooked rice
✓ Corn
✓ Watermelon
✓ Pumpkin
✓ Scrambled Eggs
✓ Cottage cheese
✓ Oatmeal – cooked or uncooked
✓ Pineapple
✓ Bananas
✓ Celery
✓ Broccoli
✓ Asparagus
✓ Strawberries
✓ Oranges
✓ Cooked potatoes
✓ Cabbage
✓ Popcorn
✓ Raisins
✓ Cucumbers
✓ Corn stalks
✓ Cheese
✓ Cantaloupe
✓ Carrots
✓ Sweet potatoes
✓ Cereal
✓ Pears
✓ Bell peppers
✓ Cauliflower
✓ Zucchini
✓ Mango
✓ Spinach
✓ Yogurt
✓ Peas
✓ Peanut Butter – creamy only, and never whole peanuts
✓ Non-green potato peels
✓ Brussels Sprouts
✓ Fish
✓ Garlic
✓ Cooked potatoes
✓ Chia seeds
✓ Squash – all types
✓ Grapefruit
Unless the flock is free ranging in some manner, grit will also need to be added to their diet.
The grit helps the birds to properly and safely process their food. It stays in the bird’s gizzard and breaks up the food as it is being consumed.
You can purchase grit at agricultural supply stores – it is usually sold as oyster shell grit. Putting small gravel into a bowl or pile in the chicken run can also be used as a grit supplement. The birds will instinctively gravitate to the gravel as needed.
What To Never Feed Your Chickens
The foods on the list below are toxic to chickens, and should never be fed to them:
✕ Artificially sweetened food
✕ Uncooked or undercooked Beans of any type
✕ Apple with seeds still in them
✕ Cherries or peaches with pits
✕ Dry rice
✕ Dry pasta
✕ Raw eggs
✕ Mold food
✕ Salty food
✕ Green potato peels
Hatching Chicks
Regardless of the breed of chickens you decide to raise, it takes approximately 21 days for the birds to hatch. The heat and humidity levels beneath the hen will vary depending upon the time of year – and influence the number of hatching days at least somewhat.
If you are planning on getting an incubator to attempt to use during a SHTF event, buy one that comes with both an automatic turning and and a humidity gauge.
If the incubator does not have an automatic turning arm you will need to manually turn all of the egg racks multiple times per day. Keeping the humidity within the recommended levels on the incubator will play a substantial role in how successfully the eggs hatch.
Chicks do not need to be removed from an incubator right after they are born. It is actually best to leave them inside unless they are in danger of getting harmed by a turning arm (which can happen) so they can garner all of the nutrients that come out of the egg sack.
The chicks can typically remain in an incubator for up to 24 hours after pecking their way out of the egg.
Some incubators have turning arms that can be removed individually to provide space for the chicks to walk about so the device can also be used as a brooder.
If you have to place chicks inside of a brooder use a red heat lamp, and not a white light one. The red cast that the light bulbs emit will hide any bloody spots on a chick from pecking and help deter other birds from pecking at the wound – sometimes killing the chick.
The use of red lights also proves to be far less distracting for the chicks at bedtime. A white light can keep them up chirping all night – preventing them from getting the rest they need to remain healthy, and you from getting some sleep if the brooder is in an attached garage.
The temperature inside of the “hot spot” in the brooder should roughly be 95 degrees F (35 C). Only a portion of the brooder should be hot, while the rest of the space (where the feed and water are located) should be closer to room temperature to allow the chicks to cool off as needed.
The brooder temperature should be reduced by five degrees each week until the interior temperature hits 75 degrees F. Reduce the heat inside of the brooder by raising the light higher above the brooder.
Never place chicks outdoors until the weather is warm enough to prevent them from getting chilled – typically a minimum of a consistent 65 degrees F.
A chick waterer and feeder must be cleaned at least once a week if not more to prevent bacteria and debris from gathering in the drinking and eating areas from chicks that leave their droppings in them, or walk through them.
There really is no way to prevent the tracking of droppings entirely, but using feeders and waters that are covered as much as possible with only head peek in holes for the birds will help substantially.
The best bedding for a brooder consists of sawdust shavings, newspaper, or straw.
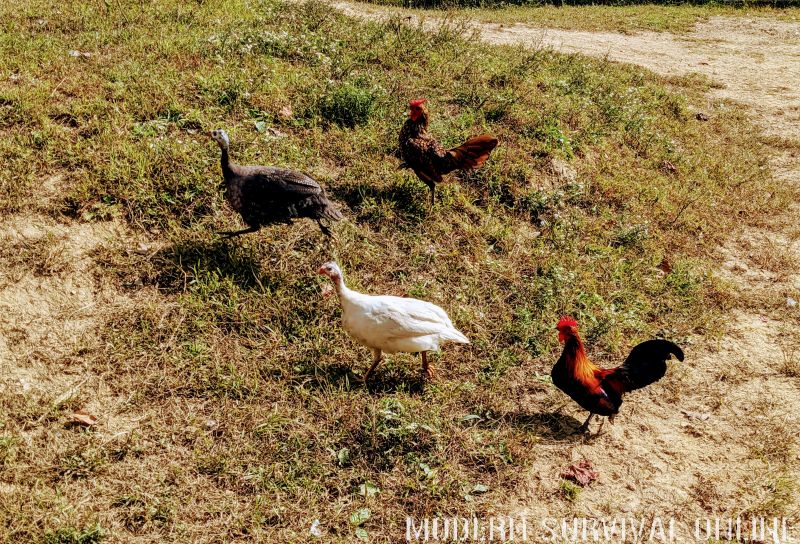
I have successfully kept chickens and ducklings together in an incubator and a brooder, but would not recommend doing so with poults or guineas. The poults are larger and more aggressive than either chicksn or ducklings.
Guinea chicks are comparable in size to Bantam chicks, grow slowly, and tend to be quite fragile:
Guineas are more prone to chick deaths from both getting squished when accidentally sat upon, or trampled by larger birds and to infections from bacteria and dampness.
All breeds of hens are fully capable of producing eggs throughout their lifespan, but, the egg laying slows both in the winter and as the hens age. If a hen grows too old to either lay a suitable number of eggs or stops laying entirely, the bird can be harvested for food.
Due to her age, the meat will be exceptionally lean not typically not moist. The best way to make use of an unproductive hen is to boil the meat to make chicken stock – broth.
Hens start to lay roughly when they are six months old. The first eggs will be substantially smaller than the eggs the hens lay when they are more mature – which happens around the 18 month mark.
When a hen turns 18 months old, she may hit a molting stage. During this time she may begin to lose a lot of feathers, and spend the vast majority of its energy growing new ones instead of laying eggs.
Molting typically lasts 60 days. I personally have never had a hen go into molting stage, and stop laying eggs. I think the constant mental and physical stimulation provided by free-ranging and boredom busters has helped contribute to the deterring molting.
What does most often vary by breed is the number of eggs a hen lays. Top egg laying breeds are capable of producing 250 to 280 eggs each year. The overall health and eating habits of the hen also play a part in how many eggs she will produce, regardless of breed.
A sick or stressed hen will never absorb as many nutrients as a healthy one, which will not only reduce the number of eggs produced, but can also cause the egg shells to be thinner and more fragile when they are laid.
Hen stress typically happens when the coop is overcrowded or not enough hens are present to service a rooster. A sick hen can also be more prone to “internal laying” – which basically means the egg gets stuck inside of the oviduct after the yolk if formed in the ovary.
The hen will eventually absorb the egg back into her body, causing the abdomen to become distended – almost always causing death. This can also happen if the hen is overweight, small statured, or produces an unusually large egg for her breed.
Egg peritonitis can also kill a chicken. This occurs if the egg does not properly develop, and will move into the abdominal cavity instead of the oviduct. The egg will be absorbed into the hen again causing infection, and usually death unless the condition is caught early and the bird receives antibiotics.
Herbs that can help increase calcium intake and egg production – especially after a long winter or stint of molting include: calendula, lavender, chamomile, and rose.
Chicken Illnesses
Most contagious poultry bird disease will spread quickly through the entire flock. Conducting a quick health check on each bird during daily feeding can help you discover a problem quickly.
Once an illness is detected, the sick bird or birds need to be removed immediately and killed or placed in a quarantine only brooder. The entire coop, run, and everything in it must be disinfected.
Any bedding must be removed and should be burnt to prevent the birds or any other type of livestock from coming into contact with the feces droppings, fungus, and bacteria.
How To Tell If A Chicken Is Healthy
Elevated head and tail to have a proper and erect chicken stand.
Clean nostrils
Normal eating and drinking habits
Proper weight – neither skinny or overweight
Smooth and typically clean feathers – expect some mud or dirt but not a matted or mange type look
Wattles and comb are the red or orange shade they should be in vibrancy for the breed
Comb and wattles are not bloody, coarse, or otherwise disturbed from the expected appearance
Eyes are both bright and alert to movement
Legs are filled out firmly and not spindly – the bird is walking normally and not limping or bow legged.
Most Common Chicken Illnesses and Diseases
Coccidia
This is the number one killer of chicks. Coccidia is developed from a digestive tract parasite that rarely afflicts more mature birds. Unfortunately, the chick is likely dead and spreading the disease before you even know it is sick.
Symptoms of Coccidia include scours (diarrhea) excessive blood loss from even a small wound, and poor absorption of nutrients.
Fowl Pox
This poultry bird illness is most often transmitted by mosquitoes. Once a bird suffers an insect bite and contracts Fowl Pox it can spread the illness to other birds through its droppings and shared feed and water containers.
There are two different types of Fowl Pox – dry and Wet. Dry Fowl Pox causes wart style wounds to grow on parts of the chicken’s body that are unfeathered, or only lightly feathered.
Pox of this type tend to heal up on their own, or with a Neosporin type ointment in two weeks. Wet Fowl Pox are canker style sores in the mouth and throat of the chicken that can cause a lack of air flow and the inability to swallow food or water.
Marek’s Disease
A poultry bird with this type of illness is an avian cancer. Marek’s Disease causes the growth of tumors that eventually lead to death.
Symptoms of Marek’s Disease include loss of appetite to the point of starvation, paralysis, loss of muscle control, blindness, and the inability to raise or use their wings in any way.
Bird Flu
The Avian flu can impact not only chickens but a plethora of bird species. A mild version of this illness typically causes egg laying to decrease, a loss of appetite, and respiratory problems. A severe bird flu case can often cause death.
In a serious case of Avian flu, a chicken’s comb and wattle usually turn blue, the legs develop white spots, and there is a bloody discharge from the chicken’s nostrils. Dehydration also usually occurs in such a serious case of the highly contagious bird flu.
Coryza
This is yet another contagious poultry bird illness. Coryza, which is a bacterial infection, can be cured when proper antibiotics are administered. Symptoms of Coryza may include difficulty breathing, discharge from the nostrils, and eyes with a foul odor, matted eyes, swelling of the face, and scours.
Rickets
A chicken with poor nutritional intake is a prime target for rickets. Once a chicken has contracted Rickets its body is no longer able to absorb phosphorus, vitamin D, and calcium properly. This condition causes a bird to develop weekend and soft bones as well as beak.
Typically, a chicken with Rickets also develops lameness. A hen with Rickets will either stop producing eggs entirely or slow down laying.
Any eggs that are produced and laid almost always have incredibly soft shells. Increasing the bird’s intake of vitamin D four times the normal amount it usually receives can help treat Rickets.
Bronchitis
A single chicken with bronchitis can cause the entire flock to become ill in a matter of days. Eggs laid by hens with this affliction commonly have incredibly watery whites and the shells are misshapen.
Symptoms of bronchitis in chickens include labored breathing, lethargy, a lack of appetite, poor egg production, dehydration, as well as watery discharge from both the eyes and nostrils.
Staphylococcus
This poultry bird illness is also commonly dubbed “bumblefoot” due to swelling of the feet it causes. Staphylococcus bacteria is found in the dirt and stagnant mud puddles, and can be transferred from bird to bird view bedding in the coop, shared waterers, and feeders.
Chickens with Staphylococcus typically have symptoms that include swollen joints, extremely watery scours, difficulty or inability to stand or walk, and painful movement in general.
The only way to attempt to save a chicken stricken with bumblefoot is to catch it early, and have proper antibiotics administered.
Worms
Poultry birds can contract multiple types of worm parasites but roundworms are the most common. A chicken with worms will often experience stunted growth. If dewormer is not given so the worms can be passed, the bird will die.
Aspergillosis
Exposure to mold usually causes this type of fungal infection that is commonly referred to as “chicken pneumonia.” Birds with this ailment have breathed in mold spores that then cause terminal gurgling, respiratory problems, and silent gaping or gasping.
Colibacillosis
Poultry birds can be vaccinated against this E-coli ailment. There is known treatment or cure for any chicken that contracts it. Symptoms of Colibacillosis include respiratory issues, lack of appetite, and lesions on any part of the body.
To help prevent this terminal condition make sure the coop is properly ventilated, cleaned regularly, and any sick bird is removed quickly and the entire living space disinfected.
Best Chicken Breeds For A Survival Flock
Deciding what type of breed or breeds of chickens that are best to keep in a SHTF flock depends on a number of factors.
First, you should determine if you want to keep strictly meat birds, a large flock of just hens for egg laying, or if you want dual purpose chickens that can provide both ample and quality meat and eggs to feed the family.
The amount of space you have to covertly keep the flock, local laws that could inhibit the keeping of roosters, specific breeds, or a limit the number of hens being kept in municipal areas pre-SHTF, are also factors that must be researched and considered.
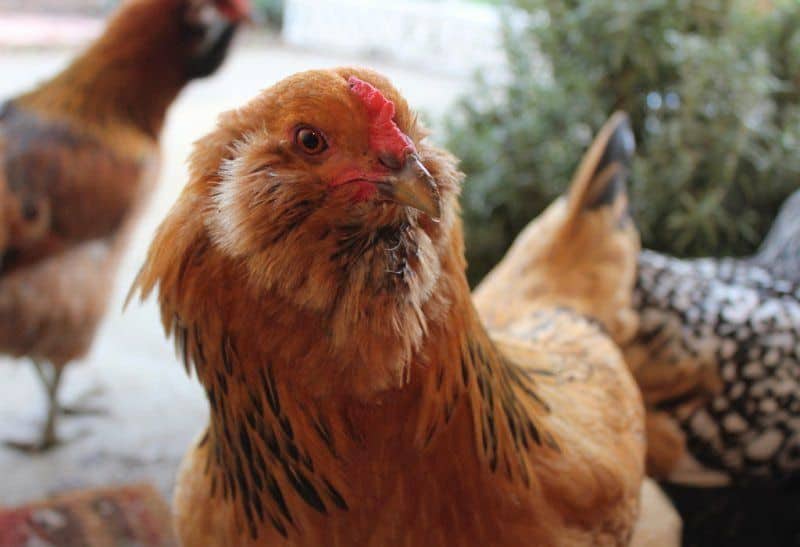
Ameraucana hens are really good egg layers
Best Egg Laying Chicken Breeds
You can garner nice edible eggs from all breeds of chickens, but some are better than others at laying abundantly, nearly all year around, and producing large and nutrient rich eggs.
Meat, as well, can be garnered from any bird, but the tenderness, flavor, and fat percentage is typically less present on egg birds than it is from meat birds or dual purpose birds.
Ameraucanas – These hens lay roughly 250 eggs each year. The hens are quite docile except when you are attempting to remove eggs from their nest. I strongly recommend you wear a pair of leather gloves when taking eggs from these protective hens. Ameraucanas are average free rangers but are better suited to live in a coop and chicken run. They are a hardy breed that start to lay eggs when they are 25 weeks old. A mature hen of this breed typically weighs roughly five pounds once mature. Ameraucana hens are also called “Easter Eggers” because the eggs they lay are not the typical brown or white, but beautifully light shades of pinks, blues, and greens.
Golden Comet – Hens of this breed commonly lay between 250 to 300 large brown eggs annually after reaching full maturity. This is an excellent free ranging breed that is also incredibly cold hardy. A mature Golden Comet hen usually weighs between five and a half to seven pounds. It begins laying eggs around 15 weeks old. This is a quiet and docile chicken breed that rarely ever goes broody when sitting eggs.
Rhode Island Reds – These cold hardy hens lay approximately 250 large brown eggs each year. The hens weigh roughly six and a half pounds once they reach maturity. While they are decent free-rangers, in my personal experience they are not extremely geared to detecting predator threats early, and are best kept in a chicken coop and run environment. Rhode Island Reds are incredibly docile, including most of the roosters or this breed – broodiness is not typically a problem, either.
White Leghorns – These large hens lay an average of 280 large white eggs per year. White Leghorns, in my personal experience, tend to be superb free rangers as well as exceptionally hardy against illness. The rooster can become quite aggressive if not handled regularly when they are young and associate the keepers with food and safety and not a threat. White Leghorn hens start laying when they are around 17 weeks old and often lay nicely through the winter. The only downside with keeping White Leghorns is their lack of desire to set. Since Bantam hens are not only amazing sitters of their own eggs but are willing to “adopt” eggs from other chickens and even ducks, keeping hens of this breed also gives you the best of both worlds.
Best Meat Chicken Breeds
Meat chickens, or “broilers” as they are most often dubbed, are known for putting on weight quickly and producing a robust, flavorful, and tender meat. In under six weeks a quality meat chicken can weigh a grand total of five pounds – long before it is anywhere near reaching maturity.
It would take a non-meat breed chicken months to reach the same desirable meat weight.
Meat chicken breeds lay eggs to varying degrees of quality and quantity until they are deemed time for butchering. The eggs produced by a meat hen are typically not as large as hens of other breeds
Cornish Cross – These meat birds typically weigh between 10 to 12 pounds once mature. They put on weight quickly and are known to be docile and cold weather hardy.
Jersey Giant – Farmers once attempted to breed these chickens to rival the meat production and popularity of turkeys. Jersey Giants weigh between 11 to 13 pounds once they reach maturity. Hens of this breed may be the one exception to the lackluster egg production rule applied to broilers. Jersey Giant hens lay large brown eggs that are quite tasty.
Freedom Rangers – These broilers are not only cold and illness hardy but are substantially good at free ranging, also. They can put on weight even when merely foraging and subsiding on a low protein diet. Freedom Rangers do not grow as quickly as other broilers but still put on weight at a far greater pace than non-meat birds.
Buff Orpingtons – Hens of this breed weigh roughly 8 pounds once they reach maturity – on average. The meat from Buff Orpingtons is highly regarded as being both incredibly moist and flavorful. This is a quality dual purpose breed that is nearly equally good at egg laying and meat producing. Rhode Island Reds are also often touted as a top quality dual purpose chicken breed.
Best Roosters
If you live outside of a rural area where keeping roosters is not allowed, I have only one piece of reasonable survival chicken raising piece of advice for you: move.
If you do not keep roosters the flock will not be sustainable. You will only have fertile eggs and a continuous supply of chicks to add to the flock if there is at least one rooster to mate with the hens.
There are some things you can do to keep a rooster quiet – which is essential for OPSEC during a long-term disaster – and before if you have neighbors.
Do not fool yourself into thinking that nearby neighbors will not recall that fact that you keep livestock when the SHTF, and their own unprepared family is starving.
To help curtail the noise a rooster makes you can keep it in a separate chicken coop and run that is located far away from the chickens that he cannot see, or preferably, hear them.
The rooster is introduced to the hens only for a short amount of time to mate and then is placed back in his own pen.
Purchasing “no crow” collars will help reduce the urge to crow and muffle the sound, but will not eliminate the crowing noise a rooster is naturally inclined to make – and not just at dawn. Some rooster breeds are quieter than others, choosing from the list below will help give you an edge when covertly raising a flock of chickens during a long-term disaster.
Bantams – These small roosters are not only particularly quiet, but they tend to have a docile personality. A “banty” rooster will reach maturity by the time he is seven months old.
Barred Plymouth Rocks – Both roosters and hens of this breed are often referred to as the “workhouse” of the poultry bird world. They free range diligently, and take the task of ridding their domain of insects quite seriously. Roosters of this breed appear to be very intelligent and can easily differentiate between a real threat and mere noise or the wanderings of other livestock. Barred Plymouth Rock roosters tend to crow less frequently than many other breeds, doing so only during the early morning hour and when their hens need protecting.
Buff Orpingtons – Roosters of this type are also known to be both docile (to the point of seeking out the attention of their keepers), and fairly quiet. Buff Orpington roosters are excellent free rangers and keep a watchful eye on their hens there entire time they are outside of the coop and run. The only time you can expect to hear real noise from a rooster of this breed is if it senses a threat, and crows to alert the hens and helps usher them back to a safe place.
Cochins – Roosters of this breed are among the most friendly, and never venture far from either their coop and run of the keepers themselves. They are not excitable but do a fine job of keeping a watchful eye on their hens.
Brahma – The sheer size of the roosters and hens of this breed can be intimidating to new chicken keepers, but in spite of being the giants (2 feet tall in many cases) of the chicken world, Brahma rooster are known to be both docile and fairly quiet.
Australorps – Roosters of this breed tend to be shy at first, but eventually warm up to their keepers, and sometimes even become the rooster version of affectionate. Australorp roosters are excellent at protecting their hens both inside of the chicken coop, and run and when outside of those confines in a free ranging environment.
Sebrights – Although this breed of chickens is small like a Bantam breed, Sebrights are still capable of handling many threats to their hens. While they are a quieter breed of rooster and typically docile, you must condition them to your touch, sight, and smell from a young age to prevent them thinking you too are a threat when entering the chicken coop or run.
Polish – This might be the most calm, fairly quiet, and considerate breed of rooster you can keep from a breeding perspective. They rarely ever get rough with the hens of pull out feathers on their backs during mating.
Delawares – Roosters of this breed typically only make any undue noise, or get into attack mode when they are startled. Delaware roosters are excellent flock masters, and keep the hens together and protected when they are out of the chicken coop and run free ranging. If you hear a Delaware rooster making racket, it is definitely time go see what is trying to attack your poultry birds.
Final Words
Raising chickens are part of your survival livestock and food security plan will provide your family with not only meat and eggs, but a valuable bartering item as well.
Either during a long-term disaster or when society once again begins to rebuild, the extra eggs your robust flock lays and the chicks themselves will be far more valuable than dollar bills or an ATM card.

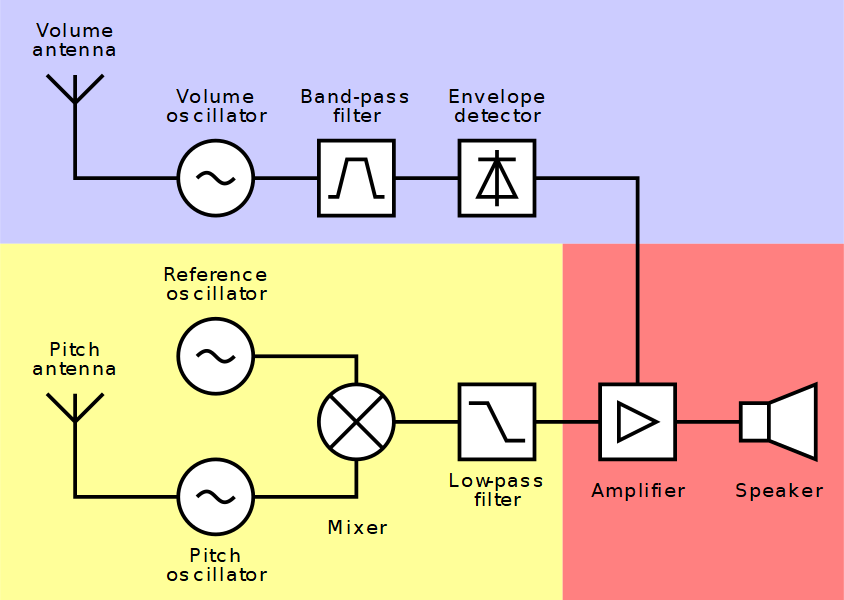


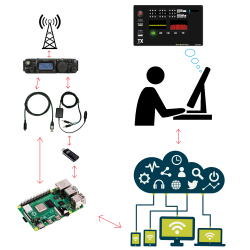 remote-controlling their rig from a laptop. As you can imagine, this essentially involves a server running on a computer hooked up to the radio, which is connected via the internet to a client running on the laptop. [Olivier/ F4HTB] saw a way to improve the process by eliminating the client software and controlling the rig from a web browser.