In the 70s, McCreery proposed the following: If one finds oneself seriously asking the question whether one is dreaming or not, it is likely that one is.
Charles McCreery co-authored the book Lucid Dreaming: The Paradox of Consciousness During Sleep with Celia Green, and useful input is found in the 'False Awakening' chapter where several examples of bizarre thinking within 'pre-lucid dreams' and false awakenings are listed.
It makes it clear that we cannot tell whether we are dreaming or not solely on how vivid or realistic our surroundings appear to be. The best reality checks, however, as Stephen LaBerge once intimated, are those that rely more on stability, especially when the environment is probed for a prolonged period of time. For example: try gazing at your index finger about six inches from your face for more than ten seconds—in the dream world, objects seldom withstand this type of inspection and soon exhibit warped behaviour. Another one is reading text, looking away, and back ...
However, even LaBerge was careful to mention he was speaking from personal experience when he said he could reliably do the text reality check as the reading content changes every time he looks away and back. There are also many other idiosyncratic factors to take into account; for instance, some people have photographic memory whereas the majority of us don't—how much this influences the level of accuracy expressed by bedroom replicas in lucid dreams is still unknown, but I would venture with due, hypothetical tone, that it have some sort of mnemonic impact upon lucid dream environments that mimick the real world.
For those people with photographic memory, it might not be a good idea to rely on spotting anomalous forms a way to check reality, and here is where unstable objects will more reliably betray the illusory nature of the environment. What McCreery proposed is not a reality test, but rather, a type of dream sign that can potentially ward off that part of the mind that tries to explain away the oddities encountered in dreams—in other words, the tendency to make sense of, or normalise, the anomalous.
The reasoning behind it is that in the waking state we don't sincerely question whether we are dreaming or not as it always seems obvious; instead, we deliberately perform reality checks in spite of the obvious mundanity that surrounds us in the hope that this habit will manifest when we actually do dream. We only sincerely doubt reality when we dream because something suddenly seems off. This analytical mind is what needs to be cultivated in order to promote lucidity.
via Lucid Dreaming - Dream Views - Attaining Lucidity https://ift.tt/3xCEw1f
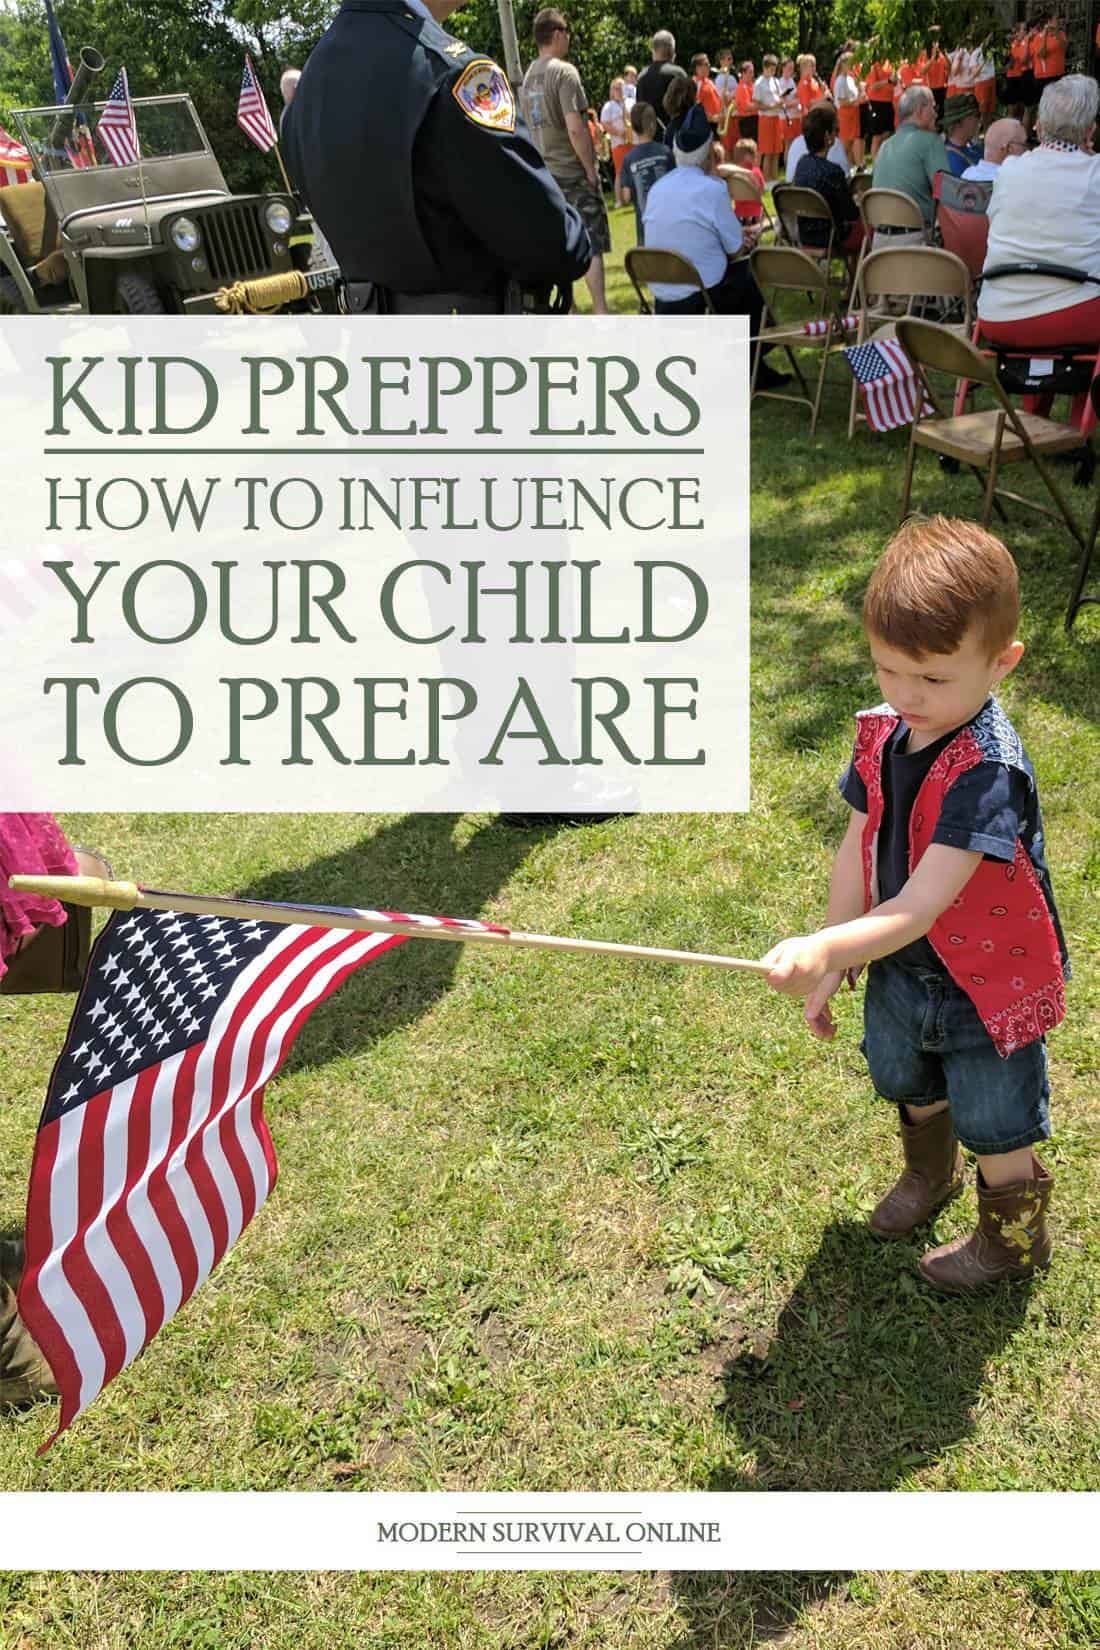
For any preppers who have kids, you naturally want them to become capable, competent adults when they grow up. I don’t know of any good parent that does not want that for their child.
But while they are small, it is only natural that you, as their parent, will spend an inordinate amount of time fussing and worrying over them, and your worries might be tripled as a prepper because you know just how bad things can really get, and how quickly!
On a strictly practical level, smaller children place an intense strain on resources, requiring a tremendous amount of attention, supplies, and general investment to make sure they stay safe and hopefully make it through whatever situation you are enduring with their health and their psyche intact.
Unfortunately, children aren’t truly good for much on the practical level of prepping, lacking the strength, endurance and intellect of adults.
But it doesn’t have to be that way. Most children are not too young to learn from their parents’ example, and take up the skills of prepping.
Even for very young children, it is possible to lay the groundwork, the foundational assets, that will pave the way for a lifestyle of readiness and self-sufficiency.
This is a great way to help fortify and protect the child you love so dearly, and also to prepare them for hard times so that they might better contribute to the family, or at least reduce their burden in some small way.
In this article I will be sharing with you tips, tricks and procedures for getting your kid started off on the road to preparedness correctly!
With Changing Ages, Changing Attitudes
Before we get to the good stuff below, I feel like I must issue a sort of disclaimer.
Much of the information presented is applicable towards younger children, or at least children who are small enough that they still both adore and obey mom and dad pretty much to a “tee”. Kids, well, kids are people, and that means they are individuals.
Myself and all of my friends have kids that run the behavior gamut despite our best efforts, including angelic, perfect children that hang on every word their parents issue and hateful little goblins that constantly run amok, misbehave and shave years off of Mommy’s and Daddy’s lives.
You, as the parent, will need to make the ultimate decision on whether or not your kid is ready, or even able to pick up what you were putting down. If they aren’t, you might not want to waste your time. That’s okay, and I’m not judging.
Also when kids start hitting puberty and progressing into their teenage and then young adult years their personalities will be going through tectonic and often radical shifts.
The good, obedient and cheery kid might turn brooding and surly, or at least affect as much. Conversely the shrieking little hellspawn might start to take shape as a promising young person.
The child’s interests, mindset, attention span and more all play a part, so you’ll need to now as always play your parental cards right if you want to correctly influence their behavior.
Easier said than done, but like anything else you would teach them there is a time, place, incentive and penalty that in concert will encourage them to arrive at the correct answer.
Disclaimer over, let’s get to it!
Kids Are Adaptable
The first thing I would teach any parent who’s wanting to teach their kids the basics about prepping is to remind them that familiarity often breeds contempt, and though that is a concept we typically reserve for discussing oversights with our friends, adult parents and peers, it definitely applies to the parents of young children, too.
It is always a surprise to me (and never fails to bring a smile to my face) when I see just how badly the average parent underestimates the intelligence and adaptiveness of their child.
It is my assertion that kids are always a little farther ahead of the curve then we think they are, despite our best assessments.
Though their brains are not fully formed and not as capable, much of the time, of the same feats of lateral thinking that adult brains are, they are wired for learning, and the switch is definitely jammed in “read/write” mode.
Don’t be afraid to introduce concepts to your child that might not normally be the purview of learning at that age. You might be surprised at how grounded they can really be.
Take myself for instance: my journey into learning firearms began at 5 years old on the buzzer, and I mean really began. I was regularly target shooting, helping dad clean the guns, learning nomenclature, ballistics, safety and all sorts of other variables. By the time I was 10 I was ahead of every, single other boy that I knew and many adults.
There are topics that your child might not get or might not be ready for and you as the parent must notice this and adjust course accordingly, but if your kid surprises you with just how well they are tracking, there is no reason to hinder them unnecessarily. Keep teaching them, and see how far they can go!
Emphasize Team / Family Effort
If there is one tie that binds most small children it is an inborn desire to please their parents, and receive accolades from them.
Part of this basic desire manifests itself in the propensity to perform humorous stunts, act silly, and generally clown around so that Mom and Dad will laugh before rewarding them with a hug and a kiss or a ruffle of the hair.
It also manifests as a desire to “help” with chores or other tasks, even if they are really just holding mom or dad back with their efforts!
This is the perfect opportunity to build a culture of mutual family or team effort. It is never, ever too early to start inculcating your kids with the idea that everyone in the family has a job to do, and how important it is the family works together for the mutual benefit of the family unit. Most children can easily understand the idea; after all, we are social creatures!
This phase is one of the outer bounds or framing devices of personal responsibility, and personal responsibility taken to its logical zenith is really all that prepping is.
You are responsible for your life and the life of the people you love, and will not outsource anything that is important to maintaining and improving that to anybody else, no matter who they are, government or otherwise.
This is a great time to teach the child that they have to be able to rely on themselves one day just like they rely on Mommy and Daddy, and one day Mommy and Daddy will have to rely on them.
With a proper system of rewards and encouragement in place for any behavior that helps the family, or team, it won’t be long before your child is self-steering, constantly looking for ways to contribute.
Make it Fun!
There is one thing that all children love, and all former children loved about their childhood, it is having fun. Kids crave excitement, stimulation, laughter, activity.
All of this is the raw input that growing brains need to learn, to sort and collate. You’d better make sure you are providing it in abundance if you want to keep a child’s attention!
For this reason, when it is time to learn skills or teach important concepts you usually need to dress it up as a game or a fun activity. This could be something as simple as a race during a family fire drill, or something as complicated as a scavenger hunt utilizing concepts of personal equipage for bugging out.
It could be a high-stakes game of hide and seek when the time comes to shelter in place, or escape the danger posed by a bad guy.
It could be something as obvious as walking them through the steps of building a fire on a family camping trip so you can get on to making those tasty, tasty s’mores!
This is where you really need to kick in your imagination, and the sky is the limit. All you need to do is boil down the most important concepts about emergency procedures, skills or whatever to the most critical concepts and then dress up those concepts as a simple game with an objective and a clearly defined “win” condition.
If the child enjoys his or herself, repeat the game often enough and when it is time to intensify their learning you’ll be pleased to notice this had a sort of wax on, wax off effect- they were practicing the whole time and didn’t know it!
Use Characters they like as Examples
I have never known one single child, including myself, that did not have some greatly admired idol, assuming it isn’t already mommy or daddy. This is usually a fictional character from a cartoon or movie they absolutely adore, and most of the time that is fine.
Even in this blasted era, there are still enough positive characteristics that can be mined from children’s characters, a notion that you should exploit to its fullest.
If your child admires a classically heroic character, one that is just, honorable, prepared and self-sufficient you can foment their own enthusiasm for becoming likewise by explaining to them that learning to do X, Y or Z is how they will become more like their idol, and explain further that it was only by continuous effort, education and self improvement that their idol came that way in the first place!
This is usually a highly effective and simple tactic to supercharge your child’s desire to learn various prepping centric skills. Keep in mind the children are also somewhat capricious when it comes to their favorite characters, and the hero of this week might be ancient history next week.
You can increase opportunities for enrichment and provide yourself with a little more ammunition that you can use by talking to them regularly about who their favorite character is and what it is that they like about them.
Instructions Should Be Memorable and Repeatable
For smaller children and older children alike, always take pains to ensure that the steps you are teaching them or the overall procedures are memorable and repeatable.
Mnemonics are great, but even instructions that you can craft into a jingle or just something that is noticeably sticky in the mind akin to a classic earworm is going to be beneficial, particularly if this is information they will need to recall and employ in an emergency.
One classic example that everybody, and I mean everybody, learned and remembers to this day is Stop, Drop and Roll: standard procedure for extinguishing yourself or someone else who has caught on fire!
I know kids in my day were learning this in preschool, pretty much as soon as they were old enough to talk and walk.
There are multiple ways to make your instructions and procedures memorable. You could send them to a sing-song tune, use a rhyming meter, frame them as a story or any number of other options.
The best way to reinforce this type of memorization is with periodic question and answer sessions. If you quiz your child about what they should do if they catch on fire you know it won’t be long before they remember and tell you “stop, drop and roll”. Remember to always reward them for remembering and recalling the information quickly.
As they progress or get a little older, you can start asking follow-up questions and having them walk you through their thought process of what they would do in increasingly challenging scenarios.
Prioritize Personal Agency
If kids have one inbuilt disadvantage when it comes to learning typical prepping skills, even the most rudimentary ones, it is their desire to typically rely on and obey adults, especially in times of trouble.
When children “vapor lock”, become scared, anxious or uncertain, they will typically freeze or hide and wait for adults to save the day or provide instructions.
This is a delicate balancing act, especially with smaller children, but I firmly believe it is best to start nudging, (gently nudging!), kids out of this frame of mind and into personal agency even while they are still young.
Don’t think it’s a good idea? Consider this; did you as a child learn how to call 911? Really, why is that? Why should any child need to call first responders or furthermore learn how to talk to an operator in a meaningful way? You got it: you just never know!
Something might have happened to Mommy or Daddy. For whatever reason they might be by themselves or the only one capable of saving themselves. You just never know.
Some good drills for children depending on their age are, as mentioned:
learning how to call first responders using a variety of methods including 911,
learning how to interact with trustworthy strangers if they become separated from mommy or daddy,
knowing which neighbors or family members they can trust and who they can run to in an emergency if they are by themselves,
and even rudimentary medical intervention if they have the strength and dexterity to attempt it.
You might scoff at the latter, but one of my friends has two daughters, ages 8 and 9, and they are already shockingly well-drilled and capable when it comes to the application of a tourniquet.
Daddy and Mommy both occasionally surprise them by walking into the room, announcing that they are hurt and then tossing a tourniquet at them or having them retrieve it from one of their pockets.
I know the notion of a child dealing with a major extremity hemorrhage is unsettling, whether it happens to them or someone else, but if the child is capable why wouldn’t you want them to learn life-saving techniques of any sort?
Don’t Overload Them
The last piece of advice I would give you for producing productive prepper children is to be wary of overloading them. As I mentioned above, children’s brains are still developing, and that means they fatigue quickly, and lose interest even quicker than that.
If your child is gung-ho to keep going on anything, by all means indulge them, but if they tire of it or just need a break that’s okay too.
I have seen far too many well-intentioned and genuinely caring parents basically entrap their kids and force them to drink from a “fire hose” of knowledge when all they can handle is a cupful. This leads to burnout, resentment and instills the exact opposite attitude of the one that you want.
Also, some kids don’t do as well at task switching as others, and might want to focus down on only one or two topics versus a variety.
This is not always the case, so if your child is keen for new information, new adventures and new “games” you might be best served to season them with a variety of subjects versus trying to give them a master class in one.
Conclusion
It is possible for children of any age to learn or at least begin learning the principles of self-preparedness.
Using their know-how and a little bit of diligence, moms and dads can easily engage their children in a meaningful, fun way, while also preparing them for the hazards and dangers that the world has in store for them.
Implemented consistently enough and with a careful eye towards matching the child to the task at hand you can produce kids that will already be capable preppers by the time they are teenagers.
When you spend enough time prepping, you will find that many common hand tools we take for granted today take on new life when considering them in the context of a survival situation.
Owing to the importance of building and maintaining a fire in order to stay warm and stave off the threat of exposure, not to mention cook food and boil water, tools that can help us efficiently process wood will be high up on our list of important preps. Perhaps none have more pride of place than the humble hatchet.
Like its larger cousin the axe, the hatchet is one chopping tool that is incredibly versatile and optimized for the task at hand.
From felling small trees and limbing branches to splitting the hard-won firewood of your efforts, the hatchet can handle it, and do it with a size format that is compact enough to make it attractive for travel or inclusion in your bug-out bag.
But to be used to best effect, and safely, your hatchet must be kept sharp, and that means you’ll need to sharpen it periodically.
Whether this is after a practice session, a round of chores on your property or after a lengthy time gathering wood, you’ll need to keep your hatchet sharp so it can do the job.
A dull hatchet will only wear you out, waste your time, and set you up for serious self-inflicted injury. In this article we will provide you six proven ways to effectively sharpen your hatchet.
Power vs. Manual Methods
You’ll find there are many ways to sharpen a hatchet, and other chopping tools. You probably know one or two ways to accomplish this yourself.
Among all the varied methods, we can group them into two broad categories. Manual, or hand sharpening methods and power sharpening methods, ones that require a power tool of some sort.
I can make a case that you should learn to use at least one method from each group, and as you will learn throughout this article they both have pros and cons.
But there is one special factor that remains universal to the employment of power to sharpening methods, and that is heat buildup in your workpiece.
Any powered sharpening method creates tremendous friction, and that friction will result in the steelhead of your hatchet getting hotter and hotter as you continue to sharpen.
If you aren’t paying attention, or distracted by other things on your mind, it is actually possible to heat up the head of the hatchet so much that you affect the temper and potentially even ruin your hatchet. This is the last thing you want to be dealing with in the middle of a survival scenario.
Luckily, it is easy to deal with heat accumulation.
When using a power tool for sharpening, stop periodically and allow the head to cool down, or if you have a convenient container or body of water nearby dip the head of the hatchet into the water to cool it off rapidly before continuing. That is all it takes to beat heat buildup!
The Methods
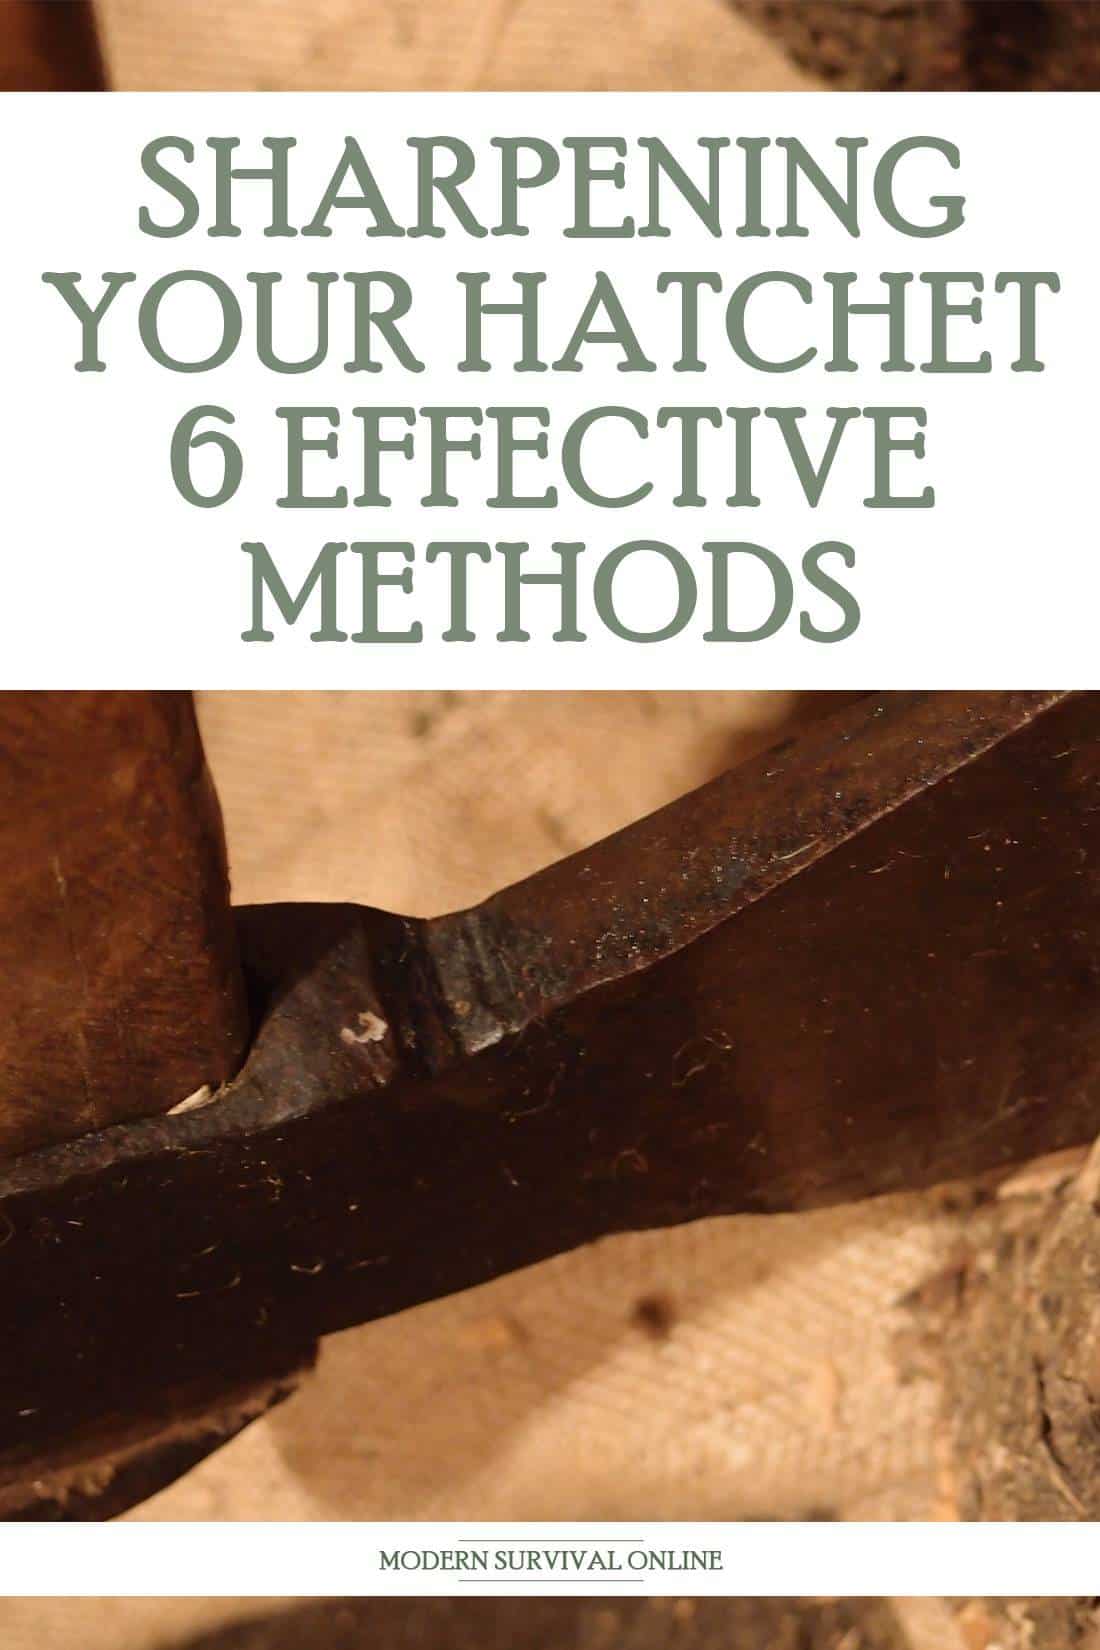
File
Sharpening a hatchet via a file is one of the most effective and the most common methods around. The efficacy of this method is limited only by your selection of files and your skill.
The main advantage to hand filing is that it can be done anywhere, even out in the field away from your bench, so long as you have a good grip and a reasonable way to brace your hatchet.
Some users effectively file their hatchets to restore a working edge by holding it in their free hand, clamping it between their knees or just decking it on a convenient rock or tree stump.
To sharpen your hatchet with a file, all it is required is pushing or pulling the file in a cutting action along the edge, paying careful attention to match the same angle of the bevel.
Depending on the aggressiveness of the file, how much force you use and the state of your hatchet’s edge this could require anywhere from a half-dozen to 24 strokes on one side before flipping it over and repeating the process on the opposite side.
It is helpful to clean the metal bits and shavings out of the file’s teeth periodically before continuing.
As with most hand sharpening methods heat buildup is minimal to negligible, and most files will afford you great feel and control over the process, though you will need a fairly specialized file to put a truly sharp edge on your hatchet.
Sharpener
Not everyone learned how to properly sharpen an edged implement freehand, and even people who have aren’t necessarily great at it.
If you want to save time and frustration, a purpose-made sharpening system, or sharpener, is often the way to go. You have doubtlessly seen a plethora of such systems for sale, and available in every configuration you can think of, and many you cannot.
There are powered varieties and manual varieties, some simple and some complex, that can sharpen a wide array of cutting tools, including hatchets and axes.
Comprehensive systems like the WorkSharp combine the speed and efficiency of power sharpening with error-free alignment guides to take the guesswork and expertise out of putting a shockingly good edge on any tool.
But, as always, it is critical that you are able to align your tool with the sharpening surface correctly prior to beginning. This can be challenging when working with a heavy, chunky tool like the head of a hatchet compared to a pocket or kitchen knife.
The best advice I can give you for using any sharpening system for your hatchet is to work in small steps, or increments, checking for improvement as you go.
If you aren’t detecting any noticeable improvement with the way you have the sharpener currently configured, don’t keep going. Instead, assess, make adjustments and then try again before checking for further improvement.
And, as always if you are using a powered sharpening system, take care to manage heat buildup in your hatchet head.
Whetstones
Whetstones are the most time tested and ancient method for sharpening any edged tool, and many of us doubtless learned to first sharpen our pocket knives by learning on granddad’s whetstone atop his workbench.
Whetstones can work just as well for sharpening your prized hatchet, but they do come with a few drawbacks, namely that you’ll need to use a stone far, far more coarse than a typical course whetstone you would use for repairing the edge of your favorite pocket knife.
The reason why is that hatchets and axes typically have edges that are not super sharp, as they are wide, chunky and designed to stand up to abuse.
Most whetstones remove a comparatively pitiful amount of steel with each pass and this means you’ll be wailing away on the whetstone practically forever trying to restore the profile of your hatchets bevel or edge.
On the other hand, assuming you are just touching up a working edge, or are trying to put on a legitimately sharp edge, whetstones can do it. Progressing through finer and finer grades of stone will eventually produce a hair-popping edge on your hatchet.
Angle or Bench Grinder
Grinders suitable for sharpening hatchets are available in many form factors. Those of us who have experience in automotive work or construction probably have an angle grinder clunking around in one of their toolboxes.
Any well-equipped garage workshop has a bench top grinding wheel. Both will work, but both require focus and a steady hand because this is potentially the tool most likely to ruin your hatchet if you aren’t cautious.
This is because these tools, whatever disc they are equipped with, typically remove a considerable amount of material very quickly.
That being said, they are just the thing when you are working on a badly mauled edge, able to flatten out nicks and gouges, and rapidly reprofile to get the edge ready for finer sharpening.
The trick to making any grinder work for you is to use the lightest possible touch with as fine a grit as you can come up with. You shouldn’t be using any aggressive cut off disc or anything like that.
As with the other sharpening methods shared in this article, make the same number of back and forth passes along the edge before doing the same on the other side in order to keep the edge even.
And take care! More than most tools grinders will impart a terrific amount of heat, and this can quickly ruin the temper of an otherwise salvageable hatchet. Use the lightest touch, go slow, and give your hatchet time to cool between passes or quench it if you are able.
Dremel
The Dremel tool, or any other brand of rotary tool, is certainly the nimblest and easiest to use of the powered sharpening methods on this list, but it is also the one that will demand the most from the user if you don’t want to waste time and needlessly remove material from your hatchet’s head.
The name of the game with these tools is speed, and most of them have RPMs measured in the tens of thousands, meaning a moment’s inattention or a single slip could see you putting an unsightly gouge in your edge.
On the other hand, they are light, easy to handle, and generally easy to control so long as you maintain a good grip on them. Some even have attachable angle guides that might help with your task.
Because these tools rotate so quickly even comparatively mild abrasive attachments could remove a shocking amount of material and quickly if you aren’t careful.
The best bet is to use the slowest speed that will still do the job, and use an attachment milder than common sandpaper, such as aluminum oxide impregnated polishing or grinding stones.
You might think you don’t have to worry about heat on account of the small size of this tool, but you should know that it will impart a dramatic amount of heat into a small surface area, potentially causing problems for your temper as with any other power tool.
Now as always, be patient, pay attention and cool off your work piece!
Belt Sander
The belt sander is a favorite for sharpening hatchets among those in the know. Fast, efficient, and consistent, the belt sander gives you all the advantages you need whether you are using a handheld model or a bench top model.
One potential drawback is that you will really need to clamp your hatchet into a secure fixture if you are using a handheld belt sander, as you’ll need both hands to wrangle this unruly beast.
Despite the requirement for a third hand, the wide, rapidly rotating belt will process the edge of your hatchet evenly and quickly, allowing you to restore a bevel or put a preliminary edge on the hatchet in very little time.
Considering that they work across a larger surface area than the other tools on this list, you must pay special attention to the number of passes you make on each side of the edge if you want to keep it even.
Like the other larger, beefier tools mentioned don’t brute force this one as all you’ll do is create more heat buildup and chew through even more material than is necessary to produce a working edge.
Use light, consistent pressure, and perform the same number of identical strokes at the same tempo on either side of the edge to ensure good results.
Conclusion
A trusty hatchet is one of the best tools to have in the field during a survival situation. For processing firewood and various other chopping tasks hatchets are portable, lightweight and definitely effective, but they will only be as effective as their age is.
A dull hatchet is a dangerous time-waster, whereas a sharp hatchet is far safer and a pleasure to use. Stay on top of maintaining your hatchet’s edge using any of the methods shared with you above.
I am a newbie and first of all want to thank everyone for the amazing content on this platform, it is so much interesting information that I am dug into it since 4days and still far from through :)
I have been practicing my version of Hukifs Gravity RC (Clothing instead of Gravity) for 19 days, been meditating and practicing some Recall (although seriously only in the last few days, currently about 3 dreams a day with 2 wakes in the night) and am at a point where I get lucid daily (today 3x :D) but not one time have I become really lucid (I guess stage 3 and upwards) and stayed in the dream. It is always either semi lucid, so I know I am dreaming and even sometimes exercise some control, but it does not „click“ (I am just acting out the dreams course) or it is that I am more aware and get a „Click“ moment and realise I am dreaming (sometimes just like that, sometimes NoseRC), but then I get kicked out immediately. Mostly when The latter occurs, it is after some time spent in the dream unaware. - in total I had about 25 LDs like this now, but in the last 14 days, I made a lot of progress in incubation.
That’s why I suspect my self-awareness is not strong enough to realise I am dreaming early in the dream when it is stable, but only in the waking process in the end of dream. I would love to hear Your opinion on that as I would like to determine if I have to change something in my practice.
If I am right, then I think that I will put more focus on combining the RC with the distinction feeling exists = reality, feeling lacks = Dream, as I realised I have not been doing that enough.
I will look into all the other advice I gathered from the forum and update if I add something else (which I will likely do).
Thanks for Your help!
via Lucid Dreaming - Dream Views - Attaining Lucidity https://ift.tt/3dvcDjx
Choosing a blade for survival is serious business for preppers. In one form or another, a bladed tool is going to be one of the most used and most important that you will have with you when the chips are down. It will be used for shelter creation, and a multitude of other tasks. Two of the most popular options are the classic survival knife and machete.
Which is best between a machete and a survival knife? The survival knife is the all-around choice, being generally competent at most tasks, more adaptable, and still serviceable for processing wood when used with a baton. Machetes excel at chopping and hacking, making them perfect tools for lemming branches and clearing brush, and also afford more reach in a close combat situation – but are less adaptable than knives.
As always, the context in which the tool is used and your requirements are going to dictate the piece of gear that is right for you. In the rest of this article we will make a case for, and also against, each of these tools depending on what you need.
Basic Survival Tasks for a Blade
In most survival situations the tasks required of your bladed tool tend to look pretty similar across the spectrum of potential events.
In a woodland or other natural setting, you’ll rely on your blade to chop or otherwise process all kinds of natural materials, from wooden branches and logs to live plants like vines and creepers.
In an urban setting you’ll often use a blade and improvised crafting, utilitarian tasks and self-defense.
And of course some chores are universal. You might only need your knife or other blade for a little whittling, to cut paracord, strike on a ferro rod, or just help you fish something quickly out of burning coals.
The bottom line is that some tasks call for significant power and brute force, where others call for a deft and delicate touch. There is no universally right answer to most of these questions; instead, everything is a trade-off.
There are times you’ll have a survival knife where you wish you had a machete, and plenty of times where you will have a machete and pine for a survival knife.
Carrying both is always an option, but most preppers will not want to commit to the weight and additional bulk unless they can truly justify taking both along. Those situations will be few and far between.
Pros and Cons: Survival Knife and Machete Compared
Attribute
Survival Knife
Machete
Versatility
Excellent
Limited
Chopping
Fair; if used with baton
Excellent
Weight
Light and handy
Light, but length can be a problem
Precision
Good for detail tasks
Clumsy for detail work
Defense
Fair; can be used as spear
Good; potent slasher with reach
Survival Knife
The survival knife is the constant, venerable choice of most preppers and outdoorsman. A good field, or bushcraft, knife can handle the overwhelming majority of jobs you might ask of it, even in the middle of a survival situation
Keep in mind that serious brute force tasks will require you to be creative and use the knife in tandem with another tool that you’ll have to salvage or fashion.
Your survival life is going to be just as capable of shaving twigs and bark for tinder as it is for notching out wood pieces to help you construct a trap such as a snare.
You can cut cord with it. You can cut your food with it. You can skin game with it. And you can even process your firewood with it if the wood is soft or you want to baton through it using a sturdy branch or some other soft club to help it along.
Any good knife is a formidable weapon in a close combat situation, and a survival knife is no exception. But it does give up reach, only barely extending yours compared to going empty handed.
Luckily, with some suitable cordage and a working knowledge of knots and lashings a survival knife can be paired with a strong, straight branch or pole to make a primitive but deadly spear.
The survival knife’s biggest shortcomings are any situation that calls for a considerable amount of power. You’ll only be able to effectively hack and slash your way through comparatively soft, thin twigs and branches or vines, and even then your knife had better be plenty sharp.
As mentioned above, it is true that you can creatively employ a survival knife for heavy duty tasks it is not otherwise suited for, but this will prove to be very hard on your knife, even a good one.
In the end, the survival knife is a superb all around choice, and one that is highly adaptable to all kinds of survival situations and the definite choice for delicate detail work.
Machete
The machete is the obvious choice when chopping, clearing and limbing are your primary concern. If you need to process firewood, the tough, flexible blade of the machete as well as its greater length is going to help it do a far better job used with or without a baton.
Machetes are perennial tools in any biome where plant life is abundant, grows thick and must be pruned back to make any progress through it at all. It excels at sailing through small diameter woods and tough, fibrous vines and creepers alike.
If heavy duty work is going to make up a large percentage of your survival tasks, you’ll be well served by the machete.
The machete also excels in most self-defense situations, combining excellent chopping and slashing capability with greater length than a comparable survival knife which will help keep you safely out of an attacker’s reach while generate power.
Only in a tangled up grappling encounter will the machete falter compared to a survival knife.
But while the machete excels at hard use, brute force tasks it falters greatly when the time comes to use precision.
The machete is a poor choice for delicate notching, stripping and shaving, and though it is more than capable of cutting all kinds of cordage its greater length makes it clumsy for close-in chores.
The machete is also less versatile than the survival knife. It is not as handy, not as agile, and cannot be combined with a branch or other half to make a good serviceable spear as most machetes are edge centric tools, not point centric.
The Overall Winner
For the vast majority of preppers facing the vast majority of situations they would be best served by having a large fixed blade knife instead of a machete. A machete gives up quite a bit of versatility in exchange for its singular excellence at slashing and chopping.
The versatility of the survival knife and its general competency at so many various tasks is what makes it a supreme tool for emergencies.
Unless I was in extremely dense terrain with tons of vegetation I’ll take a survival knife, though I would still feel pretty confident about my chances if all I had was a machete.
Conclusion
Both survival knives and machetes are valid tools for surviving uncertain situations and emergencies or all you can depend on is your wits and what you have with you.
That being said, the versatility and adaptability of the survival knife makes it the ideal choice for dealing with the unknown.
Though the machete has far greater efficacy and power for chopping and limbing, it will struggle and become cumbersome for the many delicate, up close tasks that you’ll need to complete.
If you find yourself in the middle of a survival scenario where you run out of food and are facing starvation, you’ll be considering all kinds of things that you never would have dreamed of eating previously.
Plenty of survival experts and survival manuals will recommend you scavenge for various kinds of plant life to supplement your calorie intake, but one that never seems to be mentioned is grass. It is all around us and certainly easy to harvest.
But will eating grass let you avoid starvation? Unfortunately it will not. Human beings cannot eat grass and derive any nutrition from it. Though you can consume it more or less safely, it may make you sick and even if it doesn’t, grass contains a lot of cellulose, which is indigestible. Eating grass might make you feel full if you’re able to consume enough of, but you’ll still be starving.
There is a lot more to learn about this topic, and surprisingly there are a rare few exceptions when it comes to eating grasses, as a couple of them can actually supply nutrition. We will learn about them just below.
Common Grass is Not for Human Consumption
The vast majority of grasses that you will see out in the world are not toxic, and they are certainly edible in the strictest sense of the word, meaning you can chew and then swallow them without any deadly effect.
But if you do manage to quaff down the stuff, you are liable to get sick and vomit. Assuming that you don’t get sick from chowing down on grass clippings your body will be unable to process any nutrition in any meaningful quantity from it.
Even though there are plenty of mammals that eat grass as a major or even primary component of their diet, humans are not one of them. Animals that are able to consume grass and live off of it have specially adapted biology that allows them to.
Their stomachs and intestines are able to break down the tough, durable cellulose in grass over a long period of time, and even their teeth are adapted for chewing the hardy plant life without wearing down.
But surely there must be some benefit to eating grass, right? If it isn’t poisonous, then there has to be something in there that your body can extract that is helpful, some vitamins or minerals, right? Unfortunately no, again, not in any meaningful quantity.
Consider other large mammals that are able to eat grass must consume dozens and dozens of pounds of it every day to subsist on it. This should furnish a better understanding of just how little nutrition there is to be had in grass.
More Bad News about Grass
The hits just keep on coming when it comes to grass as a potential survival food. Aside from its total indigestibility and near complete lack of nutrition, grass is also very difficult for human teeth to deal with. Sure, it is soft and springy and fibrous and definitely not palatable, but you can chew it.
And therein lies the problem: Grass contains minerals that are very hard on the enamel of your teeth, with silica being the chief offender. You might not notice it straight away, but if you attempt to eat grass for any length of time, your teeth will get torn up in the process.
Also, I would ask you to consider how filthy grass is likely to be. Everything under creation walks on grass, poops and pees on grass and dies on the grass.
It is highly likely that any given patch of grass is crawling with bacteria, and though you might be so delirious with hunger, you can deceive yourself into thinking it is a crisp, fresh salad it will be nowhere near as sanitary.
Please believe me when I say that grass, at least the vast majority of common grasses, are completely useless as a survival food. That is because they aren’t food at all, at least not for humans!
Can Grass Be Improved by Processing?
I could admire your determination to get some benefit out of grass in a survival situation, but there is nothing you can do to improve it as a foodstuff.
Cooking it will make the grass softer, but does nothing to reduce or alter the cellulose content that makes it so hard for our bodies to digest it. It certainly doesn’t do anything to improve its already non-existent nutritional profile.
Cooking grass for any purpose, even to just improve its flavor if you are desperately hungry, is nothing but a waste of time and resources.
You are far better off using that time and whatever energy you are spending to try and improve the grass looking for bugs or other nutritious edible plants instead.
It is time to face the facts. Grass is just not for human consumption. You’ll just have to be content to enviously watch your cows and goats eat it.
But There Is Always an Exception
But despite everything you have just learned about grass and its complete inadequacy as a survival food, even in an extremely desperate situation, you are avowed and determined to eat grass or at least make use of it somehow to stave off starvation.
Well, you are in luck because there are a few edible types of grasses, and even the inedible types might furnish you a few, scant calories if you are dedicated enough to harvesting them.
Regarding edible varieties of grass, you have several options although they do not grow just anywhere, and are only viable and reliable emergency foodstuffs in certain places.
You’ll be able to choose from alfalfa grasses, wheat grasses, and potentially even barley grasses depending on where you live and the season.
But for every other kind of grass if you pay attention you might find grass that is germinating, and has sprouted seed heads.
Though you cannot eat the grass itself the seeds are edible, even though they have the slightest amount of nutrition imaginable and you’ll have to gather and eat a ton of them to make any of your effort worthwhile in harvesting them.
However, if you plan on employing the strategy however marginally successful it is likely to be you must take the time to learn the various species of grass in your area.
First, certain varieties of grass produce seeds that are toxic even if there is no toxin in the blades of grass themselves. This could make for a rude awakening if you harvest seeds for eating.
Second, sprouting grass seeds are vulnerable to mold, including several species of mold that can make you terribly sick, potentially even kill you. You should never harvest or eat any grass seeds that have obvious signs of mold or have a fuzzy appearance.
Also stay away from any grass seeds that have a black or purplish appearance.
Conclusion
There is no way to effectively eat common grasses in order to stave off starvation. If you are able to keep down a sufficient quantity you might be able to reduce your pains of hunger, but your body will not be able to drive any nutrition whatsoever from grass clippings.
Exceptions exist in the forms of certain species which have viability as a crop and scarce nutrition can be derived from germinating grass seeds, though eating these seeds entails its own risks.
You are better off avoiding grass entirely as an emergency survival food.
Virginia is a state that is fairly hostile to the concealed carry of knives, though you can own most types of knives regardless of action, length and other characteristics. Several classes of knife are banned outright: switchblades, throwing stars, oriental darts and ballistic knives.
When it comes to concealed carry, though, many varieties of knife are banned by name and the language used to describe them and define them is inclusive enough that many neighboring or similar designs could be likewise categorized as restricted for concealed carry.
Open carry of knives is broadly more permissive according to the wording of the state statutes.
Virginia is a highly litigious state, and one that has for some years been on a staunchly anti-second amendment bent.
Though firearms are predominantly in the state’s crosshairs knives will likewise be swept up in their legal mandates, and anyone who chooses to carry a knife, or at least any knife more dangerous than a tiny, folding pocket knife will need to be on guard.
Below you will find our assessment of Virginia’s knife relevant statutes along with the exact text of the law at the end of this article.
What You Need to Know
What Kind of Knives Can I Own?: Any kind of knife, except a switchblade or ballistic knife.
Can I Carry a Knife Concealed Without a Permit?: Yes, except bowies, dirks, machetes, razors, throwing stars, oriental darts, switchblades and ballistic knives or any weapon of “like kind”.
Can I Carry a Knife Concealed With a Permit?: Yes, except bowies, dirks, machetes, razors, throwing stars, oriental darts, switchblades and ballistic knives, or any weapon of “like kind”.
Can I Carry a Knife Openly?: Yes, except switchblades and ballistic knives.
General Ownership
Virginia only bans two kinds of knives outright from possession, and the possession of either is grounds for charges. Those knives are switchblades, or automatic knives, and ballistic knives.
Ballistic knives are defined as any knife that launches the blade as a projectile from the handle, and a switchblade is a knife which releases the blade to the deployed position under spring tension through the use of a switch or button.
Note that switchblades are not expressly defined in Virginia’s statutes. You may possess any other kind of knife you choose in the state, but know that it is also illegal to give away or sell any throwing star or oriental dart.
Additionally, there is no statewide preemption in Virginia, and this is one case where it might theoretically be possible for local laws to cut you some slack compared to the state laws, but unfortunately that is not the case.
Several municipalities have laws even more restrictive than the state’s laws, brush up on them, and pay attention whenever you are traveling if you choose to carry.
Concealed Carry, No Permit
Concealed carry of knives in Virginia is a very tough row to hoe. You may not carry concealed any of the banned categories of knives, including switchblades, ballistic knives, oriental darts and throwing stars.
In addition you may not carry any dirk, bowie knife, machete or razor or any weapon of like-kind as those enumerated in the statute.
Such language is broadly inclusive when it comes to categorizing knives, and Virginia has already proven through tedious legal proceedings that they do not apply the same level of nuance and care that professionals in the knife industry will when it comes to defining and labeling the knives in question.
In fact, previous precedent has already determined that possessing a sharpened edge and a point is considered good enough for categorizing a knife as a restricted type.
Regarding concealment, for the purposes of the relevant statutes a weapon is deemed to be hidden from, “casual observation” when it is observable, but is of such deceptive appearance as to disguise the weapons true nature.
Again, another section full of fluid weasel words that can be twisted to suit the purposes of the people doing the charging.
Concealed Carry, With Permit
Virginia makes no distinction when it comes to the carrying of any knife with a permit as opposed to without.
Open Carry
The open carry of any knife that is not expressly forbidden in the state of Virginia is, nominally, legal compared to carrying concealed, but it is with the greatest caution that one should proceed when carrying any knife more threatening than a tiny folding pocket knife in this state.
Prohibited Places
You may not carry any knife into a place of worship when a religious gathering is taking place without a “good and sufficient reason”. “Good and sufficient reason” is not legally defined in the statutes, making carrying any knife into a sanctuary during a gathering extremely risky.
Additionally you may not carry the majority of knives onto the grounds, or into the structure of any school, grades K through 12, or onto a school bus, unless it is a folding pocket knife with a blade measuring less than three inches.
Again, I would urge caution considering how hostile Virginia is in regards to knife violations.
Assessment
Virginia is a pretty nasty state for knife ownership and carry. Switchblades are banned entirely from possession, and open carry is legal only on shaky ground. Choosing to carry any knife concealed, with or without benefit of a permit, it’s always going to have you on thin ice legally.
Important Virginia State Statutes
18.2-311. Prohibiting the selling or having in possession blackjacks, etc.
If any person sells or barters, or exhibits for sale or for barter, or gives or furnishes, or causes to be sold, bartered, given or furnished, or has in his possession, or under his control, with the intent of selling, bartering, giving or furnishing, any blackjack, brass or metal knucks, any disc of whatever configuration having at least two points or pointed blades which is designed to be thrown or propelled and which may be known as a throwing star or oriental dart, switchblade knife, ballistic knife as defined in § 18.2-307.1, or like weapons, such person is guilty of a Class 4 misdemeanor. The having in one’s possession of any such weapon shall be prima facie evidence, except in the case of a conservator of the peace, of his intent to sell, barter, give or furnish the same.
…
18.2-311. Prohibiting the selling or having in possession blackjacks, etc.
A. If any person carries about his person, hidden from common observation, (i) any pistol, revolver, or other weapon designed or intended to propel a missile of any kind by action of an explosion of any combustible material; (ii) any dirk, bowie knife, switchblade knife, ballistic knife, machete, razor, slingshot, spring stick, metal knucks, or blackjack; (iii) any flailing instrument consisting of two or more rigid parts connected in such a manner as to allow them to swing freely, which may be known as a nun chahka, nun chuck, nunchaku, shuriken, or fighting chain; (iv) any disc, of whatever configuration, having at least two points or pointed blades which is designed to be thrown or propelled and which may be known as a throwing star or oriental dart; or (v) any weapon of like kind as those enumerated in this subsection, he is guilty of a Class 1 misdemeanor. A second violation of this section or a conviction under this section subsequent to any conviction under any substantially similar ordinance of any county, city, or town shall be punishable as a Class 6 felony, and a third or subsequent such violation shall be punishable as a Class 5 felony. For the purpose of this section, a weapon shall be deemed to be hidden from common observation when it is observable but is of such deceptive appearance as to disguise the weapon’s true nature. It shall be an affirmative defense to a violation of clause (i) regarding a handgun, that a person had been issued, at the time of the offense, a valid concealed handgun permit.
B. This section shall not apply to any person while in his own place of abode or the curtilage thereof.
…
18.2-282.1. Brandishing a machete or other bladed weapon with intent to intimidate; penalty.
It shall be unlawful for any person to point, hold, or brandish a machete or any weapon, with an exposed blade 12 inches or longer, with the intent of intimidating any person or group of persons and in a manner that reasonably demonstrates that intent. This section shall not apply to any person engaged in excusable or justifiable self-defense. A person who violates this section is guilty of a Class 1 misdemeanor or, if the violation occurs upon any public, private, or religious elementary, middle, or high school, including buildings and grounds or upon public property within 1,000 feet of such school property, he is guilty of a Class 6 felony.
…
18.2-308.1. Possession of firearm, stun weapon, or other weapon on school property prohibited; penalty.
A. If any person knowingly possesses any (i) stun weapon as defined in this section; (ii) knife, except a pocket knife having a folding metal blade of less than three inches; or (iii) weapon, including a weapon of like kind, designated in subsection A of § 18.2-308, other than a firearm; upon (a) the property of any public, private or religious elementary, middle or high school, including buildings and grounds; (b) that portion of any property open to the public and then exclusively used for school-sponsored functions or extracurricular activities while such functions or activities are taking place; or (c) any school bus owned or operated by any such school, he is guilty of a Class 1 misdemeanor.
…
18.2-283. Carrying dangerous weapon to place of religious worship.
If any person carry any gun, pistol, bowie knife, dagger or other dangerous weapon, without good and sufficient reason, to a place of worship while a meeting for religious purposes is being held at such place he shall be guilty of a Class 4 misdemeanor.
One increasingly popular option for home security systems is the addition of hardwired or wireless security cameras. Small, sleek, and user-friendly, these cameras typically integrate with your home PC or any other smart device, enabling you to remotely control and intuitively manage a network of linked security cameras.
This is undeniably an attractive option for many people, but what these kits have in user-friendliness is oftentimes overshadowed by the user’s lack of expertise in placing them, especially with regards to exterior lighting.
What is the best way to position your security cameras near exterior lights? Though it is not difficult, installers must be cautious that exterior lights (or the sun) don’t shine directly into the lens, and don’t bounce light off of any reflective surface into it. Failing to account for this will reduce effectiveness, and degrade image quality.
There are also concerns that cheaper cameras may not be able to effectively peer into the deep shadows cast by bright exterior lighting.
You don’t need to be a home security expert to benefit from these camera systems, but it would be in your best interest to brush up on best practices if you want to get the most bang for your buck, and avoid blind spots in your surveillance system.
In the rest of this article we will tell you more.
Correct Placement is Essential for Effectiveness
If you decide to install security cameras around your home it is imperative that they be correctly placed, oriented and aimed in order for them to be effective. This includes proper coordination and deconfliction with any and all exterior light sources around the home.
Failing to do this means you are just engaging and security theater, and theater is rarely a good defense.
Your security cameras have a job to do, and that job is surveilling the various approaches to your home as well as all exterior access points, including windows that are large enough to accommodate an intruder.
Taking care of this using the minimum number of cameras is not always easy depending on terrain features and the shape and style of your house.
But security is a thinking man’s game, and there are other factors to consider aside from placement and aiming.
The security cameras must be placed in such a way they are reasonably protected from weather but also protected from anybody who would tamper with them, either knocking them off your intended viewpoint or disabling them entirely. The other big one, as indicated by this article’s title, is lighting.
There are all kinds of light sources that can harm, or help, your security cameras do their job, and also make your home less appealing to burglars or home invaders.
You’ll need to account for lights not only on your home but also public light sources such as street lamps, and even the lights on neighboring homes or buildings.
Bad or Improper Lighting Can Interfere with Security Cameras
Lighting is necessary for proper visualization or recording of an image through a security camera, but if you are dealing with bad light or have improperly set up the light and camera relationship around your house what you’ll get instead are poor or even completely worthless images.
The chief offender is bright light that is directly entering the camera’s lens. This results in washout. Have you ever used a digital camera or even your phone’s camera, and picked up too much sun or even a car’s headlights shining into the lens?
Did you notice how it turned the resulting picture into a muddy, washed out mess, and even made it difficult to tell colors apart if it didn’t completely obliterate certain parts of the image?
That’s what can happen to the image on your security cams just the same when too much light gets through!
For the average home security setup utilizing surveillance cameras, this often comes about as an improper orientation of the cameras, or lights, and the result is a conflict.
For instance, if you have a driveway that runs parallel to the front of the house and you have your security camera placed on one corner, watching the driveway, but your security light placed on the opposite corner, illuminating the driveway there is a high likelihood that you will be splashing your security camera with your security light. Not good!
The result is likely going to be highly degraded, or even totally useless still images or video clips under these lighting conditions.
Though the presence of your security apparatus might be enough to deter criminals it might hang you later if the criminals are too stupid or too bold and decide to mess with your house anyway; you won’t have vital intelligence or evidence that could be used against them.
Be Wary of Reflective Surfaces
To further complicate your task of properly setting up your security cameras, you’ll have to be on the lookout for any reflective surfaces that could bounce light into your camera.
I know it sounds like a major pain; now you have to police your property and surrounding area for anything shiny in addition to taking care of the lights themselves! It sounds like a drag but it’s really not that bad a chore, don’t worry.
In short, you’re looking for anything that could produce glare or a direct reflection of light from any source. Some sources of reflected light are obvious. Others are pretty insidious.
Your vehicle’s mirrors or polished wheels could be one source, as could any uncovered metal trim on outdoor appliances or furniture. A window caught from the right angle could be one significant source of glare as could a pool or pond when the water is calm.
It is likely that you can easily get rid of or otherwise neutralize these sources of glare with a little creativity or just by moving them, but in certain instances you might have to move the camera itself or just re-aim it to prevent glare from scrubbing your image.
It is also possible to equip your camera with a kill-flash device or anti-reflection screen that can cut down on perceived glare if it is impossible to do anything about it.
Be Mindful of Shadows
Generally speaking, when it comes to light in a home security context more is better. The better you can eliminate your property all around, and the more darkness you can deprive the bad guys of, the better off you’re going to be.
However, the lights that you install to banish this darkness could actually wind up being a source of darkness that can be turned against you.
Any bright light source is capable of casting a deep well of shadows when something blocks the light. Once again, depending on the terrain around your home and other features, this could be a major problem or it might not be.
I can tell you this, you had better believe that savvy bad guys will look for these virtually impenetrable pools of darkness in order to help conceal their approach or to lurk and ambush.
This will definitely affect your powers of observation, but it might or might not affect your cameras depending on their capabilities and their features.
Most optical systems, even not electrical ones like telescopes and binoculars, will easily pierce gloom and shadows better than the human eye, and your cameras might do just the same.
But if they are cheap or malfunctioning they might not, so make sure you test them if you’re unable to eliminate any of these substantial shadows.
Consider a Co-Ax Mount
One way to ensure you are properly lighting your camera’s FOV (though potentially not providing enough area lighting for the rest of the property) is to use a coaxial light and camera mount.
These mounting solutions mount the camera and a variety of lighting solutions on the same mast, allowing you to easily aim them in the same general direction, and then fine-tune them for your specific needs.
These mounts work well and are an all-in-one over the counter solution that will be a perfect fit for many homeowners.
Perhaps the only drawback with these mounts is that you must take care to prevent the camera, depending on its size, from obstructing the beam of light cast by the lamps, and thusly throwing an enormous shadow. Not always an issue, but worth mentioning.
As long as you do a little homework to make sure that your chosen lighting system and camera will play well together on the mount, you won’t have any issues.
Conclusion
You are wise to install a home security system that includes surveillance cameras, but haphazardly placing them could defeat the purpose.
Image washout from a variety of light sources both on and around your home is a challenge that you must work to overcome from the outset if you want your cameras to record clear, usable high quality images.
Take care of that you properly manage lighting around your home and eliminate any potential sources of glare if you want to get the most out of your security cameras.
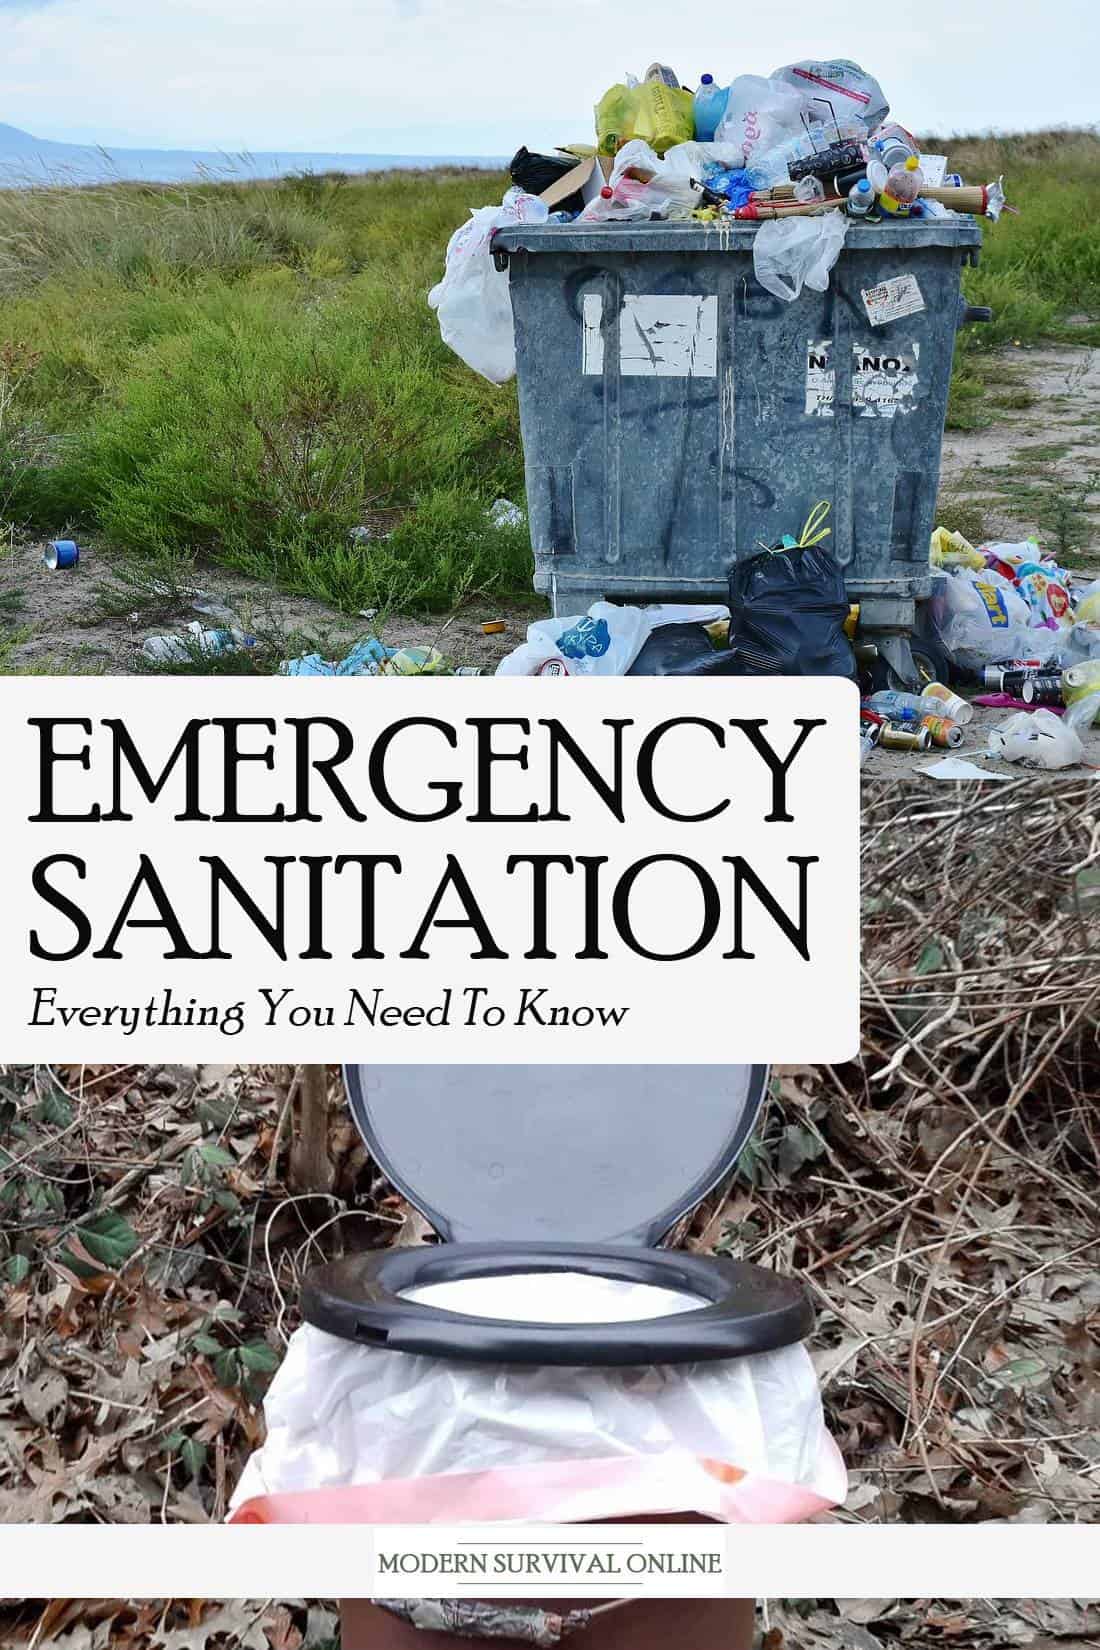
Keeping yourself and your surroundings clean and free of germs is critical if you want to stay healthy. This is easy enough in kind times though it can be a struggle when far afield for extended forays.
But where most people struggle to deal with keeping clean bodies and surroundings, including preppers, is during long- or indefinite-term disasters.
More than most factors it is the simple propagation of filth leading to an explosion of disease that can level most groups of people, especially people living in close quarters for a long period of time.
Proper control of human waste, garbage and even the deceased are serious concerns that you must be prepared to deal with when society no longer takes care of these things for you. Forgoing dealing with these facts of life will have disastrous consequences.
It might not be pretty, and it certainly isn’t fun to talk about, but it is important. In today’s article we will be telling you everything you need to know about emergency sanitation concerns and procedures for SHTF scenarios.
Sanitation is Essential for Survival
There is no civilization, from the most advanced to the most primitive, that is not entirely reliant on good sanitation procedures for staving off disease. It is hard to believe that humble germs of all kinds have been responsible for the lion’s share of mass die-off events throughout human history.
Throughout the world, a couple of billion people have been categorized as living in regions where sewage systems, toilets and other fixtures of sanitation that we take for granted are classified as “inadequate”.
This inevitably results in a lack of cleanliness that makes outbreaks of diseases like dysentery, cholera and others more likely.
Before you pat yourself on the back for our achievements, remind yourself that one bad day or a series of bad turns could result in us living in very much the same conditions through loss of public or private waste management services.
Now keeping clean, dealing with waste, trash and other vectors of pestilence is going to become a survival mandate. Getting it wrong could make for a terrible, grueling death for you and your group.
But luckily, these skills are not particularly difficult to learn and a few simple, inexpensive preps can give you a major leg up on taking care of business. It will be best if you committed to learning these skills, and developing a sanitation plan now before you are forced to deal with the ugly truth later.
Typical Diseases Caused by Lack of Sanitation
Diseases like influenza, hepatitis, cholera, typhus and plague have claimed millions upon millions of lives all total, and all are exacerbated and helped along by improper or absent sanitation.
But when it comes to filth-related pathogens none are more infamous than dysentery. Even when seemingly greater threats are in abundance, such as open warfare, dysentery is often the Reaper’s tool of choice.
Throughout our near, modern history, dysentery has resulted in hundreds of thousands of deaths even in the middle of active war zones.
And what’s more, in the Spanish-American war it killed more people than actual combat. Think about that. It can do the same thing to you and yours when you’re trying to survive the aftermath of a major disaster.
Dysentery is a hideous disease, causing inflamed intestines. The symptoms are gruesome, and disgusting.
Paralyzing abdominal cramping, high fever and never-ending, horrible diarrhea that is often bloody. As bad as this sounds it can easily get worse, with dehydration and electrolyte-related shock being all but certain.
The resulting weakness and eventual incapacitation makes it extremely difficult to care for oneself and presents a severe test for caretakers; lying around in your own filth is a great way to spread fecal born germs to those people attempting to help you.
Dysentery blazes a trail through any group of people who have to live in close proximity to one another, and that makes it a perennial threat in any survival situation where sanitation standards start to slip.
In the remainder of this article you’ll find what info you need to equip yourself against such an eventuality.
When it comes to sanitation you have three primary material concerns that you’ll need to manage during a survival situation.
So long as you can take care of these three things you will dramatically cut down on the amount of germs you will encounter and the other, attendant problems that result from that contact.
They are, in order of priority:
Human Waste
Human waste will be your most pressing and constant concern when it comes to sanitation, with both liquid and (to a far greater extent) solid waste being major vectors for pathogens.
Coming into contact with human waste will easily spread germs to your skin or contaminate anything else that it touches, and it is also highly attractive to mammalian and insect scavengers that then become secondary vectors of dangerous germs.
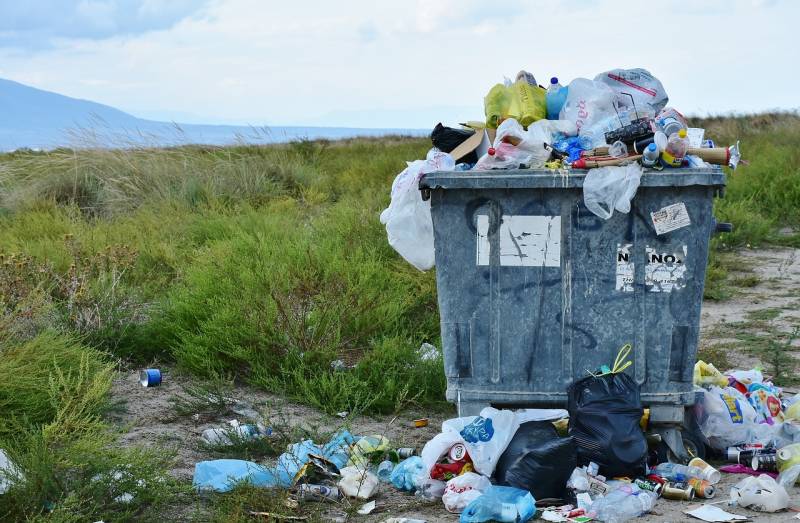
Trash
Second only to human waste in terms of quantity generated is trash, with biological matter being of particular concern.
Food scraps and other kitchen waste can rot, go rancid, and otherwise decompose allowing germs to flourish and once again attracting critters looking for an easy meal.
They’re fine dining experience could make for the beginnings of the next epidemic. Dealing with trash under the circumstances will be a chore but is comparatively easy in most situations.
Trash
Second only to human waste in terms of quantity generated is trash, wit
Dead Bodies
The pathogenic threat posed by dead bodies is greatly overhyped by most people owing to a lack of knowledge about the processes at work.
While distinctly unpleasant and potentially traumatizing to handle, most dead bodies do not represent a major source of disease unless the departed died of a contagious disease.
Nonetheless, dead bodies must be dealt with to prevent substantial discomfort and trauma for survivors.
Each of these concerns requires a slightly different approach to deal with it, with the one common factor being you must deal with them carefully in order to prevent the spread of germs, and then ensure you diligently wash up after handling any of them. We will go into details for all of them below.
The Metrics of Human Waste
Okay, it is now time to get into the ugly part. Before you can prepare to deal with any problem, you must understand the scope of the problem.
Concerning human waste, this means getting into some specifics that are not for the faint of heart. It might make your toes curl, but there is going to be some fecal-centric math in this section. You have been warned, so hold your nose, and let’s get to it!
The biggest part of the problem when it comes to dealing with human waste is that there will be so much to deal with, and so often. Said another way, humans generate a lot of poop day to day, generally.
A normal adult will create around a whole pound of feces every single day, and generate two to three pints of urine, though output can fluctuate based on several factors. Thank God that this all goes into our toilets and disappears with the press of a lever!
But what should happen when our toilets no longer work, or we don’t have any? Oh, boy. You now have over a pound of poop to deal with and a quart of pee. Remind yourself this is just for a single adult!
How many people are in your group? Let’s just say you have a group of four adults to make things simple. That now means you are dealing with four entire pounds of feces, and over a gallon of urine. Good grief!
But we aren’t done yet. What if you could not leave your home or some other shelter in order to dispose of it? Where would you put it? How will you deal with the odor? What will you do when all kinds of animals and insects start homing in on it?
Those animals will likely include your very own pet, dog or cat. I don’t need to explain how far and how wide these animals will spread the germs picked up off this human waste. Imagine them tracking that all over your shelter and all over your supplies…
This is how outbreaks of disease crop up so rapidly in survival situations and then carve a virulent path of gruesome death and destruction through groups and even through entire populations. When sanitation breaks down pestilence is always close behind.
And another thing, those pounds of poop and gallons of pee? That’s just for one day for a group of four adults. A single day! How bad will it be after a week? After two weeks? After a couple of months?
Folks, you cannot afford to screw this up: Time to learn how to deal with it properly to spare your lives and your sanity.
Improvised Facilities and Waste Storage
You’ll deal with human waste in much the same way as you normally deal with it in usual, non-disastrous times. The only difference is you’ll have to put in more work to accomplish the same objectives! Whether or not you’re surviving predominantly indoors or out the solution remains.
Dealing with human waste involves two major components: disposal and storage.
Waste Disposal
A process by which waste is eliminated or relegated to its final resting place. When properly disposed of, waste represents no or minimal danger of contagion, being completely covered or sealed or treated with chemicals that mitigate the threat of cross-contamination as it breaks down.
Waste Storage
Waste storage is an intermediate or temporary step when getting rid of waste. While waste might be allowed to accumulate in a storage solution, it is not truly dealt with, and the storage solution must be emptied more or less often to dispose of the waste.
Whereas a proper waste disposal site can be the first and final stop for human waste, a waste storage site is only ever temporary.
We’ll talk more about both of these components below. Other concepts you’ll need to familiarize yourself with include sanitation supplies as well as indoor and outdoor options for disposal and storage.
Concerning the supplies you’ll need to take care of business you should invest in the following, both for taking care of the aftermath and washing your hands:
TP
Toilet paper is one of those things you really don’t want to be forced to improvise in a survival situation. It is not that difficult to improvise, but the efficacy of anything you’ll be able to come up with pales in comparison, not to mention comfort, to the real thing.
There is nothing for it: make sure you stock up on a bunch for your survival stash, and know some of the plants that grow in your area that can replace it.
Baby Wipes
Baby wipes are a close relative to toilet paper when it comes time to go number two, and will help keep you cleaner than you could be using toilet paper alone. They are also very handy for interim bathing, able to give you a touch up clean on troublesome parts of your body.
Improvised TP
Through bad luck, lack of preparation, or just an extremely long-term survival scenario, you have run out of toilet paper and now you must improvise.
There are all kinds of things you can use to wipe your behind with, including pages torn from books or newspapers, old (clean) rags or swatches of t-shirt cut for the purpose, and even leaves from plants, though you must be triple sure you are not wiping with anything that is irritating or poisonous.
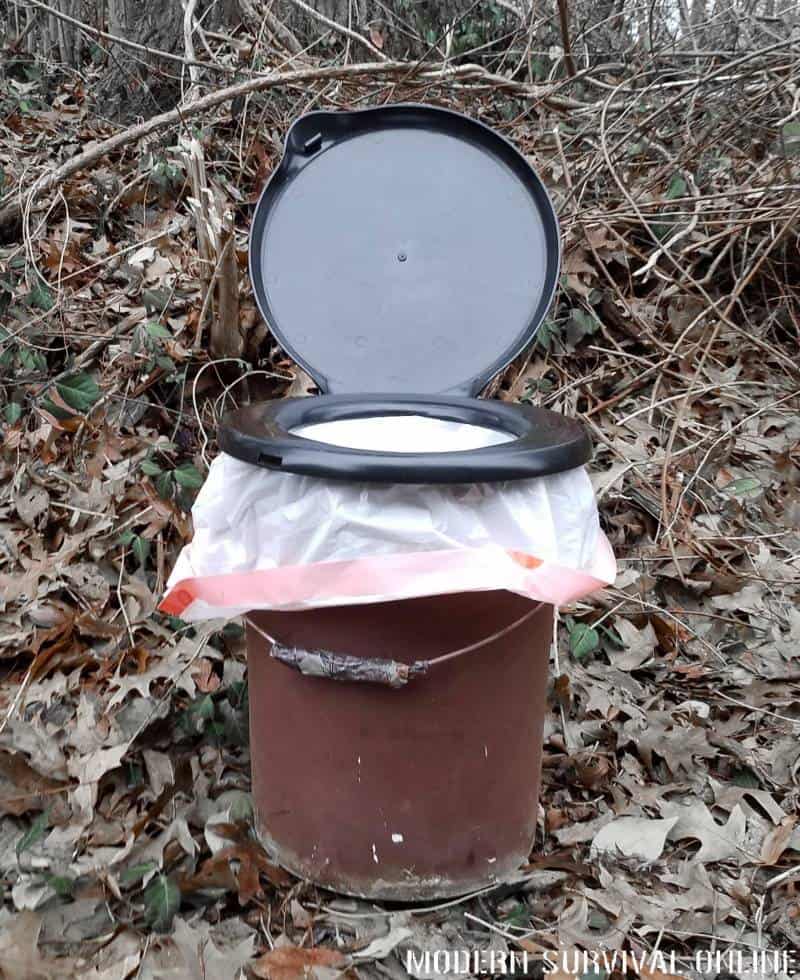
5-Gal. Buckets
Common hardware store 5-gallon paint buckets, the kind that features an equally sturdy, gasketed lid for sealing the contents are absolutely invaluable in a survival situation when used as an improvised toilet or waste storage container.
These have the strength needed to hold up to repeated use and the lid will cut down on disastrous accidents when moving the contents around, not to mention help keep the smell at bay. Get several. Don’t forget the lids.
Can Liners
Ultra-heavy duty can liners are useful for waste storage and compartmentalization. They can help keep an improvised toilet cleaner by allowing you to remove the interior and the waste in one fell swoop before neatly tying it off.
Please listen to me when I implore you to buy the strongest, toughest can liners that you can afford; one rip, one hole and you’ll be dealing with a calamitous mess.
Absorbent Media
Absorbent media is very helpful when improvising a waste disposal solution. Anything that will absorb moisture and help control odor or provide a barrier between you, and solid waste is a good idea.
Standout recommendations are kitty litter, sawdust, granulated clay pellets, shredded newspaper and sand.
Bleach / Disinfectant
You’ll be thoroughly sanitizing yourself, your equipment, and all nearby surfaces regularly during a time like this if you are wise.
When it comes to sheer germ killing power, bleach is an excellent option- even if it is hell on your clothing! It also makes a good hand wash when thinned a little bit with water.
Other disinfectants are fine, including hand sanitizer, though if you’re going to use anything else on your skin, make sure you double check it for potential health effects.
Soap
It is hard to beat good, old fashioned soap when it is time to wash your hands. At least it is so long as you have access to plentiful water. You can use whatever kind of soap makes sense to you and your situation; just make sure you have some on hand.
Toilet Solutions, Indoor
The situation outside might be dangerous or the weather just too freaking harsh to make doing your “business” outside plausible. Whatever the case, you’ll have to take care of things indoors like you normally do, only now the stakes will be somewhat higher.
Good options are comparatively few compared to outdoor options, but are still reliable and adaptable. The key difference is that most of your indoor improvised toilet solutions will boil down to storage versus proper disposal.
“Jumpstart” Your Existing Toilet
Now, if you have read this far it is so you can get the straight dope on innovative, improvised waste disposal solutions when it is time to do your business, but I would be remiss if I didn’t mention this nifty trick.
As alluded to above, it is far from out of the question that your existing water and sewer service will be knocked offline during any major disaster scenario.
However, it is also possible that your sewer or septic lines could still be intact and functional, but your toilet is just not receiving the water that it needs to flush.
In this case, all you will need to do is manually charge the toilet with water from any source before going to the bathroom as normal, and then flush. So long as you have loaded the usual amount of water the toilet requires, it will flush with no problems.
Warning: you should be at least reasonably sure that your septic or local sewer pipes are not damaged or otherwise out of operation or you’ll be making a bad situation worse.
If you are able to make use of this technique that will obviously be a big comfort for everyone involved and also highly sanitary, but it does require access to great quantities of water, quantities that might not be endless or replaceable.
Water might be better used for something else, so make sure you take careful stock of your access or existing water supply before employing this trick.
5 Gal. Bucket Toilet
The bucket toilet is a well-known, sturdy and effective solution that will make management and disposal of solid and liquid waste far easier than using some other kind of container.
The setup is simple. All you need to do is line the bucket, preferably, with a heavy duty can liner or thick plastic sheeting lacking that before sprinkling some absorbent media at the bottom.
As mentioned above this could be anything from kitty litter or sawdust to wood ash, newspaper or even chemical toilet agent.
To do your business, all you’ll need to do is fashion a seat. If you are lucky, this will be a purpose made snap-on toilet seat or one jury-rigged from an existing toilet seat.
Lacking this, don’t worry, because you can use a couple of planks of wood carefully positioned to form a functional seat. Simply sit down and do your business as usual.
Once you have done the deed, all you need to do is spray a little bit of disinfectant on your leavings and then sprinkle more absorbent media on top. This will extend the time between bag changes.
Speaking of bag changes, do not try to stretch your bag budget by allowing the container to become too full for comfort! As mentioned above, this is more of a storage solution that will need to be regularly disposed of or otherwise emptied.
If you are fortunate enough to only experience a short-term scenario, you can throw out the bags with your normal garbage when it resumes.
Toilet Solutions, Outdoor (Latrines)
You might say that using the “bathroom” outdoors has been the standard when it comes to doing the deed infinitely longer than indoor plumbing has even been a thing.
The good thing about doing your business outside is that you can generally take care of disposal in one shot with no or minimal need for any follow-up activity.
There are several important considerations though and you shouldn’t go pooping or peeing just wherever you feel like it- especially in the long term!
Human waste is notorious for contaminating above and below ground water supplies due to runoff or ground saturation. Ponds, lakes, springs, rivers, creeks and aquifers can all be vulnerable to contamination from feces under the right circumstances. For this reason you must locate your outdoor toilet with care and due diligence, using guidelines provided below.
But the good news is that, so long as the ground is workable, you can use a digging tool to easily produce a functional and mostly sanitary outdoor toilet using nothing more than a little effort.
Consider the following factors when locating your outdoor toilet, and use extreme care if you are anywhere near a known water source:
Drainage. Remember that anything you put in the ground might not stay where it is, and any germs that it contains can be carried far from the site of its leaving by rainwater, flooding and other sources.
This runoff can sometimes travel a considerable distance to contaminate otherwise safe or at least safer sources of water. For this reason, you must locate any outdoor toilet site with an eye for drainage, and minimizing the potential harm that could result.
Depth. You’re aiming for a depth of at least a foot for any outdoor toilet, and more is generally better especially when it comes time to bury it as you don’t want animals digging it up.
Soil hardness and soil condition in your area will largely dictate what is achievable and how much effort this will require.
With those concepts in mind we will move on to explore the two primary varieties of outdoor toilet.
Trench / Pit
The trench or pit toilet is exactly what it sounds like: a large hole or trench in the ground that can accommodate a substantial amount of waste, suitable for a small to medium-sized group or a typical family.
You’re going to have to work hard to dig a hole this size but it is definitely a project you should complete as quickly as possible, especially when you are facing down a long- or indefinite-term survival situation with no working sewer. These can also form the basis for a proper outhouse should it come down to it.
A typical pit or trench toilet will vary in size depending on the configuration, with pit toilets usually beginning at about a foot wide and a couple of feet deep whereas trench toilets, as you would expect, are longer and narrower, usually a foot to a foot and a half deep, and around three or four feet long.
Using the trench or pit toilet is quite simple, as all you have to do is squat over the edge or straddle it, and relieve yourself, easy-peasy.
But depending on the physical constitution of members of your group, you can improve comfort and ease of use by adding posts, rails or even a sturdy rope tied around a nearby tree in order to afford a better security, balance and, just as important, a cheap insurance policy against falling into a used trench!
Cat Hole
AKA the “cat hole”, for its obvious resemblance to the crater dug by cats prior to their deeds. All you need to do is dig a small hole, about the diameter of a large orange or grapefruit and about a foot deep. This can accommodate an adult for several visits.
Squat, deposit your leavings, cover it when you are done, finished. Despite its hasty nature note that you should take care to locate it according to the standards laid out above.
This concludes the section on fashioning an improvised toilet when your typical porcelain toilet is down for the count. Now, how do you take care of your typical post visit routine in the aftermath of a major disaster?
Wash Your Hands!
There are no great secrets or forbidden techniques that I’m going to share with you here about washing your hands. You’re just… washing your hands, just like every other day you have ever washed your hands.
The only major difference is that it is likely to not be nearly as convenient as it is most days, and failing to do a good job of it could have lethal implications should you get sick.
One of the biggest considerations that will impact your hand washing routine is what you have to wash your hands with. Water is precious in almost every survival scenario, especially pure water that is ideal for drinking.
If you don’t have access to an extremely large source of water, or are otherwise able to make efficient use of what water you do have, you might not want to use the old soap-and-water washing routine unless you have no choice.
In situations like this, hand sanitizer is a lifesaver. Hand sanitizer is portable, long lasting, and thoroughly effective as long as you are diligent. You might also employ chlorine bleach as mentioned above, but you’ll need to dilute the bleach to a 6 to 7% solution for safety sake.
Don’t worry, as this is still more than strong enough to nuke any germs that might be hiding on your skin. If you do rely on the bleach method, remember that if you cannot smell the bleach, the bleach isn’t working anymore. Then you’ll know it is time to refresh your solution!
Again, regarding procedures there are no surprises. You should wash from just above the wrists all the way down to and beneath your fingernails. Use the tips of your fingers to thoroughly scrub and rinse between each finger, in the creases of the palm and under your fingernails.
Once you are done, rinse your hands with fresh water if you are able, or just towel off. If you use a reusable cloth or towel, make sure you clean or change it regularly to prevent cross-contamination!
Taking “Out” the Trash
Human waste is probably the nastiest thing you’ll have to deal with when taking care of your emergency sanitation concerns, but it is not the only thing.
Food scraps, used hygiene products, dirty bandages and more are all significantly hazardous items you need to get rid of. These trash piles are another thing that is greatly beloved by pests, so you want to keep a lid on it, literally.
And, though it sure would be nice if your trash service kept on running through thick and thin when the world was ending we definitely can’t count on something so fanciful. As you are probably thinking, there’s nothing to do but deal with it ourselves.
Thankfully you have a couple of options, though which ones will be best for you are dependent upon the quantity of trash you are generating, what kind of trash and other cohabitation considerations like proximity to neighbors and so forth:
Dump It
Yep, just dump it. Anywhere but here, am I right? Though open air dumps are mercifully (mostly) a thing of the past, you probably aren’t going to have much choice in the matter during a long-term survival situation unless you have access to operational heavy earth-moving equipment so you can landfill your garbage.
Somewhere near where you live there is probably a site that is remote enough, isolated enough, and hopefully blocked well enough from casual observation where you can take your trash on a weekly or bi-weekly run.
No, it is not the most environmentally friendly way to dispose of garbage, and it is definitely not aesthetically pleasing, but it might yet remain an absolute necessity.
Compost Pile
One chronically overlooked method of waste disposal that actually provides a genuine return on your efforts is composting.
This only works with organic trash, naturally, but for things like kitchen waste, leftovers and other biological matter you can simply add it to an existing compost pile before moistening it and turning it over a few times.
Microorganisms and insects will hungrily break down this matter in a safe and minimally offensive manner, and the end result is glorious, rich compost that you can use to feed plants in your garden or field.
Even if you aren’t the “green thumb” type, consider that quality compost might be useful trading fodder in a survival situation.
Burn It
Burning garbage is probably the last thing you should do for a host of reasons, not the least of which is that it is highly visible while burning, and it also generates a considerable amount of noxious, black smoke depending on what materials are aflame.
That being said, for small quantities of certain types of garbage, burning does make a lot of sense, and has been used historically for a very long time as a method of garbage disposal.
First, germs cannot survive high heat to say nothing of open, roaring flames, so if you are particularly worried about biohazards coming back to haunt you, light them up.
Also, some kinds of trash, namely paper and cardboard products, scrap wood and so forth can be burned comparatively cleanly for heat in a pinch.
What about Dead Bodies?
The topic of dealing with dead bodies is an uncomfortable and unpleasant one when it comes to survival situations. Unfortunately, it is greatly complicated by the strong opinions that are typically held on the matter, as well as a great deal of ignorance and misinformation.
None of this will make a task that is grueling both physically and emotionally any easier. I will do my part to ease this burden and perhaps alleviate some mental strain in this section.
First, bottom line upfront: Dead bodies are not the ticking time bomb biohazard that most of us have been led to believe. Antiquated knowledge and personal custom on the matter informs most of these choices, not facts and reality.
While it is true that a decomposing body smells absolutely hideous and is emotionally damaging to look at they do not form a grave threat of disease by themselves or a vector for disease unless the person perished from disease or harbored a significant communicable disease already.
What does this mean to us? It means that we need not go crazy if we are forced to handle dead bodies in order to dispose of them. Wearing gloves and a face mask will be more than adequate to protect you from any pathogens the body might be harboring.
Obviously, if a body is already substantially decomposing when we are forced to deal with it, additional protective measures to keep fluids and other substances off of our bodies and our clothing are worthwhile.
For this reason it is often better to conduct what rites and burial rituals a group or family prefers in order to obtain closure and peace of mind versus taking any extraordinary measures that could be seen as disrespectful to the dead.
Immolation and soaking with disinfectant are two commonly reported user-improvised solutions for dealing with dead bodies that are typically employed due to ignorance, ignorance that leads to fear of pestilence. Neither will make you safer nor improve the situation!
Conclusion
Sanitation, or rather the lack thereof, is one of the statistically greatest threats to any group in a long-term survival situation.
A lack of water suitable for personal hygiene combined with improper storage or disposal of human waste, garbage and dead bodies can result in an outbreak of disease that can level an otherwise well prepared group.
Learning proper sanitation protocols is not nearly as pleasant or as fun as other skill sets endemic to prepping but they are likely to be far more important across a greater domain of possible situations.
Hold your noses if you have to, but study up and get prepared for this eventuality!