Understanding the trespassing laws in the state where you reside, and any state where you own property, is important when it comes to protecting your rights.
It is just as important to understand the trespassing laws in any place where you might accidentally enter the property of someone else, such as on a camping or hunting trip.
Although the trespassing laws in the United States are fairly uniform from coast to coast, there is a considerable amount of variation when it comes to penalties and the specific requirements for posting land and residential properties.
Maryland is a state that is a little strange, considering the state has a fairly strict requirement about posting no-trespassing signage while simultaneously being somewhat vague concerning exactly what is and is not trespassing in certain conditions.
This article will help you make sense of the more confusing parts of the statutes.
Maryland Trespassing Law Overview
Maryland has escalating punishments for repeat violations of the trespassing statutes, with longer fines and jail terms each time.
Maryland requires posted signage or markings for protecting most types of land against trespassers.
Maryland has several special statutes covering trespassing on cultivated land, using an off-road vehicle on private property, or the same kind of vehicle on public property.
What Constitutes Trespassing in Maryland?
In Maryland, trespasses are generally defined as entering, crossing, or remaining upon any property of another, including vehicles and conveyances of any kind, after having been notified by the owner or the owner’s agent that doing so is forbidden.
The only exceptions to this are if a person is entering or crossing under a good faith claim of right or ownership, and a few other specific exceptions that we aren’t covering here for brevity.
Sections 6-403 and 6-402 contain most of what your average citizen will need to know regarding trespassing on private property in Maryland.
An excerpt of 6-403 is below:
6-403. Wanton trespass on private property
(a) Prohibited — Entering and crossing property. — A person may not enter or cross over private property or board the boat or other marine vessel of another, after having been notified by the owner or the owner’s agent not to do so, unless entering or crossing under a good faith claim of right or ownership.
(b) Prohibited — Remaining on property. — A person may not remain on private property including the boat or other marine vessel of another, after having been notified by the owner or the owner’s agent not to do so.
…
Does Maryland Require “No Trespassing” Signs?
Yes, if you want the law to back you up when it comes to protecting your property and undeveloped land in particular, against trespassers.
6-402 states that no-trespassing signage must be placed where they are reasonably likely to be seen by a would-be trespasser.
6-402. Trespass on posted property
(a) Prohibited. — A person may not enter or trespass on property that is posted conspicuously against trespass by:
(1) signs placed where they reasonably may be seen; or
(2) paint marks that:
(i) conform with regulations that the Department of Natural Resources adopts under § 5-209 of the Natural Resources Article; and
(ii) are made on trees or posts that are located:
1. at each road entrance to the property; and
2. adjacent to public roadways, public waterways, and other land adjoining the property.
(b) Penalty. — A person who violates this section is guilty of a misdemeanor and on conviction is subject to:
(1) for a first violation, imprisonment not exceeding 90 days or a fine not exceeding $ 500 or both;
(2) for a second violation occurring within 2 years after the first violation, imprisonment not exceeding 6 months or a fine not exceeding $ 1,000 or both; and
(3) for each subsequent violation occurring within 2 years after the preceding violation, imprisonment not exceeding 1 year or a fine not exceeding $ 2,500 or both.
…
Is Fencing Required to Protect Property?
No. Maryland law is quite specific about the necessity of signage or paint markings for posting properties against trespassers, but makes precious little mention about fences, and the presence of fencing or other obstacles designed to bar foot or vehicle traffic does not factor into Maryland’s law concerning trespassing.
However, like most other times and in other states any trespasser that circumvents, damages, or destroys fencing, gates, locks, bollards, or any other barrier to entry might have just qualified their trespassing as breaking and entering depending on the circumstances and the type of property.
But such a discussion is beyond the scope of this article.
What Other Marks Indicate “No Trespassing”?
Maryland is one of several states that also allow property owners to Mark the boundaries of their property against trespassers using paint.
Commonly referred to as purple paint laws, Maryland it takes a somewhat different tack though they stick with the spirit of such laws by requiring blue paint instead of the more common purple.
Like most laws, the color and medium of the paint are specific, and the markings must be made and the style of a vertical stripe that is at least 2 in wide and 8 inches in length placed between 3 and 6 feet from the ground on a tree or post.
Anyone approaching the boundary of the property should be able to see such markings to their left and right from wherever they are standing.
Can Solicitors Ignore “No Trespassing” Signs?
No. In Maryland no one can ignore a no-trespassing sign unless they have the legal authority to do so.
This includes solicitors, and though the state does not generally make a point of prosecuting solicitors who violate such signage, it should be pointed out that any door knockers do so at their own discretion.
Can Trespassing Result in Arrest in Maryland?
Yes, though simple types of trespassing that do not result in damage or are done in the furtherance of another crime rarely results in an arrest.
Fines are far more common, but those who trespass repeatedly or flagrantly do risk arrest and jail time.
It should also be noted that trespassing in a public place by refusing to leave after being told to do so by staff or law enforcement can and usually will result in arrest.
Can You Take Someone to Court for Trespassing?
Yes, and especially if they show a pattern of such behavior, are trespassing maliciously or trespassing is associated with stalking or harassing behavior.
Special Instances of Trespassing in Maryland
Maryland has several special statutes covering specific types of criminal trespass, covering everything from the use of any sort of vehicle on private property, the use of off-road vehicles on public property or land, a wanton entry on cultivated land, and trespassing in the stable area of a racetrack.
Perhaps most notable is the entry on a property for the purposes of invading the privacy of occupants, section 6-408. This section refers to what is usually called a Peeping Tom law.
This is definitely scumbag behavior, but in Maryland it is only a misdemeanor that can result in jail time of up to 90 days and a fine that is not to exceed $500 or both as punishment.
The relevant part of a 6-408 is included below for your review:
6-408. Entry on property for purpose of invading privacy of occupants
(a) Prohibited. — A person may not enter on the property of another for the purpose of invading the privacy of an occupant of a building or enclosure located on the property by looking into a window, door, or other opening.
(b) Penalty. — A person who violates this section is guilty of a misdemeanor and on conviction is subject to imprisonment not exceeding 90 days or a fine not exceeding $ 500 or both.
…
Pepper spray is one of the finest and most well-rounded defensive implements available to the average citizen.
Filling an important niche between verbal judo and lethal force, a good dose of pepper spray is highly likely to shut down an attacker before the attack actually begins.
Although it is legal in all 50 states throughout the nation, state laws governing pepper spray and other defensive sprays do vary. Luckily, Connecticut is a state with highly permissive laws concerning such sprays.
This article will tell you everything you need to know about owning and carrying pepper spray in the state of Connecticut.
Your Connecticut Pepper Spray Passport
The following facts are the most crucial to understand concerning the ownership, carry and use of pepper spray in Connecticut:
All common varieties and formulations of defensive spray are legal for civilians to use in Connecticut. Pepper spray and tear gas are allowed, as are other non-lethal chemical sprays like mace.
Connecticut imposes no restriction on capacity or overall quantity concerning defensive sprays in the hands of civilians. Carry of large and extra large canisters is legal.
Pepper spray should only be used on another person in cases of legitimate self-defense. The misuse of pepper spray or any other defensive spray in Connecticut will likely earn you felony criminal charges.
Keep reading to learn more about pepper spray laws throughout Connecticut.
Can You Legally Carry Pepper Spray in Connecticut?
Yes, you sure can. Pepper spray, tear gas and other defensive sprays are entirely legal for citizens to carry throughout Connecticut, whether or not you are a resident or visitor.
No one needs a concealed weapons permit or any other special permission to carry pepper spray, and you may carry it openly or concealed as it serves your purposes.
Similarly, pepper spray may be carried in the cabin of a vehicle or kept in a glove box or other compartment with no restrictions.
Pepper spray can go to most places in the state, but certain restricted areas like government buildings and the secure area beyond the security checkpoint in an airport are still off-limits.
How Much Pepper Spray Can You Carry in Connecticut?
One of the best things about Connecticut’s pepper spray laws is it imposes no restriction whatsoever on capacity or the overall quantity that civilians may carry.
This means you’re entirely within your rights to carry an extra large canister suitable for riot busting if it pleases you or if you anticipate needing to defend your home or business against an angry mob.
Alternatively, you may carry a small canister on your key ring or one that fits within your pocket just the same.
If desired, you may even carry multiple canisters…
What Pepper Spray Formulas are Legal in Connecticut?
There is a lot to like about Connecticut’s laws concerning pepper spray because they hardly have it! This extends to the type, or formula, of defensive spray that a person might choose.
Of course, legitimate pepper spray, or OC, is legal and viable but you might also choose any common formulation of tear gas spray or chemical Mace. Blends of these common sprays are also permissible.
Keep in mind, pepper spray and other defensive spray formulations are categorized as non-lethal weapons because they are not designed to inflict any lasting harm or injury.
Generally, you can be assured of such if you purchase a product from a reputable manufacturer of such chemicals.
Trying to brew your own at home, repurposing other aerosol chemicals for the purpose, or purchasing sprays from unknown or shady vendors might mean that the sprays are anything but harmless in the end.
Consider that the criminal misuse of pepper spray or tear gas spray will likely result in felony criminal charges being brought against you in Connecticut, and choose accordingly. See the next section for more details.
When Can You Legally Use Pepper Spray in Connecticut?
Under Connecticut law, the use of pepper spray against another person is justified in self-defense, so long as the use of pepper spray is proportional to the threatened unlawful use of force against you.
Put another way, you could use pepper spray on someone who’s threatening to punch you, kick you, push you, or generally beat you up, or someone threatening you with any weapon.
However, you could not use pepper spray against someone who is only yelling at you, calling you names, or otherwise not threatening you with imminent and unlawful force.
Connecticut state statutes 53a-61, 53a-63, and 53a-64 cover the factors that constitute assault.
Familiarize yourself with them so that you can be sure your use of pepper spray in self-defense is indeed justified.
Section 53a-61 – Assault in the third degree: Class A misdemeanor.
(a) A person is guilty of assault in the third degree when: (1) With intent to cause physical injury to another person, he causes such injury to such person or to a third person; or (2) he recklessly causes serious physical injury to another person; or (3) with criminal negligence, he causes physical injury to another person by means of a deadly weapon, a dangerous instrument or an electronic defense weapon.
(b) Assault in the third degree is a class A misdemeanor and any person found guilty under subdivision (3) of subsection (a) of this section shall be sentenced to a term of imprisonment of one year which may not be suspended or reduced.
…
Section 53a-63 – Reckless endangerment in the first degree: Class A misdemeanor.
(a) A person is guilty of reckless endangerment in the first degree when, with extreme indifference to human life, he recklessly engages in conduct which creates a risk of serious physical injury to another person.
(b) Reckless endangerment in the first degree is a class A misdemeanor.
…
Section 53a-64 – Reckless endangerment in the second degree: Class B misdemeanor.
(a) A person is guilty of reckless endangerment in the second degree when he recklessly engages in conduct which creates a risk of physical injury to another person.
(b) Reckless endangerment in the second degree is a class B misdemeanor.
Frequently Asked Questions
What is the strongest pepper spray you can carry in Connecticut?
Connecticut does not have any restriction on the strength of pepper spray or any other defensive spray that is legal for civilians to carry.
You can carry the strongest formula you want so long as it does not inflict any lasting harm or permanent injury on someone in normal use.
Again, all sprays of this nature that are marketed and sold for civilian use by reputable manufacturers in the sector are probably going to be just fine in this regard, you won’t have anything to worry about.
However, legally, the buck will stop with you should you choose to carry and deploy any pepper spray or tear gas of a questionable quality that does inflict serious injury on someone.
Will you go to jail if you pepper spray someone?
Yes, it is a distinct possibility. The best possible outcome in any self-defense encounter involving your use of pepper spray is to be cleared at the scene. However, this is rare.
It is quite possible that you could be arrested in the aftermath of the encounter and even taken to jail.
Prepare accordingly and have this discussion with your family attorney or chosen self-defense attorney.
Is pepper spray considered a deadly weapon?
No, as a rule. The very nature of pepper spray, tear gas sprays, and the like is that they are not designed to inflict serious bodily harm or death upon the target.
Though they inflict a tremendous amount of pain and discomfort, this pain is short-lived and usually leaves no lasting injury.
Trespassing is one of those crimes that might not seem that serious, at least until it happens to you. The very notion that someone is on our land or property, and they shouldn’t be, is enough to make anyone angry.
But it is important that we know the law on trespassing both so that we may respond appropriately and also to avoid trespassing on the property of others while we are out and about on our adventures.
And though trespassing laws are broadly similar throughout the United States each state has its own nuances.
Looking at Massachusetts, you’ll find that the state typically has many laws that are lengthy, intricate, and somewhat difficult for your average everyday citizen to decipher.
To help you in this matter, we are bringing you this guide that will help you understand the most important concepts in Massachusetts’ statutes on trespassing.
Massachusetts Trespassing Law Overview
In Massachusetts, signage is not strictly required but does serve as a notice against trespassing for certain statutes.
Fencing or other barriers against entry are required for the protection of certain types of property.
Most kinds of trespassing only result in fines in Massachusetts, with successive violations incurring greater and greater penalties.
What Constitutes Trespassing in Massachusetts?
Massachusetts, trespassing is broadly defined as the entering or remaining upon any property, be it a structure or land, of another person without lawful authority and without the permission of the owner or the owner’s agent to do so after having been specifically forbidden by the same.
All this is described in Chapter 266 Section 120 of the statutes, and do note where it specifies improved or enclosed land. Vacant, unimproved land will need to be posted against trespassers. More on that later.
You can read this short but most important excerpt from section 120 below.
Section 120 – Entry Upon Private Property After Being Forbidden as Trespass; Prima Facie Evidence; Penalties; Arrest; Tenants or Occupants Excepted
Section 120. Whoever, without right enters or remains in or upon the dwelling house, buildings, boats or improved or enclosed land, wharf, or pier of another, or enters or remains in a school bus, as defined in section 1 of chapter 90, after having been forbidden so to do by the person who has lawful control of said premises, whether directly or by notice posted thereon, or in violation of a court order pursuant to section thirty-four B of chapter two hundred and eight or section three or four of chapter two hundred and nine A, shall be punished by a fine of not more than one hundred dollars or by imprisonment for not more than thirty days or both such fine and imprisonment. Proof that a court has given notice of such a court order to the alleged offender shall be prima facie evidence that the notice requirement of this section has been met. A person who is found committing such trespass may be arrested by a sheriff, deputy sheriff, constable or police officer and kept in custody in a convenient place, not more than twenty-four hours, Sunday excepted, until a complaint can be made against him for the offence, and he be taken upon a warrant issued upon such complaint.
This section shall not apply to tenants or occupants of residential premises who, having rightfully entered said premises at the commencement of the tenancy or occupancy, remain therein after such tenancy or occupancy has been or is alleged to have been terminated. The owner or landlord of said premises may recover possession thereof only through appropriate civil proceedings.
…
Does Massachusetts Require “No Trespassing” Signs?
Sometimes. Massachusetts does not explicitly require no-trespassing signage for the force of law to be in effect against trespassers, but like some other states throughout New England Massachusetts typically codifies trespassing as unlawful entry after having been notified that entry is forbidden.
In all such cases, posted no-trespassing signage serves as a notice so long as it is placed in a conspicuous area that a reasonable person would believe a would-be trespasser is likely to see.
Regardless of what kind of property you were trying to protect in Massachusetts, posting signage is a good idea.
It should also be noted that nowhere in chapter 266 is specific signage required, so ostensibly any generic no-trespassing sign, so long as it is of a size and constructed in such a way that it is likely to come to the attention of people, should suffice.
Is Fencing Required to Protect Property?
Yes, in some cases if the property is not posted. As noted in chapter 266 section 120 unlawful entry in enclosed land after prior notice constitutes trespassing, and the enclosure in this case means a fence, wall, or some other barrier against foot or vehicular traffic.
What Other Marks Indicate “No Trespassing”?
None. Unlike some other states that rely upon so-called “purple paint” laws, Massachusetts is not one of them.
The only things that qualify under the law for enclosing or posting property are fences, walls and the like or specific no-trespassing signage.
Can Solicitors Ignore “No Trespassing” Signs?
Not typically, although many solicitors in suburban and other densely populated residential areas may do so.
Massachusetts takes a very light approach to charges of trespassing, with the vast majority of violations resulting in a small fine, even for successive violations.
If you really wanted to put an end to solicitors, consider the installation of a fence with a closing and locking gate.
Can Trespassing Result in Arrest in Massachusetts?
Yes, but generally it must result in damage or other substantial harm if it is simple trespassing.
However, trespassing in restricted or sensitive areas, be they commercial, industrial or governmental can easily result in arrest, as can trespassing that is done in the furtherance or support of any significant crime.
Can You Take Someone to Court for Trespassing?
Yes, but your chances are not very good unless the trespassing results in significant damage or is done as part of harassment or stalking against you.
Massachusetts generally is not very harsh on trespassers, and though you might well be able to drag someone into civil court your chances of obtaining meaningful remedy are not good.
Special Instances of Trespassing in Massachusetts
There are quite a few special instances of trespassing in Massachusetts, each with its own section in chapter 266 that covers it.
These range from the destruction of vegetation and fruit to the operation of motor vehicles without permission.
However, probably the most important one for the average Massachusetts citizen to understand is Chapter 266 Section 120b, which covers entry on land by abutting property owners and its exception to trespassing charges.
The short and sweet of it is that if a person has a building on their property that is so close to the boundary of the neighboring property that it is impossible to access it for repairs or maintenance without setting foot on the neighboring property, then one may cross onto the other’s property lacking specific permission so long as they post a bond with the local police department or sheriff for the purpose and do no damage while their own repairs or maintenance are underway.
Section 120b – Entry on Land by Abutting Property Owners Not Constituting Trespass
Section 120B. Whoever, being the owner of land abutting that of another, the building or buildings on which are so close to the land of such other person as to require an entry on said abutting land for the purpose of maintaining or repairing said building or buildings in order to prevent waste, shall not be deemed guilty of trespass or liable civilly for damages, provided that such entry is made expeditiously and in the exercise of due care and that no damage is caused by such entry to the land or buildings of said abutting owner. Before such entry said owner shall notify the chief or other officer in charge of the police department of the city or town in which the land is located that he has requested permission to enter on adjoining land from the owner or occupants thereof for the purpose of maintaining or repairing a building or buildings and that such permission has been refused, and that he intends to enter under the provisions of this section. Before entering on said land, said owner shall post bond with the chief of police in the amount of one thousand dollars to protect the adjoining land owner from damage caused by said entry. No person so entering on land of another shall store material or tools thereon for more than eight hours in any one day nor shall he continue to enter thereon for more than thirty days in the aggregate in any calendar year. After said entry, said owner shall in all respects restore said adjoining land to the condition in which it was prior to said entry.
I've been practicing LD on and off for about 7 years now, with semi serious practice for the last two years, yet I felt like I made no progress. Long story short, I spent all this time chasing a shortcut. When i realized this, I wasn't even mad. I just laughed. This shortcut I was trying to do would supposedly help me skip learning the fundies so i could get to the good stuff, but I think i'd just be where I want if I just did the fundies there and then. Regardless, the time I spent wasn't wasted as I did learn many things about lucid dreaming, and I'm ready to try and do it the right way. I've been doing it for a couple days already and wanted to confirm if I'm on the right track.
As I understand it, There's 4 Fundamental Pillars of Lucid Dreaming, and I've organized them in order of importance roughly:
# 1 - Dream Recall
- Ability to remember dreamed experiences. Resolving to remember and record future dreams is basically resolving to be more present for them to enter the memory in the first place. This means that training dream recall also improves dream vividity and duration. The longer a dream lasts, the more likely it is for one to become lucid in it, thus also improving induction skill. I think this is why some people say that all you need is dream journaling if you really didn't want to do anything else.
- Key Skills - Memory, Awareness
- Training
Dream Journaling, duh
# 2 - Lucid Dream Induction
- Ability to induce lucidity within a dream.
- Key Skills - Prospective Memory, Awareness
- Training
1. DJ
2. Induction techniques
3. Reality Checks - PM, awareness
4. Meditation - I was always wondering how meditation helped LD, but I think I get it now. As lucidity is really just awareness of your current state, doing something to train your awareness IRL (like meditation) would probably increase the chances of this coming about.
5. Prospective Memory Training (PMT)
# 3 - Dream Stabilization
- Ability to keep the dream stable so as not to end prematurely.
- Key Skills - Focus
- Training
- Rubbing hands together - Touch
- Spinning around - Proprioceptic and vestibular
- Narrating observations made with other senses - sound + others
# 4 - Dream Control
- The ability to control the dream.
- Key skills - Focus, awareness
- Training
- Revelation technique - Visualize the construct. Once the image is clear, imagine it hidden and either turn to face it or reveal it. Could also work more easily by closing my eyes, then opening.
So, You improve dream recall to improve the quality of your dreams and to make sure you can remember the experiences. Then, you become proficient at attaining lucidity. After lucidity is something easy to come by, you can focus on stabilizing the dream so it doesn't end prematurely. Then and only then should you focus on dream control. The logic for this is that, even if you could, you wouldn't want to control an unstable dream, so stabilization is priority. But, you'll probably want to be experienced with it. In order to be, you need to be able to induce lucidity rather frequently, which itself requires some other things.
Daily Training
I caught myself on the 3rd day wondering if I should just only try techniques again(WILD WBTB, etc). Then I remembered that I've only given these things 3 days to work. I'm willing to be patient, and I'm trying to practice consistency in other aspects of my life. ADHD isn't making this any easier but damn haha
Record Dream
Perform at least 10 RCs throughout the day
Check for dream signs, check for other abnormalities, then perform state tests regardless of conclusion (I think i'm in reality, but just to be sure...) Ideally performed as a response to an abnormality or a dream sign
Some state tests I do
Checking for text consistency (Look away, look back)
Nose check (try to Breathe through closed nostrils)
Finger count
Gravity check (Do I feel particularly light or heavier than normal)
Tech Check (Is technology working as expected or at all)
Power Check (Do I have abilities some would consider unnatural)
Meditation
10 minute meditation. Slow, deep breaths. Count to 10. Inhales are Odd, Exhales are Even. Once 10 is reached, reset and count that cycle. (1,2,3,4,5,6,7,8,9,10.) One. (1,2,3,4,5,6,7,8,9,10.) Two. etc When you notice thoughts going astray, gently bring attention back to breaths. Nudge your mind back to breathing, but don't try to kill the thought right away. let it end on its own. If it's a particularly nasty thought, simply recognize that it's something you're thinking about and resolve to give it time later, or right after meditation. I notice that most of the anxiety and fear behind most thoughts is ambiguity, and that simply setting aside time for them really helps quelling them when they come up. The awareness of your typical mindscape and your breath will help train awareness in general, and it's this state of awareness we want to bring into our dreams.
PMT
I've had issues with this. I don't really go outside, so I usually never hit any of these goals, but I'll try to adapt it for home life. It's also kinda hard, but that's actually good because it's immediate feedback that it needs work.
I'll start with trying to hit 1 daily goal for 7 days, then increase this if it's too easy, eventually working up to 5 goals a day.
Nightly Stuff
Just techniques. sometimes I won't do them but when I do, it's WBTB + something else usually. I've had success with WILD in the past so i guess I'll just do that.
After alarm goes off, I'll wake up, get out of bed, drink some water and count to 30. Then, I'll lay back down and try to WILD. My anchor will be my breaths and counting them just like the meditation.
And this is how I understand it. Am I onto something? I think i am :}
via Lucid Dreaming - Dream Views - Attaining Lucidity https://ift.tt/0zXC4qd
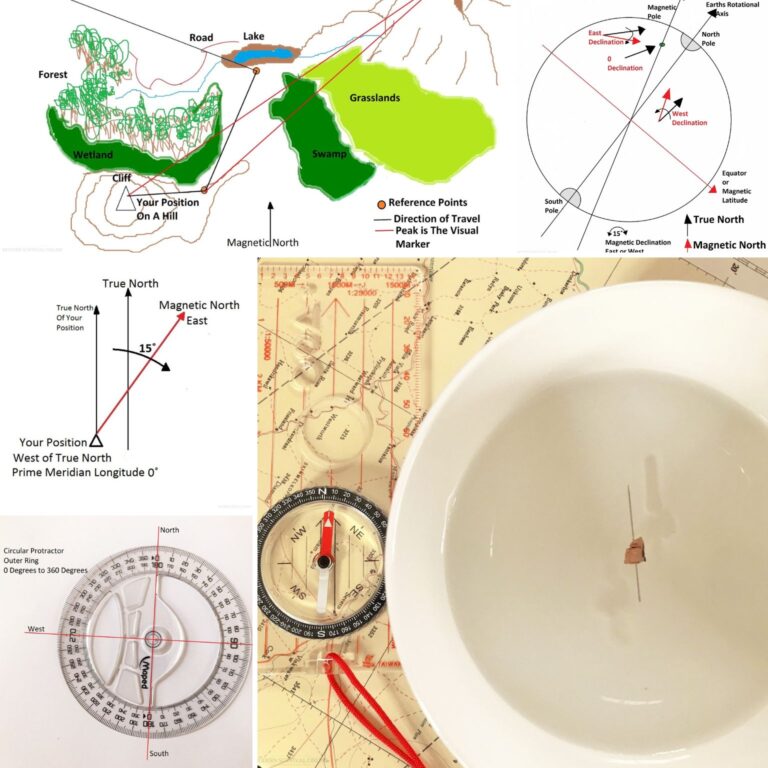
When you’ve been lost in an unfamiliar part of town, I’ll bet you turned the sound down on the radio so you could “see better”.
Joking aside, being lost is not funny. It unbalances our center, sending us into heightened awareness.
a map and a compass, along with a protractor and a pencil, and a piece of red string
Walking around a corner and seeing a familiar building across the way lifts that sinking feeling. Your feel-good endorphins kick in, and confidence returns as you take control of your situation.
Navigation is so part of our world that we don’t even recognize it anymore. We take it for granted until we are out of our comfort zone.
I’m not saying you should carry a compass around town; we have phones that do that for us already.
You have, however, traveled out of town, been without cell reception or you just want to head into the wilds to recharge your mind.
Old-school navigation is an absolute necessity for obvious reasons: if you can navigate you can find your way back.
Hitting the backwoods of Virginia with some of my Navy SEAL buddies certainly made this point clear to me. I was in another country, in a different hemisphere, in unfamiliar territory.
Once off the main road, everything changes, and it’svery easy to become disorientated…
Years of training came flooding to the surface and had me reaching for the comfort of my trusty compass, much to my buddies’ amusement and nods of respect.
In this article, I will take you through the basics of compass work, and help you understand the groundwork and how to apply your knowledge.
You will upskill, taking your confidence to a new level, just don’t get overconfident. Right, let’s get started.
A Brief History of the Compass
The compass is arguably the most important innovation in navigation equipment in the history of mankind. It predates the sextant by thousands of years, which is the one instrument that has been used to open up the world to exploration, discovery, and human expansion.
The history of the compass is firmly rooted in construction and land ownership. The need for accurate land surveying is the sole motivation for its invention.
Positioning out plots of land for agricultural use, town planning, and infrastructure development — all provided the platform for the emergence of the compass.
The earliest recorded use of a compass-type device is out of China during the Quin dynasty (221-206 BC).
A lodestone, magnetite is a naturally magnetized mineral element, used to establish true South aiding early soothsayers and fortune tellers with their conjuring and predictions.
It wasn’t long before the directional qualities were recognized and put to better use…
More importantly, these loadstones, or “South Pointers”, were used to orientate building construction and infrastructure development.
The first compasses showing the four cardinal points emerged somewhere in the late second century BC during the Han Dynasty.
With ongoing use, the compass formally saw use with the Chinese military for land navigation and maritime navigation from the early part of the 11th century.
The base was made of brass and the spoon-shaped lodestone was placed in the middle which, when given a little spin, would come to a stop and orientate on the North-South axis.
Further investigation found that metal needles that were rubbed on the loadstone became magnetized, and when placed in a light cork floating in water would also orientate on the North-South cardinal points, a wet compass.
It was found that the same needle if suspended from a thin silk thread would also orientate on the North-South axis.
The importance of this discovery is that the compass became portable, and land and maritime navigation had entered a new age of accurate navigation.
As trade with the Middle East opened up, the knowledge of the compass spread into Europe where it was combined with ongoing European developments…
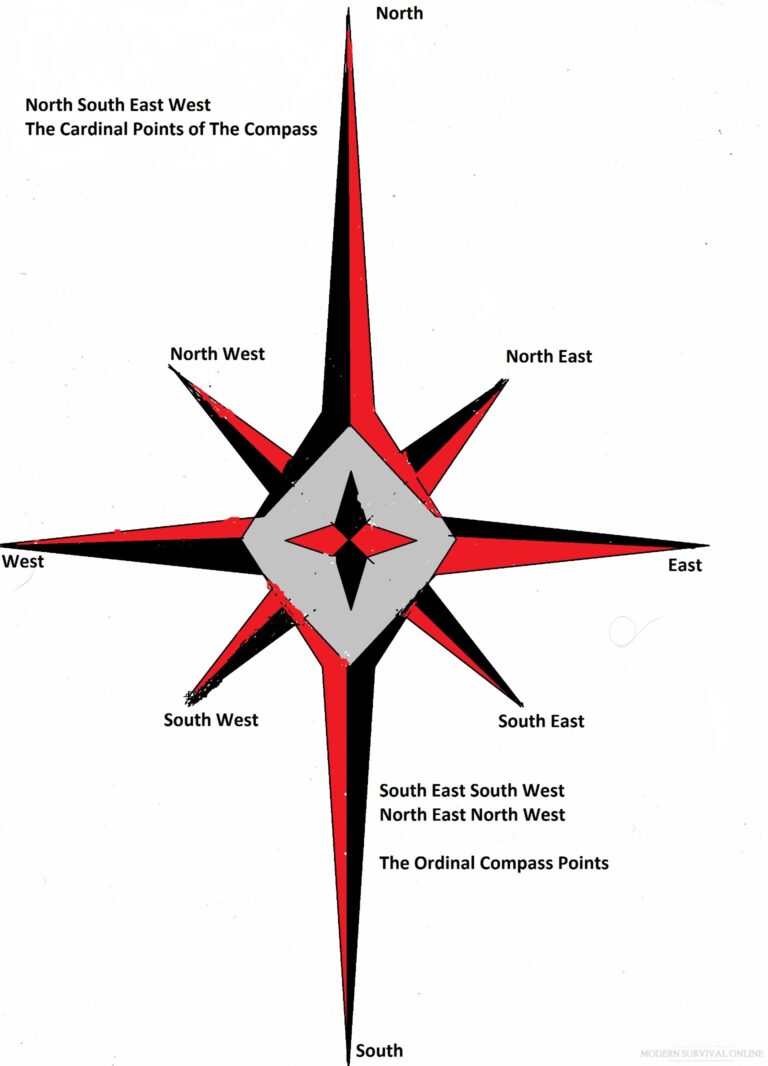
The Compass Rose
The Compass Rose is an old-school Compass Card. It can be placed on or drawn onto a flat surface and used with a basic compass to identify the cardinal and the ordinal points of the compass.
The eight points on the card can be abbreviated into North (N) South (S) East (E) West (W), the Cardinal Points, and North East (NE) North West (NW) South East (SE) South West (SW).
In maritime terms, these are:
The four-point compass rose card represents the basic winds, or the North, South, East, and West cardinal points. These are at 90 degree angles to each other.
The eight-point compass rose card represents the eight principal winds of the North East, North West, South East, and South West. The eight points are at 45 degrees from each other.
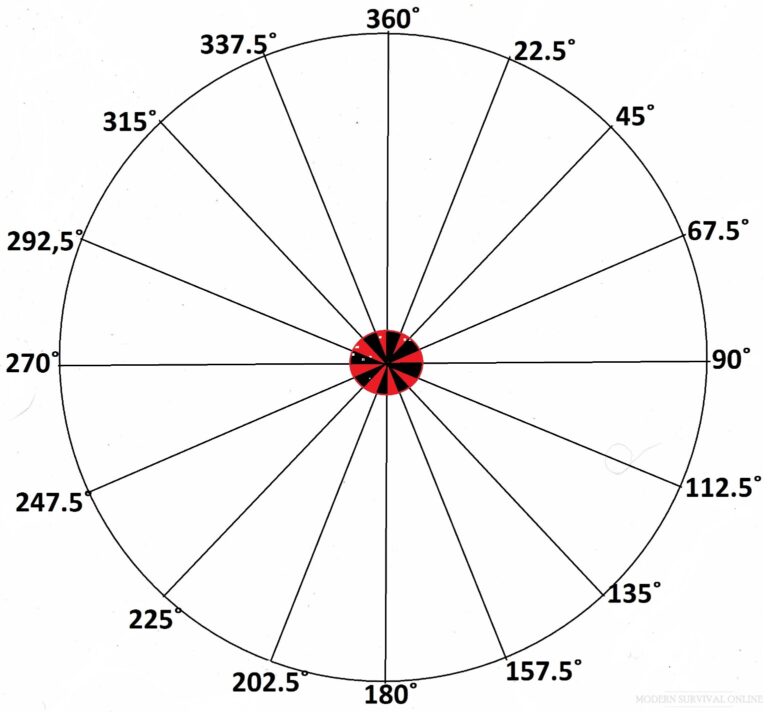
The angles can be further divided into halves all the way down to the smallest points of degrees. This will help you to refine direction if you are using an emergency compass.
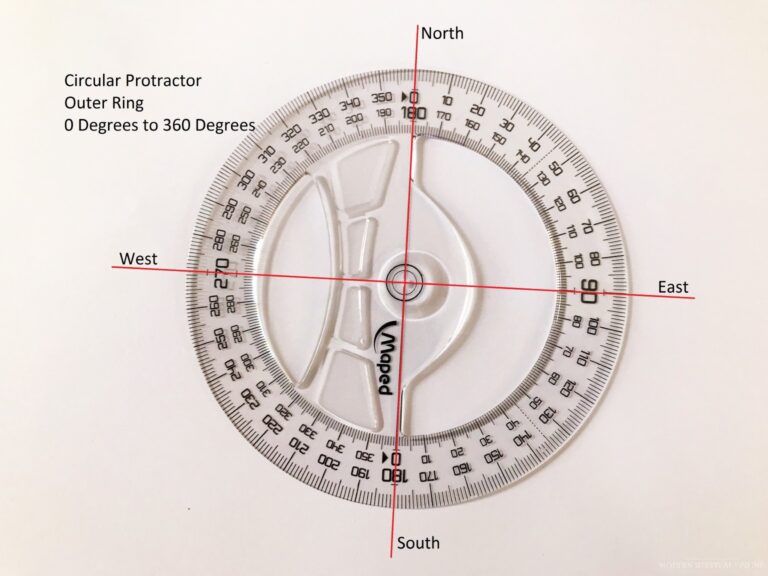
Drawing a circle around the center of the compass rose will lay out a 360 degrees dial with 10 degrees intervals like a modern circular protractor. These can be refined further by dividing the space between the 10-degree intervals, by 10 degrees of 1.
The Modern Compass
There are four distinct variations of the compass for land navigation:
The Baseplate Liquid Compass where the housing for the compass needle is filled with liquid to give the pointer more stability. It is the cheapest and offers excellent value for money. It is suitable for plotting as the baseplate has integrated scales and offers substantial navigational qualities.
The Mirror Compass is the Baseplate Compass fitted with a flip-top mirror housing with a sight line to aid in accurately determining the bearing of a landmark.
The Lensatic Compass offers a heightened degree of pressure using a mirrored base and peeps sight alignment system. This allows the user to sight the compass on a land feature while taking measured degree readings.
It has a cousin called the Prismatic Compass, with similar features, and uses a prism peep sighting system, offering a finer degree of accuracy. This compass is also called the Military Prismatic Compass.
As a military operator, I cut my teeth on the military issue Prismatic compass, which used Mils instead of degrees. It’s very accurate but complex unless used extensively and practiced regularly.
There are 6400 mils in 360 degrees, giving a degree of accuracy not attainable with a compass marked only in degrees.
The baseplate and lensatic compasses are my go-to, with the baseplate being the most suitable for ease of use.
In this article we will focus on the baseplate compass; its ease of use combined with functionality make it the first choice when starting out.
It’s important to get in as much practical use as possible, refine your skill set and develop a natural sense of direction.
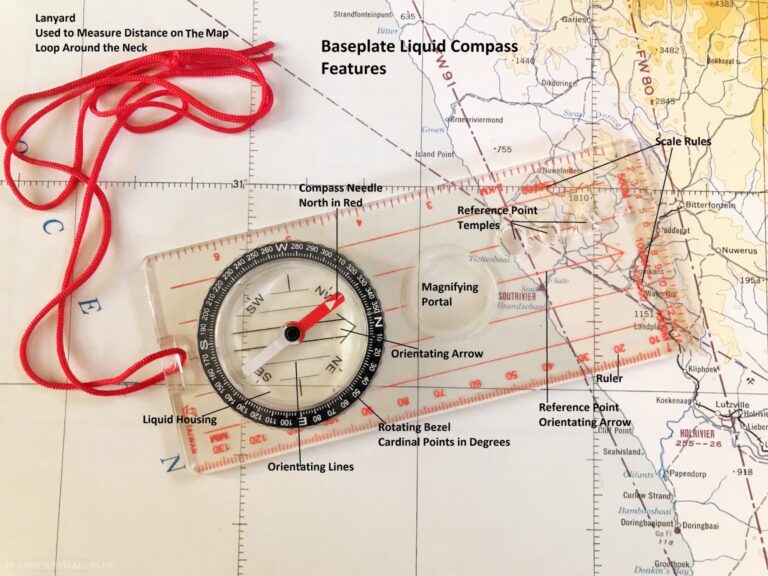
The Baseplate Mounted Compass
The compass is a relatively simple instrument to use. The magnetic needle always points to the magnetic North, making the compass orientation simple and referencing easy.
Know your tools, and they will serve you well:
Red Magnetic Needle
North Orientating Arrow
Liquid Housing
Rotating Bezel in Degrees
Scale Rues in 1:25000 and 1:50000
Map Reading Magnifying Glass
Reference Point Map Stencil Plotting Template
Ruler in millimeters for plotting a course and distance
Reference Point Orientation Arrow or The Direction of Travel Arrow
A lanyard is used to secure the compass around the neck. It can also be used to measure route distance on a map.
Reference Point Stencil Templates – to draw directly onto the map
Here’s How It Works
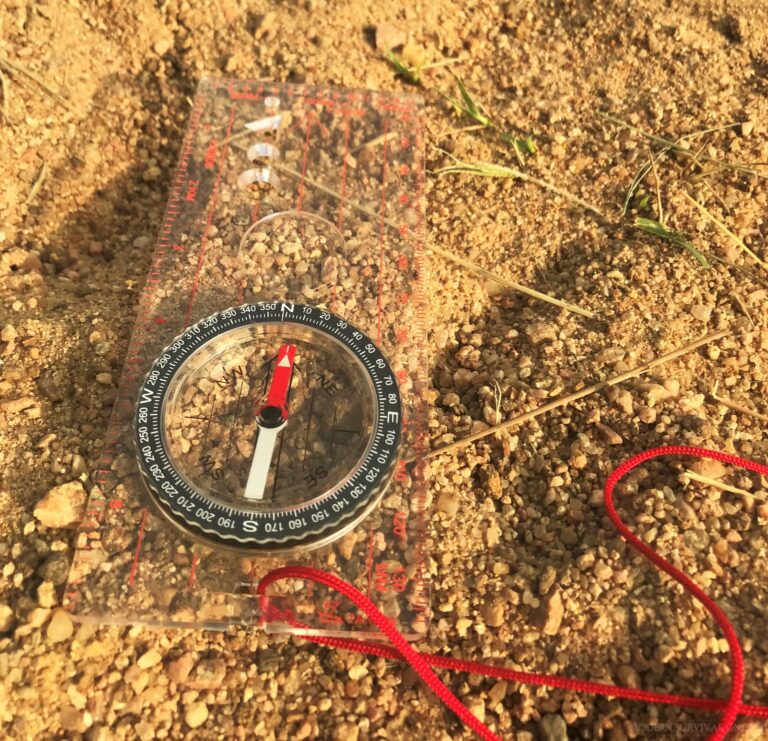
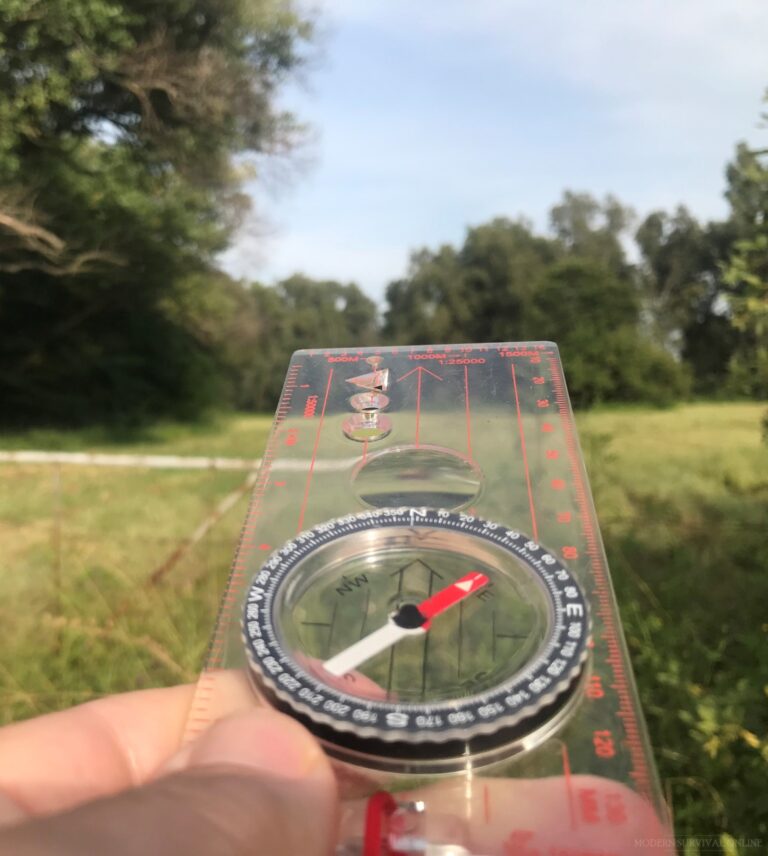
The red end of the needle always points North, Magnetic North. Setting the rotating bezel to match the orientating arrow will line up your compass with the travel arrow.
Rotate the base plate until the compass needle seats in the orientating arrow outline or frame. This is called boxing the needle or “Red in The Shed”.
This is important when we calculate true North making allowances for Magnetic Declination.
The Rotating Bezel is graduated clockwise from 0˚ to 360˚. Each degree East or West allows the user to find the bearing of a Reference Point if the coordinates are known.
A bearing then is the reference point relative to your position, given in degrees. The coordinates need to account for the difference between Magnetic North and True North.
If you know the coordinates, the bezel is rotated until the bearing is in line with the Travel Direction Arrow also called shooting a bearing. This is the bearing relative to True North or Magnetic North.
The Compass Needle is Boxed in the Orientation Arrow. This is also referred to as “Red in The Shed”:
The Red Arrow Line leading off North is the Direction of Travel Arrow
Box the red Compass Needle in the Orientation Arrow
Dial The Bezel to Box the Compass Needle
The Degree In Line with the Travel Arrow is The Directional Bearing
Ensure that you are taking your readings away from metal objects, magnets, radios, other compasses, overhead power lines, and electrical equipment.
These will all interfere with the needle’s alignment as magnetic or electromagnetic fields surrounding them.
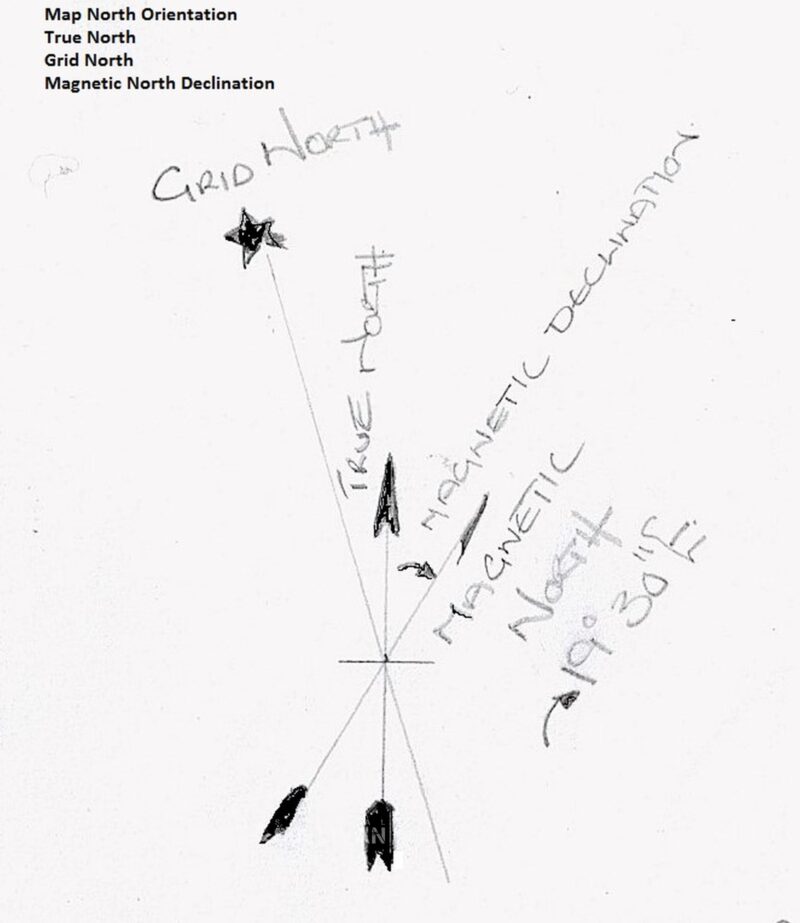
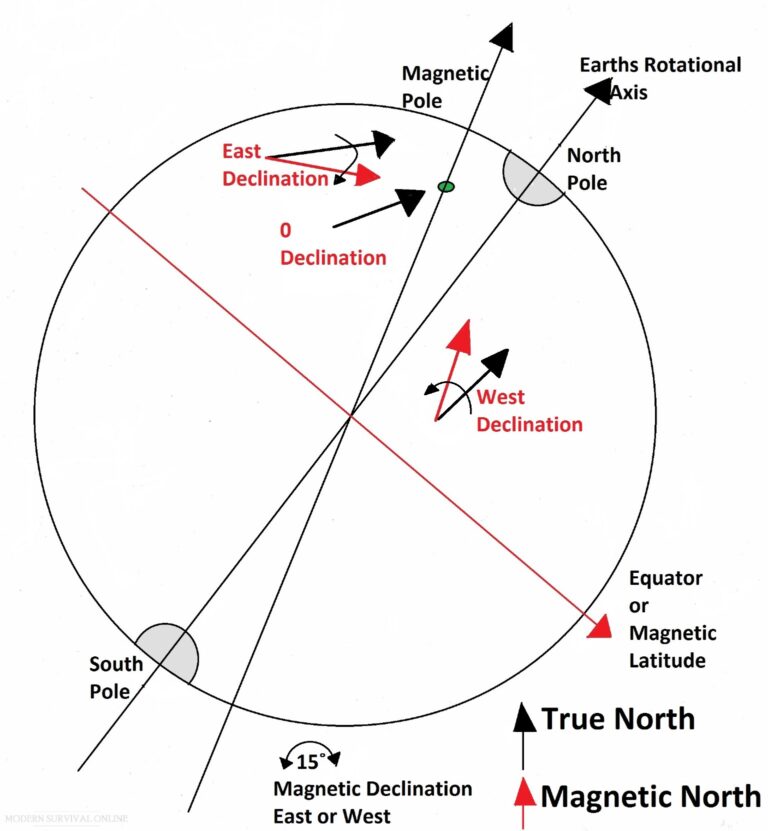
Magnetic Declination
The difference in the angle between Magnetic Declination and True North is a vital calculation to determine your correct heading. Even a few degrees off will multiply into a huge angle of error taking you off course.
diagram showing magnetic declination (map north orientation, true north, grid north, and the magnetic north declination)
When using a compass on its own, the direction is given as Magnetic North globe showing True North and Magnetic North.
When True North and Magnetic North are aligned, declination is 0˚.
East of True North, the magnetized compass needle indicates a Westerly Magnetic declination or East = West
West of True North the magnetized compass needle indicates an Easterly Magnetic declination.
The angle of Magnetic Declination is added for East Declination
The angle of Magnetic Declination is added to 0˚ for the West Declination and subtracted from the East Declination.
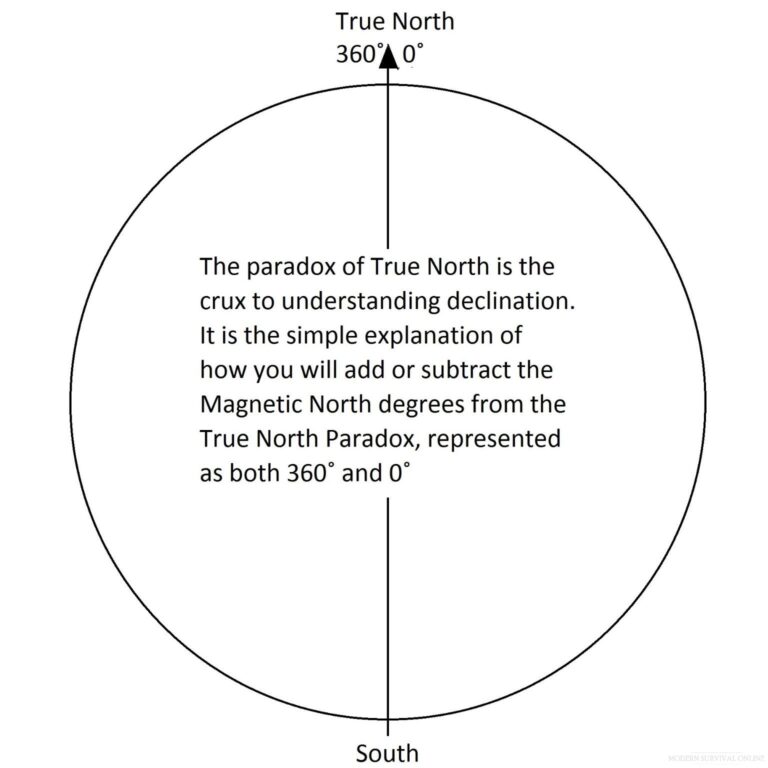
The True North Paradox
Knowing when to add or subtract Magnetic North from True North is a regular question that comes up in training.
Any mistake will take you so far off course that you could seriously jeopardize your chances of survival.
Consider this, your compass dial is graduated in degrees and increases clockwise moving from 0˚ to 360˚.
True North is Both 0˚ and 360˚.
This single piece of obvious information will uplift your understanding of declination, demystifying it.
True North 0˚ is the Prime Meridian, given as the line of longitude running through Greenwich.
In truth, all lines of longitude are 0˚ or 360˚. The lines of longitude are imaginary lines. We have to start somewhere that circumnavigates the earth which all converge on and cross over the poles.
For our purposes to understand our world we have named the longitudinal lines 0˚ to 360˚ degrees running clockwise around the world beginning in Greenwich.
Your position relative to the prime meridian will give you, your magnetic declination.
The prime meridian creates the Eastern and Western hemispheres, and is responsible for the date lines which we use to further understand the sun’s cycles around the earth’s rotation, night and day, and fathom lines of longitude.
Application of the Paradox
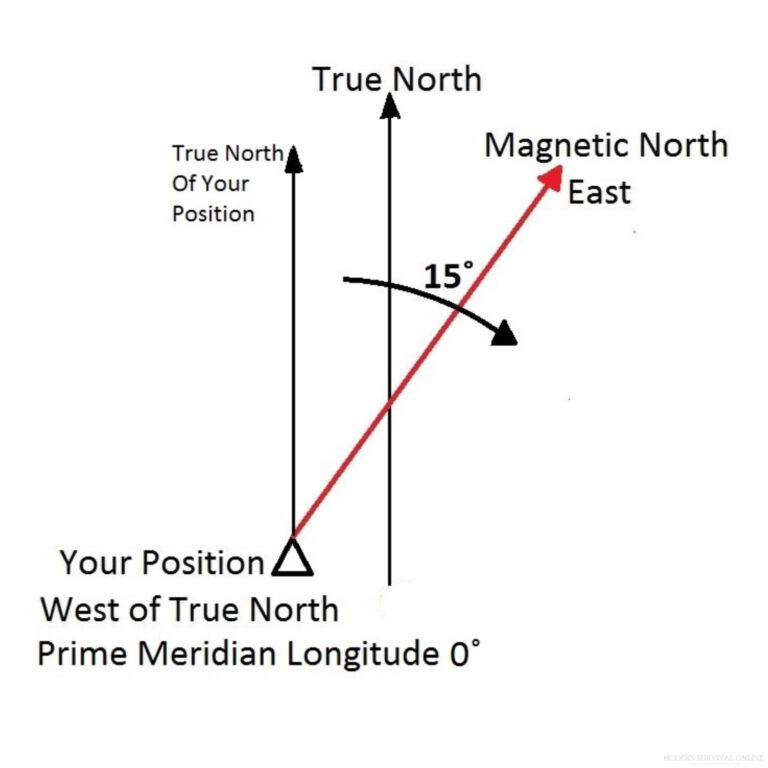
West is Best
Your position is West of True North = Declination is East of your position
Referring to the diagram. Placing your compass on the True North Line at 0, the Compass Needle will show 15˚ East of True North
Rotating the bezel dial 15˚ clockwise to the 15˚ mark will orientate your compass to the True North Direction.
This will be bearing 345˚
You have subtracted 15˚ from 360˚
West is Best
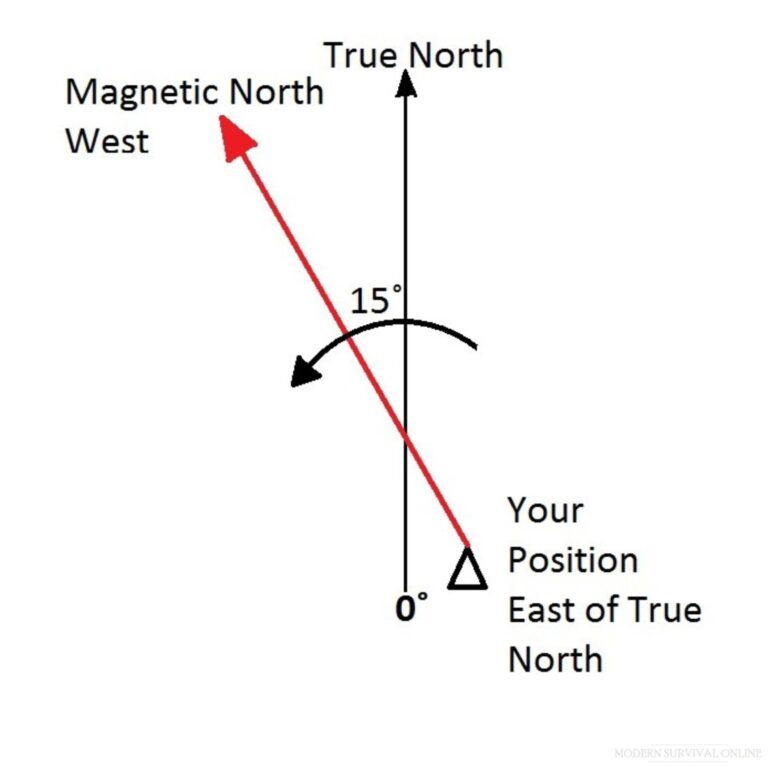
East is Least
Your position is East of True North = Declination is East of your position
Referring to the diagram. Placing your compass on the True North Line, the Compass Needle will show 15˚ East of True North
Rotating the bezel dial 15˚ clockwise to the 15˚ mark will orientate your compass to the True North Direction.
This will be bearing 15˚
You have added 15˚ to 0˚
East is Least
Before heading out into the unknown it will serve you well to familiarize yourself with the declination of the area you intend to visit. Magnetic Declination can be tracked worldwide online.
Depending on where you find yourself the angle of error can vary from 2˚ or 3˚ to 20˚ plus degrees. This can mean missing your Reference Point by meters or miles.
Working with Declination
Working with declination should be simpler now and make much more sense. Magnetic declination changes on a yearly basis which shifts with the earth’s geological movement.
The Sun’s intensity has a direct influence on the Earth’s Magnetic field which also influences delineation.
Declination will vary depending on your position in relation to the North Pole or True North. Be sure to keep up to date with the degrees of change on a regular basis here on the web.
Declination can be applied in two ways:
Declination as given by a map that is up to date.
Declination is known, it’s a given for a specific area.
Map Work
Modern Topographic maps have the magnetic declination for the specific area printed on them. This will help you to orientate your compass to True North and your topographic map.
The top of the map is always North. Once you have determined True North you can orientate your map to the ground and everything you see on the map will be orientated to the ground.
Shooting a bearing with your compass will allow you to plot your direction from your position relative to the area you are in.
From your position, align the orientation arrow of your compass with the travel direction arrow. Hold the compass out in front of you, and the magnetic needle will align with the magnetic north.
Shifting your body around until the needle is boxed or Red in The Shed, will give you the magnetic bearing.
Your position is west of the prime meridian, True North will be to your left. You will have to be familiar with landmarks and features that are True north indicators, use the sun or the stars to determine true north to verify your findings.
Once established, you can shoot a bearing in the direction you wish to travel, and be confident that you are on course.
Working With Magnetic North
If working only with Magnetic North, you will shoot a bearing in the direction you wish to travel, and stay on the bearing to the point of reference. As you navigate between points, you will keep using Magnetic North as your reference.
You can triangulate your position using three known or identifiable points. Even if you are in unfamiliar territory, this will help you establish your position on the ground.
Generally, people get lost in familiar surroundings with a known starting point and landmarks.
Keeping your head about you, remaining calm, and reverting to your compass work will help you orientate yourself to the environment and find your way back to the beginning.
Terrain Assessment, and Pathfinding
The first two terms are associated with map work, where the map and ground are orientated to correspond with each other, allowing you to position yourself.
You are however stranded without a map, so build one. Even a basic drawing based on what you can see will give you control of your surroundings and provide meaning to the environment.
Pathfinding is a natural form of navigation used for millennia, the real talent is in choosing the right path, here is where Terrain Assessment and Association come into play.
More specifically:
What do you see?
How will the environment impact your movement?
How will you get there?
Where are you going?
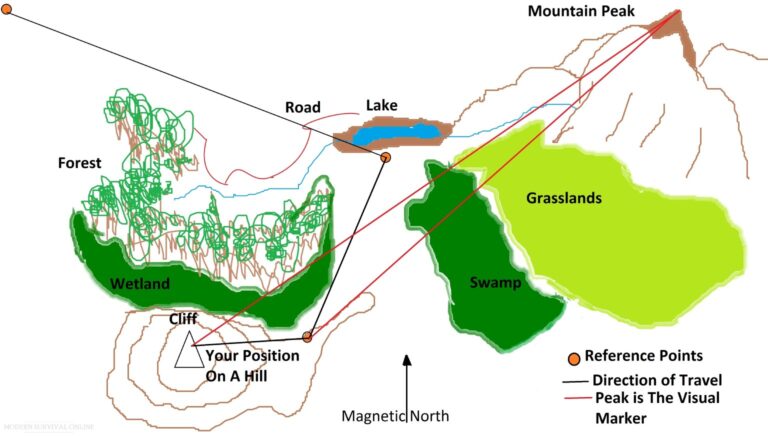
Known Position
Your position on the hill gives you a view of the surroundings, allowing you to assess the way out. Taking a look at the map you can see that the lake in the distance is what you want to head for.
The road is clearly visible as a defined line in the distance but getting there will present a problem.
Terrain Assessment
The cliffside in the diagram above has blocked out a part of the route down. The wetland may not be viable as you can get bogged down. The same goes for the swamp area.
The direct route is not always the safest or fastest route, taking a little time to ensure you assess the terrain will save you many hours of trudging.
Pathfinding
This is called pathfinding. As the name implies, you will plot your course out of the wilderness using the landmarks and features available to you, crossing the best terrain possible.
Terrain assessment is vital in plotting your route; ending up in the swamp would not be ideal.
Here, your compass will assist you, and declination will have no impact on your planning.
Baseline
In the distance you can see the lake, this is the point you want to head for, it’s large and prominent. It makes for a great reference point to head for, also called a baseline.
You can see that once you descend from the hill you are on, the lake will not be in sight anymore, your trusty compass however will help you stay on course.
Even if you are a few degrees off due to navigation errors and obstacles forcing course changes, your Baseline is still large enough that you will find it.
Aiming Off
This is also referred to as Aiming Off at times, meaning that you aim big, and miss small.
Try not to aim for small baselines if you miss them, you can waste valuable time searching for them.
The mental stress and anguish that accompanies the anguish of missing the reference point will drag at you and can seriously undermine your chances of survival.
Once you reach the lake you can follow the edge until you reach the river with the road running near it.
Handrail
The lake now becomes your guide to your next baseline called the handrail. You’ll rely on this handrail, using it to stay on course, and uplift your spirits with a sense of achievement and the knowledge that you will survive.
Plot Your Path
From your position, you can see the mountain peak, and shoot a bearing to the Peak. This Mountain Peak will be visible no matter where you are as you make your way to the lake. It will help you orientate yourself and maintain your bearings.
The next step is to plot your course along the path you have chosen. Pathfinding takes all the terrain features into account and gives up reference points that you will use to plot your course.
Shoot a bearing to a feature that you can see on your path; make a note of it.
Once you get to it, you’ll be able to look back at the position that you departed from and orientate yourself to the next reference point on your map.
Now shoot a bearing to your next reference point. The peak will make sure you are on track, by shooting a bearing to it from your new position and centering it for the next leg of your journey.
Set your Orientation Arrow to Magnetic North Bearing and the travel arrow to your reference point, you can check your position as you descend to the first reference point and keep on track.
Your first reference point will now be your new position and repeat the process to be off on the next leg of your route to the lake baseline. Write it down if you can…
The aim is not to stay on a True North course, but to stay on a true reference point course. You want to reach your objective and from there make your way out of the wilderness.
Not every road will take you home, but it will take you to a destination from which you can make your way home.
Safe Bearing
If, when you reach your first reference point or baseline and find that you cannot travel as planned due to an unseen obstacle you can retrace your steps along the safe path you traveled along earlier.
This is literally reversing the bearing from 70˚ E to 140˚ W, also called a back bearing, to return on your safe bearing.
The importance of drawing even a simple map becomes relevant when a heavy fog or cloud cover denies you visibility.
If, along the route you planned, you have to traverse thick undergrowth or high reeds, how will you find your way to the next reference point if you cannot see it?
Having drawn the features of the areas, or mapped them out, and taken bearings to place them in position relative to your position will provide you with the confidence to move even when visibility is poor.
This will require a different skill set to be applied.
Dead Reckoning
Dead reckoning must be the oldest form of planned navigation, it’s literally a matter of heading off in a direction for an estimated distance for a measured timed period.
Walking North towards a hill for two kilometers at 4 miles an hour will mean you are 2 miles from your previous position on a northerly bearing in half an hour.
There are three parts to Dead Reckoning:
Direction
Distance
Time
Your map and compass come in useful at this point.
You have worked out your direction from your position, you have an idea of the speed you can travel and you can work out the time taken to travel.
If you have all three then you’re on track, if you only have two then you can work out the third.
Dead reckoning is a tried and tested maritime navigational method that can be applied to land navigation.
Dead reckoning always starts with a known point. This can be confusing if you are lost, right?
Not so… You may not know the exact grid reference of the point of the earth you are standing on but you know where you are right now. This is your known starting point.
You are navigating out of the wilderness and using Dead Reckoning to find your way from one point to another, giving you powerful insights into how you will be able to predict your future movement.
Direction
Your compass is the starting point, irrespective of where you are it will point to Magnetic North. Shoot a bearing to a reference point you want to head to; this is your direction.
Distance
Count your paces to this point. Depending on the length of your stride, 60 to 70 right-only or left-only paces will equal 100 meters. Now you have a rough estimate of how far you have traveled.
Speed
Time yourself to this point using your watch. Apply the factor of 3.6, for converting meters per second into kilometers per hour, this is seconds x the factor 3.6.
1m/s x 3.6 = 3.6 kilometers per hour
Time yourself between two points of a given distance. Even if you have to pace it out and then time yourself, this will assist you in calculating YOUR average speed.
Calculating Your Options
Using your watch, you can determine the time taken to move between two points.
Dead Reckoning gives up a formula to determine Speed, Distance, and Time.
Speed = Distance ÷ Time
S = D ÷ T
There are three different ways to use this formula:
distance ÷ time = speed, example: 3.8 miles ÷ 1.3 hours = 2.9 miles per hour
speed × time = distance, example: 2.9 mph x 1.3 hours = 3.8 miles
distance ÷ speed = time, example: 3.8 miles ÷ 2.9 mph = 1.3 hours
Trained athletes can run 100 meters in 15 seconds or better, which means that the athlete is running at:
100 meters (D) ÷ 15 seconds (T) = 6.6 meters per second (S) (that’s right, 6.6 meters in 1 second)
Using the factor 3.6 for converting m/s into k/h:
6.6m/s x 3.6 = 24 kilometers an hour (almost 15 miles per hour)
Not many of us can keep up this kind of pace or even one vaguely resembling 15 mph for any length of time.
You have to determine your walking pace, a good brisk walking pace, to eat up the distance while conserving energy and water is 4.8 kilometers per hour (km/h) or 3 miles per hour (mph).
Your backpack or any amount of water you carry will impact your speed.
If you have a party with you, you will be subject to the slowest members’ pace or risk losing them. This is a big contributor to those getting lost.
Taking a Look at the Math
Average Speed: 1.35 m/s
Distance: 100 meters
100 meters ÷1.35 seconds = 74 seconds
To walk 100 meters =74 seconds
1.23 minutes/100meters, 12.33 minutes to travel 1 kilometer
Kilometers per hour
60 minutes ÷12.33 minutes = 4.86 kilometers/ hour
Miles Per Hour
1.6 kph to 1 mph
4.86 kph ÷ 1.6kph = 3mph
Your watch got lost, your cell phone battery is flat and you have no reliable way of keeping time, can you manage? The answer is YES!
Without the benefit of a watch, we can work at an average walking pace of 1.35 meters per second. A study conducted measured the gait or stride of test subjects to ascertain an average per age.
Taking these figures, we can conservatively extrapolate an average for men and women across the age spectrum, that one walking pace distance is approximately 1 meter, and that distance is covered in 1.35 meters per second.
Using the pace count, an average of 60 to 70 paces (100 meters) is equal to 81 seconds.
Plotting your course, estimating your time to travel this course, and working out the actual time you traveled are now all within reach using this simple formula and your compass.
If your calculations for distance are out you will walk further and longer or vice versa.
This holds for your walking speed, which is affected by natural factors or fatigue or injury, may be slower or faster, changing your time value, making arrival sooner or later.
Dead reckoning is not a precise art, it’s flawed and vulnerable to geographic features, gradient, and ground quality. Weather and wind can foul your progress.
Your age and physical condition each play vital roles in determining your speed and influence the quality of your calculations.
That said, dead reckoning is better than having no plan. It got the Vikings across the ocean to the British Isles and beyond, even as far as the Americas.
Christopher Columbus navigated across the open Atlantic to the shores of America and back again to Spain using Dead Reckoning.
It may not be the most accurate yet it will give you the confidence to make a move, save yourself from circumstances and head out to discover the path home.
Working with distances and times that are not exact is, of course, problematic and open to error. Error is compounded by distance traveled, called the angle of error.
Your compass will give you control of your direction, it can take longer or could be further, but you are in control and have rough estimates to work with.
Keep a Notebook
Keep a log, and use a notebook to jot down your work. Compass work is like learning another language, writing down your findings and checking your results will strengthen your skills.
You have to use your equipment, get out in nature and explore, take routes you know well, and plot their course.
Walk the course, and compare your notes. Join a local hiking group, and mingle with experienced field guides.
If ask for help and assistance, almost all will oblige. Many take pleasure in assisting new members to learn the necessary skills.
Wrap-Up
In this article, I have focused on using a baseplate compass without a declination setting. The aim is to introduce the easiest compass to use that will fulfill your navigational needs.
Once you have a firm foundation using the baseplate compass, you should move on to the mirror compass.
For highly detailed and accurate work, there is none other than the Mils compass., which requires detailed mathematical calculations and conversions.
Everything becomes easier with use and practice. Do not be daunted, everyone can do it.
Trespassing is bad news. It’s bad news when strangers trespass on your property, land, or otherwise, and it’s bad news if you accidentally trespass on someone else’s property when out and about hunting, hiking, camping, or scouting your bug-out routes.
Although usually thought of by citizens as a lesser or forgettable crime, trespassing can entail serious legal consequences, including jail time and substantial fines.
For this reason, it is imperative that everybody understands the trespassing laws in the state where they live, travel, or own property.
Minnesota’s trespassing laws are generally easy to understand, but they do make things a little difficult for citizens trying to look them up because the two main sections that cover them are extremely lengthy, and sometimes related concepts are spread out in the statutes.
This article will serve as a guide that will help get you up to speed with the most important things that you need to know about Minnesota’s trespassing laws.
Minnesota Trespassing Law Overview
In Minnesota, verbal notice is generally required to bar trespassing if signage is not posted.
The majority of criminal trespass charges in Minnesota are misdemeanors or gross misdemeanors.
Minnesota has highly specific requirements for no-trespassing signage that must be followed for the law to back you up if posting your own property.
What Constitutes Trespassing in Minnesota?
Minnesota law states that trespassing is, essentially, entering or remaining upon the premises or in the dwelling of another without lawful authority or permission or refusing to depart after permission has been revoked.
The trespass law in Minnesota is also notable for the various other crimes that still constitute trespassing, including vandalism, defacing of monuments and markers, stealing fruit, and more.
The Minnesota statutes covering trespassing can be found in 609.605, an extremely lengthy section that we will take snippets from throughout this article for the most important concepts.
You can review the fundamental parts of what constitutes trespassing below:
609.605 TRESPASS.
Subdivision 1. Misdemeanor.
(1) “Premises” means real property and any appurtenant building or structure.
(2) “Dwelling” means the building or part of a building used by an individual as a place of residence on either a full-time or a part-time basis. A dwelling may be part of a multidwelling or multipurpose building, or a manufactured home as defined in section 168.002, subdivision 16.
(…)
(b) A person is guilty of a misdemeanor if the person intentionally:
(1) permits domestic animals or fowls under the actor’s control to go on the land of another within a city;
(2) interferes unlawfully with a monument, sign, or pointer erected or marked to designate a point of a boundary, line or a political subdivision, or of a tract of land;
(3) trespasses on the premises of another and, without claim of right, refuses to depart from the premises on demand of the lawful possessor;
(4) occupies or enters the dwelling or locked or posted building of another, without claim of right or consent of the owner or the consent of one who has the right to give consent, except in an emergency situation;
(5) enters the premises of another with intent to take or injure any fruit, fruit trees, or vegetables growing on the premises, without the permission of the owner or occupant;
(6) enters or is found on the premises of a public or private cemetery without authorization during hours the cemetery is posted as closed to the public;
(7) returns to the property of another with the intent to abuse, disturb, or cause distress in or threaten another, after being told to leave the property and not to return, if the actor is without claim of right to the property or consent of one with authority to consent;
(8) returns to the property of another within one year after being told to leave the property and not to return, if the actor is without claim of right to the property or consent of one with authority to consent;
(…)
Does Minnesota Require “No Trespassing” Signs?
Yes, for certain properties and to qualify certain kinds of trespassing if no prior specific verbal or written notice has been delivered.
Also, as mentioned above in the introduction Minnesota has some surprisingly specific requirements for signage for various types of property.
In some cases, any generic no-trespassing sign will do so long as it’s large enough and posted inconspicuous place, for other properties the size, format, and other inclusions are highly specific.
Once again we can reference section 609.605, but you’ll need to look up the indicated paragraphs mentioned below to cross-reference them:
609.605 TRESPASS.
(…)
(5) “Posted,” as used:
(i) in paragraph (b), clause (4), means the placement of a sign at least 8-1/2 inches by 11 inches in a conspicuous place on the exterior of the building, or in a conspicuous place within the property on which the building is located. The sign must carry a general notice warning against trespass;
(ii) in paragraph (b), clause (9), means the placement of a sign at least 8-1/2 inches by 11 inches in a conspicuous place on the exterior of the building that is under construction, alteration, or repair, or in a conspicuous place within the area being protected. If the area being protected is less than three acres, one additional sign must be conspicuously placed within that area. If the area being protected is three acres but less than ten acres, two additional signs must be conspicuously placed within that area. For each additional full ten acres of area being protected beyond the first ten acres of area, two additional signs must be conspicuously placed within the area being protected. The sign must carry a general notice warning against trespass; and
(iii) in paragraph (b), clause (10), means the placement of signs that:
(A) carry a general notice warning against trespass;
(B) display letters at least two inches high;
(C) state that Minnesota law prohibits trespassing on the property; and
(D) are posted in a conspicuous place and at intervals of 500 feet or less.
(…)
Is Fencing Required to Protect Property?
No. Fencing is generally not required to qualify trespassing so long as prior notice has been given to a specific individual or no-trespassing signage is posted inconspicuous places and in accordance with the regulations for doing.
It should be noted, however, that any trespasser that defeats, crosses, damages, or destroys fencing or other barricades against foot or vehicle traffic in the course of trespassing will likely face additional charges.
What Other Marks Indicate “No Trespassing”?
None. Minnesota is not a state that relies upon what is commonly referred to as “purple paint” laws for posting properties against trespassing.
Can Solicitors Ignore “No Trespassing” Signs?
Technically no, but they commonly will. If you really wanted to press the matter, you could potentially bring charges against a solicitor who ignored a properly posted no-trespassing sign, but Minnesota case law does not have a strong record in this regard.
Something you might want to keep in mind if you really despise dealing with solicitors is that they definitely cannot circumvent a closed and locked gate or other barriers to entry on your property.
Can Trespassing Result in Arrest in Minnesota?
Yes, definitely. Trespassing, especially trespassing that is done wantonly, trespassing that results in damage, or trespassing that is done in furtherance of a crime can certainly result in arrest.
And, even though it isn’t necessarily common, especially in cases of accidental trespassing, remember that trespassing is a misdemeanor and potentially worse in the state of Minnesota, and can result in a rest at the instance.
You should never trespass, or risk trespassing, because you think it is a lesser crime!
Can You Take Someone to Court for Trespassing?
Yes. You will definitely have a case if the trespass results in damage, breach of quiet domain, or is done in connection with harassment, stalking, or some other crime.
If a specific person has repeatedly trespassed on your land, say to hunt illegally or for some other purpose, you’ll definitely have a case.
Special Instances of Trespassing in Minnesota
There are several special instances of trespassing in Minnesota, typically revolving around other closely related clients that aren’t, in and of themselves, trespassing by definition.
Near the beginning of 609.605 you’ll see that trespassing is also considered allowing domestic animals or poultry under your control to go onto someone else’s land within a city, interfering with any monuments, signs or pointers that designate a boundary, subdivision, or tract and damaging fruit, fruit trees or vegetables on someone else’s land, to include taking the fruit or vegetables of a plant.
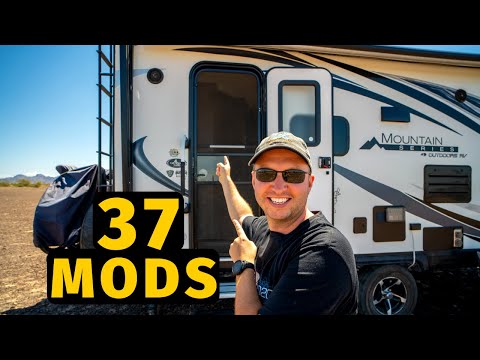
Millions of people around the world use RVs or Motorhomes or even day-vans for a variety of reasons.
They provide some of the comforts a house provides, heat, an oven, table, comfy chairs and a bed to name a few.
Preppers will modify an RV for their Bug-Out Vehicles for the same reason, as comfort is king!
You can even get trailers for RVs like Winnebagos to tow other vehicles or find an RV that stores a vehicle onboard hidden away.
As preppers, we have to know what to store in there, we also have to understand safe stops might be hard to find, so make our own.
The Vehicle: RV and What is Out There And What are their Pros and Cons?
What is an RV? It stands for Recreational Vehicle, in some countries they call it a Motorhome.
They are usually single-story houses on wheels if you will. They contain a kitchen, bathroom, and bedroom, some are more than two berths and so have extra sleeping areas, and some require the vehicle to expand to create more space.
Some are purpose-built RVs like Winnebagos, and some are normal vans with folding bed-chairs in them along with a few storage cabinets; they are referred to as day-vans.
They are not as comfy long-term but will do the job, especially if you’re using them as shelters in a safe location where they work well enough for two people.
You can purchase some great RVs, some need towing and some can tow as they are a vehicle.
SportTreck Touring Edition
I have seen the 2022 designs and they are modern and nice, with much of the comforts found in a home, the floor plans differ depending on what you want. This can be towed by most vehicles.
Pros
Cons
A separate unit for your vehicle
You have to attach it to your vehicles
Lots of room to store supplies
The possibility of Jackknife
Separate Vehicle for supply runs
The possibility of losing your trailer/caravan
The Hellwig Rule Breaker
This is a camper that becomes part of the vehicle, some are a Nissan Titan XD.
Pros
Cons
Attached to the vehicle
Less room to store supplies
The ability to tow smaller vehicles
Only two people can sleep in the vehicle
Makes a great long-distance scout car
If the vehicle is taken you lose your shelter
Motorised Motorhomes
Winnebago
This is possibly the most famous of any motorhome, the one I found is the 2020 Journey (Class A) and diesel. It is a cozy-looking vehicle that can store much of your prep supplies.
The RV is smart with everything controlled via the onboard touchscreen or your phone. They also do an EKKO which is also nice.
Both have the same pros and cons, one might have a unique pro and con, and this will be labeled.
Pros
Cons
Both are a complete unit that gives access to the steering wheel
If either is taken you have nothing
Both can sleep more than two people
Little space to move around
Lots of storage for supplies
You need to tow other vehicles
Both can two smaller vehicles
Tire changing has more steps
Laika Kosmo F510
The Laika Kosmo F510 is not as big as the Journey but offers spacious overhead storage, above the driver is a sleeping area as well as in the back.
Dembell Land
If you have the money for a Dembell Land that will be perfect. Lots of room for a family and supplies and carries a small vehicle, the downside is to drive it now you need a licence to drive a bus.
Terra Wind RV
If you have the money a floating RV is what you need. A flood won’t stop you from surviving in This beauty.
Lots of space to store all your preps and comes with a built-in dock for jet skis, the only downside is the dock looks easy to access and you couldn’t tow a vehicle. Again you will have a bus licence to drive this.
Thor Motor Coach
This is a diesel 4x4. This will sleep up to six people and it also has lots of space for supplies.
Being both diesel and 4x4 you should be okay to travel most terrain and with old chip fat extend the diesel you use.
The windows are tinted for helping with harsh light and security. The roof looks good for additional supplies storage and as a lookout post.
This also comes with a pre-wired solar panel, which you can wire in a wind turbine for extra power as well as a portable generator.
Driving an RV
When it comes to driving one, it can be tricky to maneuver at first, a trick many uses are cameras and sensors, they allow you a full 360° view of the vehicle and tell you how close you are to objects, like curbs or posts.
Depending on the weight or category you may need a new licence.
In the USA, if the RV is over 26,000 pounds you need a new licence. Anything under that is covered by a regular licence in all 50 states.
In the UK, you will need to know what category the vehicle falls into as well as your age. To do this you find out the MAM or Maximum Authorised Mass.
Anything under 3.5 tonnes is drivable on a full licence. Anything between 3.5 tonnes and 7.5 tonnes needs a Category C1.
Anything above 7.5 tonnes you need a Category C licence. All standard UK full licences are Category B.
However, during times when the law is voided, you can drive unrestricted by license.
Prepping a Van as an RV
Yes, you can do this, some find it cheaper to do this, however you sacrifice a lot of comforts.
Many commercial vans are modified to do this. You may not get the same amount of room as a motorhome or RV, however many can have roof sleeper boxes attached to accommodate one to two more people.
You will most likely fit a folding bed chair and a few cupboards for storage and for your leisure battery or batteries.
They make good scavenger vehicles though as they can store a lot when you sacrifice the bed, they will normally sleep two people at least unless you attach a sleeper box to the roof, then up to four people can sleep in the van.
That is why many will use converted vans just for overnight trips.
Some people carriers can do the same job, however, they will sleep only two people and you have lost space for supplies.
Some Pick-ups can have caravan attachments, but you lose the safety of being able to get to the steering wheel quickly, like in a Winnebago for example.
If you can get a Winnebago or a similar motorhome then that is the best bug-out vehicle, you can have a secondary small vehicle or vehicle as a scout and for quick supply runs, which you can tow on a special trailer, or if you are lucky store within the RV.
How Long Can You Survive In An RV?
The short answer is: a long time, depending on how well you maintain the vehicle.
The long answer is: it depends on your various fuel supplies and how good you are at fixing the vehicle as it will degrade over time.
As long as you can take the measures to combat dampness, rust and mould you should have a habitable vehicle for a long time.
RVs have a freshwater tank that has around a 60-litre or 13.198 gallons capacity.
One person is advised to drink 2 litres or 0.44 gallons a day, so a full tank will last one person 30 days, however, that projection decreases when you need to use water to make a meal.
If you do two meals a day you will use some of your water supply, you should estimate about a ten-day supply for one person to be safe, however, you can stretch this with bottled or containerized water, like in a water jerry can.
You can also replace the factory tank with larger freshwater tanks, you can get ones that are about 120 litres or 26.396 gallons.
You can also replace the factory-installed waste water tank with a larger one so you spend less time emptying and cleaning it.
If you use the cupboards wisely then you can store at least a month’s worth of food in MRE or ration packs or dehydrated or tinned form when stored properly.
The fridge should also work as long as the leisure battery is operational, allowing the storage items that need to be chilled.
Stockpiling Food
How much can you stockpile? The answer is a lot. You have all those cupboards that you can fill with MRE’s, ration packs, and tinned foods.
One MRE ration pack is equal to a meal. One person would most likely eat two once a day.
Each cupboard, minus your camping plates and bowls, will be able to hold at least two 24-hour boxes, which is equal to a daily meal intake.
Then your RV should hold a month’s worth without including the wardrobes or fridge/freezer, this will give you about 39 days of food, which you can use when having to scout.
You can also stock emergency food buckets around the RV and when bulk ordered they can last between 6-12 months for one person.
Some cupboards will only hold one bucket at best, it is best to stock up on tins as well.
One shelf of a cupboard could hold 27 tins, so the whole cupboard could hold 108 days of tinned food, the equivalent of over 3 months worth of food for one person.
Hunting and fishing will help reduce the need for a ration pouch, if you can preserve the meat then you have a longer survival time than those boxes and buckets.
This is useful as it will get you past the chaos that unprepared people will cause because they went three days without a meal.
The timeframe to stock is on you, food is one of the most important preps and so, depending on your way of prepping it could take you one to six months to fill the cupboards with rations boxes and stored buckets.
Water in the RV
The RV will have its water tank and that can be anywhere between 60 litres or 13.198 gallons, it’s enough for one person for about ten days.
Water when sold in shops comes in bottles, some small, some large and some that need a water dispenser. The large bottles take up less space when being stored.
However, you can buy camping water containers, some look like jerry cans, some have taps, and others have wheels.
These are going to be a better way to store water as the jerry cans can store stacked, while containing 25 litres or 5.499 gallons of fresh water.
You will also need to ensure a good supply of ways to purify water, purification tablets are good, and you can get purification straws that allow you to drink from a body of water, these are easily stored in your pack or small cupboards in the RV.
You can also boil the water first, this will remove much of the toxins in the water.
Activated charcoal is also good, as it is useful in other ways. A must for your bug-out vehicle.
RV Modifications
A larger capacity freshwater tank and wastewater tank are a must if there is room, you can not survive long without a good fresh and clean water supply, and you will last around a week without water.
This allows for you to have a reserve freshwater supply that will last around ten days when working off bottled water as well.
Some basic modifications I would suggest are special tires that will not puncture or will run flat when attacked.
You will have to reduce your speed to about 90 km/h or 56mph and your distance will be greatly reduced to about 16km or 10 miles, but the trade-off is worth it as you will be able to carry on your journey for a little while.
Another idea would be a security system. This will protect your RV from unwanted attention and them trying to break in, especially if it catches attention.
Armour is another idea, armouring the weak points will greatly improve the longevity of the vehicle, like the fuel tank, protecting the windows is also a good idea.
You could modify the roof with a hatch and set of pulldown ladders as this will allow you to use the roof for various purposes like a lookout.
You can modify the bed/seat furniture and turn it into a hidden safe to store extra supplies, gear and weapons with hidden draws or a large safe, this will help keep the cupboards free for other things, like a surge protection unit.
The addition of a battery bank would also be a good idea, the more power you can store the better your chances and you can use some electronic items like radios.
A larger fuel tank would also be a good idea. It will not only increase the projected range but compensate for the weight of the modifications.
A large inferred concealment tent stored on the roof is a good idea. This will unfold at night to cover the RV allowing no heat and light to escape and help conceal your location.
I can go on and on about RV modifications, however at the end of the day the choice is yours, all I am doing is giving you ideas from what I have seen and would like to include in my build.
Some preppers will attach floodlights to their RV. This is a good idea as lighting up an area with bright lights will aid in defence, you can get ones that are linked to a remote or fob, ones that you can either pick which light around the RV or choose to have them all on is a bonus.
Energy Production
If you can get a hybrid RV then that would be a bonus as you can keep the motor battery charged with solar energy and you can attach dynamos to the wheels to produce even more energy.
Solar panels would be a good idea as this will help reduce the fuel consumption to heat water for a shower, as well as help charge electrical devices among other things.
You will have to install surge protection, this will ensure your vehicle does not fall prey to EMPs or overcharging of the battery bank.
You can store a generator onboard, this will help produce more power, however, this will eat into your fuel supply.
Yes, you can get wind turbines for your RV, another bonus for charging your batteries.
Basic RV Maintenance
To keep the vehicle running and inhabitable for as long as possible, learning how to repair the vehicle is a must, from changing a bulb to fixing the engine is something you should know.
Just like you need to keep an eye on the engine water and oil in your everyday vehicle, so too must you do it for your RV or suffer a breakdown, which in a bug-out situation is a nightmare.
Cleaning the Water System
Cleaning the freshwater system is a must, you do not need to end up ill because you did not clean the tank or piping. This needs to be done once a year or if you scavenge one.
You can do this with chlorine bleach and freshwater, you can do the same with the wastewater to stop a build-up of smells and bacteria that might find their way into the RV.
Maintenance Information
Creating a folder with all the maintenance information you need would be a good idea.
It should detail what modifications you have made, how they need to be maintained, and how to maintain the vehicle in general, this should be readily available, along with a tool kit to help maintain the vehicle.
Damage Checks
You should also make it a habit to check the vehicle over each morning and note any damage or unusual markings you find, after a full sweep of the area.
This will help further the familiarization of your vehicle to ensure nothing has been added or taken, which is vital for your survival.
Regular Cleaning
Keeping the vehicle as clean as possible is also a good idea, especially the inside, this will reduce the chances of anything growing or infesting your RV and boost morale.
The toilet will need a good clean almost every day as this will stop bacteria and smells, especially when you have no choice but to use the onboard facilities.
To maintain your toilet you will need to use a blue and pink solution, one is the fluid and the other is the rinse. You will have to add fresh water to it, which eats into your water supply.
You can get a deep cleaning acid wash that will help kill bacteria, which you can use once a week.
A mould lichen and algae remover is also a good idea. You start growing those and it gets everywhere, again you can use this once a week.
A supply of hand gel is a must, this will stop the spread of bacteria that can cause you to fall sick.
Keeping the shower clean is also important so stocking up on shower head cleaner is a must, as if you can’t keep that clean you’ll find it hard to be clean.
Regular Inventory Checks
Also, a good supply of toothpaste, toothbrushes, soap, and shampoo is a must. You can learn to make toothpaste, which I may do in an article for another time.
You can get body and hair wash which will do a good job and will take up less space and some can also be used as washing up liquid.
A clean sink and pipes mean a happy survival. Stockpile cleaning solutions for those as well.
Know Your RV
Learning how to change an RV tire is also a must. If you can not you might need to abandon your RV and that is not good when trying to survive.
As for fuel, Diesel is better as you can locate other diesel sources like red diesel, though normally banned to normal motorists, you should be able to find sources when in an apocalyptic situation though.
Remember red diesel is illegal in some vehicles and should not be in your vehicle unless the law is voided.
Old chip fat will be important as it will help reduce the diesel used, although illegal normally, you can do this in an apocalyptic situation, this too is illegal and should not be in your vehicle unless the law is void.
Also, know if you can refill the distilled water of your leisure batteries, this is simple as boiling a kettle, letting it cool, and pouring it into the circular holes using a funnel.
If that doesn’t work the battery will need a jump start using a charger, if that does not take then you will have to replace the battery.
Making An RV Feel Like Home
There are lots of ways to do this from curtains to wallpaper. Modifying the inside is important as you do not want to feel trapped when the situation arises where you’re unable to leave your RV.
The important thing for wallpaper and curtains is they can be easily cleaned and repaired, replaced, or regularly changed when the time arrives.
You can get washable wallpaper and that will go a long way, especially if you are a messy cook.
As for curtains, I would have three sets for every window that can take them, with the windscreen having a pull-down blind.
I would have three sets of bedding per bed, that way I can wash them once a week to maintain my and my family’s mental health and wellbeing.
If you’re looking to put up shelves or other wall hanging items get advice about the RV internal wall first as you need to maintain the structure as best as possible.
A manual washing machine is very helpful. Washing clothes is a mundane task that we must likely opt out of and let a washing machine do.
A hand turn one is small enough to store, you have to remember that it will take from your freshwater supply.
You will also need to have all the washing supplies, such as powder and conditioner stored, but it’s a task that can save your well-being and mental health.
Having games that do not require electricity is a great bonus for your bug-out vehicle prep.
They offer hours of entertainment and for the young children a fun education, past the various prep, education, and entertaining books you might have tucked away for their education, as you might now have the power spare to play their favorite DVD movie or series.
Final Thoughts
An RV like a Winnebago is a great bug-out vehicle once you have modified it to your needs, like green sources of energy, surge protection, and making it feel like a home.
Towing a bike of some kind or small car allows you to scout areas and bring back supplies, this will allow you to conserve the diesel of your motorhome. Knowing how to maintain the motorhome is vital for survival.
Remember: The prepared survive and the wise thrive.