Friday, April 29, 2022

7 Reliable Alternate Power Sources in an Emergency

For most of us, especially people who are planning to bug in during most survival situations, having the capability to provide reliable electricity in the absence of public utility grids is a worthwhile goal.

Briggs & Stratton generator
a Briggs & Stratton generator

Electricity is far more than a luxury made possible by modernity: it is overwhelmingly responsible for providing climate control, food preservation, and more essential capabilities.

Having electricity means you can keep vital medicine cold, keep your now-precious food from spoiling, and beat the ever hostile outside climate.

Not for nothing, it will also keep the lights on and the darkness at bay!

But as you have already inferred, you cannot rely on an increasingly fragile and decrepit public power network to hold up to the stresses and destruction of a major disaster.

Resulting from a natural weather event or other catastrophe, or from purely man-made destruction you can bet your bottom dollar that one of the first casualties in any SHTF emergency will be the power supply.

But, as preppers, we know that every single thing that we want, everything that we depend on, is purely on us to provide.

Electricity is no different, and though you probably cannot install and much less run regional power infrastructure yourself you can do it on a much smaller scale with household or personal emergency power generation systems.

Today we will take a look at seven reliable sources of emergency power that you can depend on to keep your devices charged, your appliances running, and lights burning brightly.

Go Big or Go Mobile

In stark contrast to eras gone by, the generation of electricity is no longer limited to massive, building-sized installations that can take advantage of favorable terrain features, natural phenomena.

Preppers and ordinary citizens can now both enjoy power on the go or in austere environments using nearly the entire spectrum of electrical generation technologies.

For virtually any power requirement, device or personal situation there will be at least a couple options that will serve your needs beautifully and reliably.

If you are planning on bugging in and riding out the worst of things in your own home, you’re probably only worried about keeping power flowing into your house whatever else has happened.

That is certainly a valid approach, too. But I would like to point out that this is not just a matter of personal preference, or an obvious choice based on your default SHTF response plan

There is a clear case to be made for making use of both forms of power generation as part of a well-rounded, holistic readiness lifestyle.

You should be able to rely on smaller, portable electrical generators for on-the-go or in the field feeding of your devices, and whole house or fixed site systems for powering larger appliances and “survival critical” equipment.

Neither of these options to find your identity, so why can’t you use both?

A person who is committed to bugging in might find themselves forced to grab their BOB and flee into the night, despite their best efforts, and when that time comes they will be damned glad they brought along some portable power sources.

The reverse might be true for a prepper who is always on a “hair-trigger” toward bugging out, as the best solution might obviously be to stay put.

In that case, being able to rely on their in-home infrastructure per usual would be a huge advantage.

Regardless, consult the list below and you are bound to find at least two power sources that will serve you well.

7 Reliable Alternate Power Sources in an Emergency

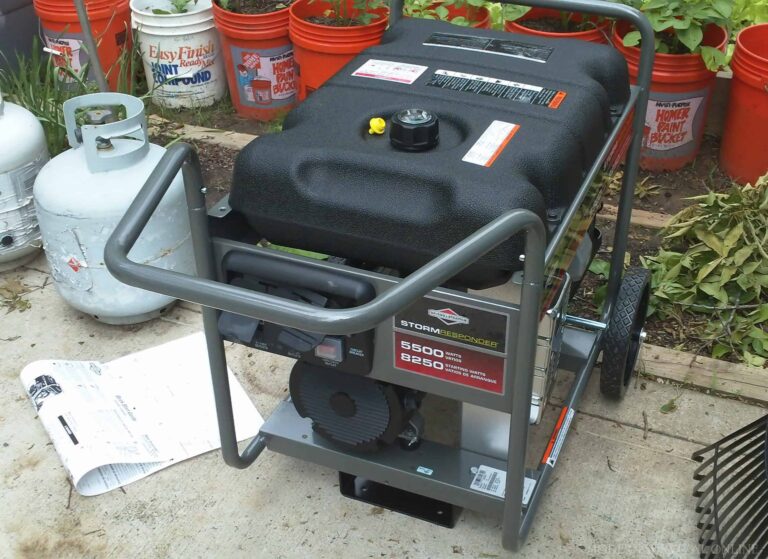
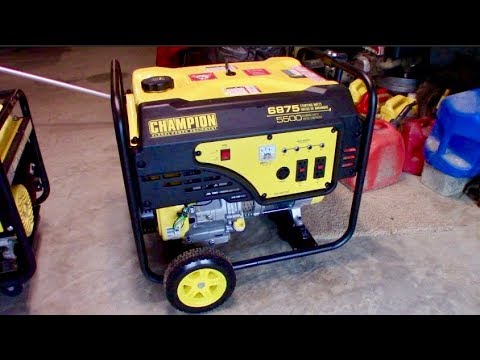
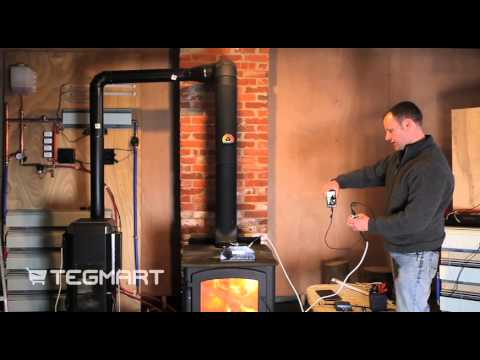
Gasoline / Diesel Generator

A backup, liquid-fueled generator utilizing gasoline or diesel is probably the quintessential backup power source most people think of when it comes to disaster preparedness.

In theory, all you need to do is fire up your generator, flip a switch to supply the generator’s power to your house, and you’ll be able to run your home more or less like normal in the aftermath of a disaster. 

In practice, there’s quite a bit more to do to keep a liquid-fueled generator viable as a standby source of electricity.

Obviously, they require fuel and modern fuels, particularly gasoline, don’t have lengthy shelf lives unless you treat them with additives and special storage requirements.

YouTube Video

The generators themselves require maintenance, inspection, and careful integration into your home’s electrical system.

Not for nothing, they are also popular targets for theft, so you’ll have to take pains to secure them.

In operation, they are noisy, smelly, and (if not being run outside) generate significant exhaust fumes that must be properly vented to prevent the creation of a hazardous condition.

However, despite these shortcomings they are one of the best overall solutions for reliable, on demand power, requiring only fuel in order to create electricity in the bargain.

These generators are one of the few consumer options capable of reliably powering the largest and hungriest appliances, including refrigerators and air conditioners.

There are portable generators that are reasonably mobile if being moved by a vehicle or by a team of men, but there are very few that are truly man-packable.

The good news is, however, that generators are available in all kinds of sizes, from compact, “essentials-only” residential models to gargantuan standby generators that can power entire complexes, limited only by their lengthy “up” times and the supply of fuel on hand.

These should be one of your first considerations for all around preparedness, especially if most of your plans revolve around bugging in.
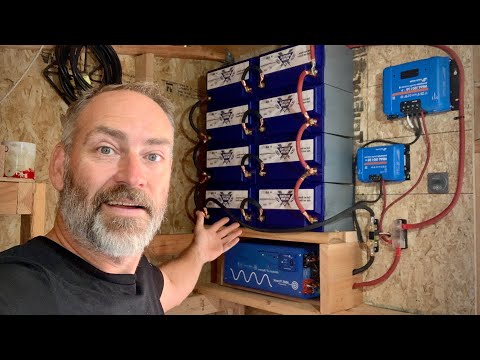
YouTube Video

Battery Bank

If you want to get technical, batteries in all their many shapes, sizes and formats are power storage devices, not power generation devices, but they are still a source of power for you and your personal electronics and appliances so long as they are charged.

In this capacity they are one of the very best on demand options that you can use.

Nominally, all you need to do is flip a switch or plug in directly to make use of the electricity stored in an inappropriately set up battery or battery bank.

When it comes to battery banks, most preppers immediately think of the small, compact units that serve as a good accompaniment to a smartphone or laptop, something that can extend your up time while away from a power outlet.

These handy, reliable devices are also just the ticket for recharging radios, GPS sets and any other portable device.

However, larger, whole house battery banks consisting of deep cycle batteries can store a remarkable amount of power, enough to power major appliances sparingly or an entire home’s worth of low-drain fixtures for quite a while.

Although seemingly complex when looking at them as a layman, these systems are easily understood and comparatively easy to install, even as a seasoned DIY-er.

They’re the perfect complement to genuine power generation equipment in any form, and the overall boost in efficiency provided by capturing surplus power that would otherwise be wasted cannot be overstated, especially for long-term survival scenarios.

Even better, a properly set up battery bank can instantly switch on and maintain the supply of power to dependent electronics when primary power fails, meaning you won’t lose crucial data or risk any sort of mishap that might damage the equipment in question.

Anyone who has ever lost a refrigerator to a power surge or brownout knows how disappointingly common that event can actually be!

Battery banks, large and small, do require a little bit of know-how and some particular maintenance to ensure reliable operation but the benefits far outweigh the investment of time and knowledge.

Solar Array

Solar power systems are the current darling of nature-loving, green energy zealots.

Though these systems are probably not quite ready for prime time as reasonable, regional power production facilities, you should not let their association with climate bullies and duplicitous politicians dissuade you from making use of this mature, reliable and effective technology for home and field use.

Simply enough, solar charging arrays make use of one of the most copious and reliable sources of energy around to generate electricity suitable for use in a variety of settings.

It’s all in the name: that energy source is of course the sun, or rather the rays emitted by the sun.

When the sun’s rays strike the solar cell they are converted into electricity, and either immediately transmitted to devices that need them or, somewhat more commonly, stored in an onboard or separate battery for later use.

The advantages of this system are obvious. The sun’s rays are effectively free for the taking, and the only thing this system requires for success (so long as it is in a good state of repair) is a clear view of the open sky during daylight hours.

YouTube Video

Modern solar systems, even compact, portable ones, are surprisingly efficient and can rapidly recharge all sorts of power hungry devices and are reasonably quick when the time comes to refill big, energy-dense batteries.

There are some fairly obvious drawbacks to these systems, however, but everything is a trade-off in the end.

They obviously do less than no good at night, and their effectiveness, not to mention their speed, is greatly hampered in overcast weather, or if you are unable to periodically babysit the charging array and keep it pointed square and plum directly at the sun.

But, residential solar systems show considerable promise, either as separate arrays for larger parcels, or integrated into your home’s roof, a fairly seamless installation.

They can function to greatly reduce your monthly utility bill in normal times, recharge an attached whole house battery system, or provide a reasonable amount of standalone power in case of a grid down scenario.

These systems really shine, pardon the pun, in places with a high UV index, particularly the American Southwest.

Wind Turbine

“Windmill” power generators, more properly called wind turbines, are another greatly beloved concept that is constantly peddled as the cure to all of our woes by the legions of climate hystericals.

Again, despite their inadequacy as a replacement for fossil fuel power plants on a regional level, the technology does have quite a few merits for clever preppers, and you should not let political debate over these systems blind you to what they can do for you on an individual level.

YouTube Video

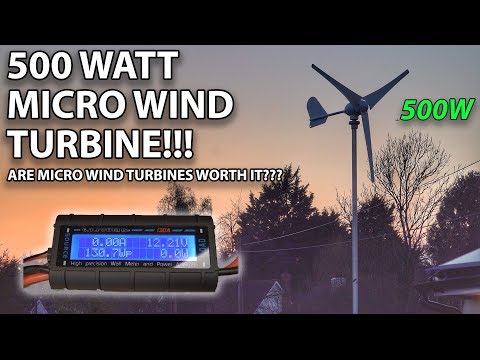
Windmill power generators work by, obviously, harnessing the wind, and turning kinetic energy into electrical energy.

Though they can be surprisingly productive, wind turbines are at best an intermittent source of power, being completely dependent upon a sustained, peak level of wind in order to function properly and produce usable electricity.

If the wind isn’t blowing, they aren’t generating power, and even in traditionally windswept places there will be days where the wind is inadequate or absent entirely.

On the other hand, the wind will blow even at night or on cloudy days, and this might result in better net energy generation in certain circumstances compared to solar systems.

Wind turbine technology is well understood and generally reliable, and in total makes wind turbine power generation inadequate for sustained production but great as a supplemental source of power.

Additional problems with wind turbines include the difficulty in balancing their lifespan and fatigue factors against the energy they are likely to produce.

They can wind up being a “loss leader” when it comes to expenses if not properly maintained or in place.

Though these systems are iconic, and everyone is familiar with the sight of enormous, three-pronged rotors dotting the landscape everywhere from Texas to Northern Europe, portable versions do exist, and are a viable choice for preppers, especially those in wide open places where wind is ample.

Used on a small scale like this, they function somewhat better and more reliably as they are able to generate levels of electricity meaningful for an individual fueling a couple of devices compared to depending on them to power entire cities.

YouTube Video

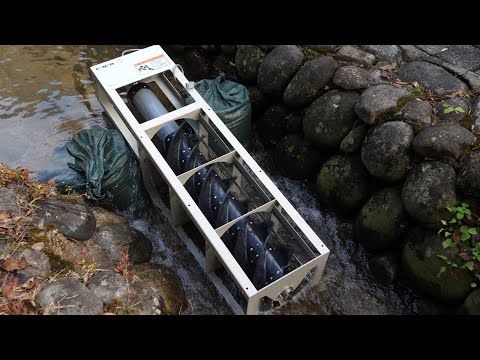
Hydroelectric Generator

Out of all the naturally sourced power available, hydroelectric generation is generally the most consistent, and one of the most productive, forms.

Once again, hydroelectric generation converts kinetic energy to electrical energy by way of a turbine, and since the force of moving water is often substantial hydroelectric generation proves to be the go-to for large scale or energy-intensive applications.

In a civil setting, we typically think of dams when we think of hydroelectric generation, with such iconic structures as the American Hoover dam and China’s Three Gorges dam standing out in the popular imagination.

No doubt, they are monumental works of engineering, and also responsible for producing the majority share of power for consumers in their area.

The advantages of hydroelectric power are that it works pretty much around the clock, assuming the equipment is in a good state of repair, so long as the water is moving.

As most of us already know, this is more or less a constant assuming drought conditions are not a factor or some other mishap has, somehow, diverted or stopped the flow of water from reaching the turbines.

Freezing conditions are one such natural occurrence that could prove to be a showstopper for hydroelectric generation!

It is easy to understand why some people would think that the utilization of hydroelectric power is beyond an individual, but that is just not true any longer.

Hydroelectric power is available to consumers at a structural or whole house level, and even on a portable level.

Integrating hydroelectric power into an existing structure reliably is mostly a matter of having the good fortune to be located near a sizable and swift moving river or waterfall.

On an individual level, portable hydroelectric turbines prove to be compact, lightweight and ready for deployment into the nearest stream or river that you are camping near, channeling electricity back to your battery bank via means of a long, waterproof cord at any time, day or night.

Though highly circumstantial and obviously totally dependent on the presence of moving water, hydroelectric generation is one of the most consistent and robust forms of power generation available to preppers today, even for emergencies, and should not be underestimated.

YouTube Video

Thermoelectric Generator

Thermoelectric generation functions on the principle of converting heat energy into electric energy, and in practice is highly adaptable to a variety of circumstances and other operations.

Anything from wood to trash can be burned in order to harvest electricity from the flames, and this is another technology that is surprisingly scalable, being used in massive industrial settings as well as the smallest, packable thermoelectric stoves for hikers.

The single biggest problem with thermoelectric generation is that, even with the best available technology in application, it is not particularly efficient.

That being said, this is not just a math problem to be solved, as the true net gain for settlements (as well as individuals) can be substantially higher if a burning process was already underway for some other purpose and thermoelectric power generation is incorporated as a way to get more “bang for your buck”.

In an industrial setting, or even a traditional power plant, thermoelectric generation can make use of what would otherwise be waste heat.

For individuals, this could be something as simple as a basic camping stove burning twigs and other debris for boiling water, or preparing dinner also fueling an onboard battery pack or charging a device directly.

One should not discount the sheer amount of burnable fuel in a given area. This technology is far more viable, and sustainable, in certain places compared to others.

One quirk of thermoelectric generation is that it seems to produce the best results at either end of the scale, either small scale, individual production or large scale, regional production.

Setting up a thermal electric generator system for a house or single structure is possible, and quite a few people do it in remote places, but you’ll be burning literal tons of fuel for comparatively little useful electricity in a setting where you’re running any major appliances. That fuel might be better spent as firewood or something else.

YouTube Video

Manual Crank Generator

All of the power generation methods on this list require something in the bargain before you get electricity out of them. That’s physics, man.

And aside from liquid-fueled generators, drawbacks inherent to each of them could prevent you from creating electricity at the instant, should you need it.

There is one type of generator that can provide electricity on demand so long as you’ve got the muscle, and those are manually cranked generators, sometimes called dynamos.

These generators work very much as you are probably thinking.

Depending upon the size of the unit in question, they can be cranked by hand, both hands, pedaled like a stationary exercise bike or even driven round and round by two or more people using a contraption that looks for all the world like a giant hamster wheel.

This is one category of generator that only lends itself to personal and structural use, they simply are not scaled up any larger since they are human operated as a rule.

The most common units in this category by far are the compact, hand-cranked types that are used to fuel personal electronics or recharge small power banks.

You have probably already seen these, and might already own one, in the form of a hand-cranked emergency flashlight, or modern emergency radio.

The radios for years have featured a hand crank for its own power source, but increasingly send surplus power to an onboard battery that can be used to recharge phones and other small devices plugged into it.

Larger models like the aforementioned stationary bike type can produce surprising amounts of power once you get them up to speed, capable of powering mid-sized radio sets, multiple lights and more.

The most obvious shortcomings of these units are also exactly what you would anticipate. They are entirely, 100% dependent upon the input of human effort, and the limits of human endurance.

If you aren’t cranking or peddling, you don’t get any juice! You might say they turn sweat into electricity!

But despite their constant need for human input in order to function these are one of the few generators that can immediately begin pumping out electricity so long as you have the energy and willpower to put into them.

This on-demand capability makes them useful for all kinds of situations.

Never Lose Power

You need not be dependent upon the electrical grid in any survival situation so long as you have taken steps to procure and correctly implement your own emergency sources of power.

Whether you need a whole house backup generator or a compact wind turbine as a component of your bug out compliment, you are certain to find your next power solution on the list above.

With the right systems in place your power demands will be met no matter the situation!


via Modern Survival Online https://ift.tt/ZzFTH6v

Sunday, April 24, 2022

Lucid Dreaming | Use of Lecithin to Increase Dream Recall & Lucidity

So, in my exploration of baking bread I have stumbled upon something called "lecithin". It is a natural food product that comes from sunflowers, soy, eggs, and other foods. People use it in bread-making for the emulsifying effect. However, I immediately noticed that it naturally contains a type of choline (phosphatidylcholine). This sparked my interest, as acetylcholine is a neurotransmitter highly involved in dreaming - and higher amounts of it in the brain are strongly linked to lucid dreaming.

Not only is lecithin used for baking, but also as a supplement. People add it to shakes for brain health, enhancing memory, and as a general nootropic. I am curious to see how this product affects dreaming - vividness, recall, and lucidity.

I'm guessing this is going to be much less potent than Galantamine, Huperzine-A, and/or Alpha-GPC, as those supplements use acetylcholine (the type that goes straight to your brain), or block it from being naturally used up. For that same reason, I avoid those drugs as they mess with the natural order of things/the chemistry within the brain. Our foods don't typically contain this type of choline.

I like the idea of lecithin because it's a natural food product, the natural food form of choline (not modified to be the type that affects the brain more directly), and therefore, lets our body do the work to determine how much would get converted into brain-friendly acetylcholine. I feel like that may make it a safer supplement for healthy people to take. At the same time, it would provide our bodies (and brains) with all the choline it needs to be at peak performance - as our diet can often be lacking. Much like taking a protein shake when trying to build muscle.

Thoughts? Anyone have experience with it?


Here is a link I found from another thread from long ago that discussed lecithin and its use with dreaming:

https://www.dreamviews.com/attaining...am-recall.html


via Lucid Dreaming - Dream Views - Attaining Lucidity https://ift.tt/iNmUGVK

Wednesday, April 20, 2022

Tent Security: How to Secure Your Tent and What is In It

Outdoor activities and tents often go hand in hand. Whether you’re on a multi-day hiking or camping excursion or in the middle of bugging out, or just a bug out practice run, your home away from home while in the middle of nature will likely be a tent of some sort.

This tent is going to keep the worst of the weather not only off of you but also off of your gear.

two-person tent

The problem is, tents don’t offer anything in the way of security, especially compared to a legitimate structure. Whatever you store in your tent is just one pull of a zipper or flick of the wrist away from being taken by an amoral thief.

Sad to say wherever you find people you will find people that are ready, willing and able to steal. This naturally presents a problem for those who are out camping for any reason because you can never be entirely sure that your stuff will be there when you get back.

But as it turns out you do have options when it comes to securing your tent and your valuables. In this article we will talk about what you can do to protect your tent, and what is in it from the thieves and other malicious people when you are out camping.

Thieves are Always Around

It is an awful thing to contemplate, but no matter where you go, no matter what you are doing, and what the greater situation is, you’re always going to encounter thieves. People who will take whatever you have with no remorse, and even do it after looking you in the eye or sharing a meal with you.

It doesn’t matter if you are in the middle of a packed campground with other like-minded people who are taking part in the great outdoors, or desperately trying to stay one step ahead of encroaching trouble during an SHTF situation. Thieves are going to steal, that’s it.

All we can do is try to thwart them. If we make our stuff too difficult to get to, they might not waste their time with it. If we make it too noisy or too obvious to gain access to they may very well not risk getting caught in the attempt, caught either by you or by someone else.

Thieves as a broad and general rule generally like an easy score, that’s why they are thieves. They don’t want to have to work for their meal.

Yeah, it’s a crying shame. You can chalk it up to sin, desperation, decay of society and culture or anything else you want, but you’ll have a much easier time dealing with the problem on the practical level if you just accept it. Anywhere you go that there are people, you could be dealing with thieves in your midst.

Lock it Up

For some folks, the simplest solution when it comes to protecting their goods and keeping honest people honest is to simply lock their tent. It’s not rocket science! Anything from a common combination lock of the kind used on luggage to specialty zipper-clamping tent locks will do the job.

These devices all work by essentially keeping the zippers on your tent’s closure or flap shut and held tightly together so that the tent cannot be entered by the normal way. You can even rely on nothing more than a short length of strong cord, properly knotted, to hold your zipper’s closed.

For “friends” who turn out not to be trustworthy or thieves who only operate with the lightest possible touch, this might be all that is required to keep your stuff safe.

But while it is true that anything you can do that increases a thief’s profile, time on target or likelihood of being caught is a deterrent and will contribute to keeping what’s yours, yours, these tent locks have obvious and major defects that you are probably already thinking of.

While these devices might keep the zippers closed, they do nothing to deter anybody who is intent on gaining access to your tent. Any tent can be opened up like a cheap wrapper using nothing more than a pointed or sharp object.

A motivated thief will simply slash his way into the tent though one of the sides and go right on pillaging your stuff. That’s a depressing thought. Is there anything else we can do about it?

There is No Such Thing as “Safe”

Just safer. It is time to start accepting that there is no such thing as truly safe when it comes to protecting your goods and gear while out camping for any reason. Your stuff is simply going to be more vulnerable, and that is all there is to it.

What’s more, you will have less access to reliable protective measures then you would at home where you could employ massive safes that can be bolted into the wall or even entire safe rooms built into the home itself. That’s the real stuff of asset protection, right there.

Your options are going to be decidedly limited, and likely less effective, while you are camping, or at least they are if you are intent on relying on typical and traditional methods of protecting your stuff. Locked doors, secured containers and all that are just not enough on their own, not most of the time.

But, preppers aren’t going to take “no” for an answer. Preppers are problem solvers, and this is just another new if novel problem to solve. Instead of fighting an uphill battle, let’s start thinking about the problem in context.

What are some other ways to deter thieves and burglars, besides the methods we have already discussed? There is more than one way to skin a cat, and definitely more than one way to protect your stuff.

In fact, you have a few methods that remain entirely viable…

They include avoiding thieves entirely, situating your possessions in such a way that thieves are not willing to risk an encounter or exposure in order to get it or hiding the presence of the erstwhile ill-gotten goods entirely so that thieves come away empty-handed in the event they do make an attempt on your tent.

Some of these methods can even be used in tandem to maximize protection no matter where you are.

In the next section, we will provide you with an assortment of tips, tricks, techniques and procedures for protecting your stuff while camping, and each of them go far beyond the wishful thinking method of simply locking your tent.

YouTube Video

Procedural Methods for Protecting Your Stuff

Below you’ll find many methods for securing your tent from the predations of thieving scumbags. Some of these tricks rely only on clever planning and a little know-how. Others will depend on having the right tools or gear to execute.

Whatever your preferences and whatever kind of camper you are you will be bound to find at least a few methods you can employ to improve your personal security while in the field!

Camp in a Remote Location

In what has to be the most “duh” technique on our list, if you camp in a remote location where people don’t generally travel, don’t hike and typically do not camp you won’t have to worry about anyone stealing from your tent because there won’t be anyone around to do the stealing!

Assuming, of course, that everyone in your party is indeed trustworthy… At the very least it will narrow down your list of suspects considerably.

Camping in a remote and generally untrodden location comes with its own risks and challenges of course, and it is not everyone’s cup of tea, even among serious outdoor enthusiasts or dedicated preppers.

With isolation comes a certain modicum of safety but also a portion of danger, just in a different direction. That being said, if you’re the type of person who likes to camp in such a way that you are trying to get away from it all, why not go ahead and really get away from everything and everyone?

More so with this method than many others you can rest assured that your pack or other belongings will be right where you left them after you take a jaunt down to the river’s banks.

Camp with Friends or “Good Neighbors”

The polar opposite of camping in the middle of nowhere with no one around is camping where you have plenty of people, particularly trusted friends or other “good neighbor” campers who can be reasonably expected to watch over your stuff and your campsite while you aren’t around.

Now, this can be a dodgy thing if you don’t have anyone in your party who is willing and able to stay behind and watch the campsite while you are away, and are forced instead to make nice with your campsite neighbors wherever else you might be.

Yes, most people are generally good, or at least decent, and will not try to hurt you or steal from you but you never really know, do you?

At any rate, having a “guard” stationed to watch over (or at least nominally watch over) your tent and possessions is always a good idea when you are in a heavily trafficked area.

Avoid Easy Ingress/Egress Routes

Another way to help protect your possessions against theft is to set up your campsite in such a way that messing with it will make thieves very uncomfortable, either by making it harder to approach in a nonchalant way or denying them a fast and easy getaway without many witnesses.

For instance, thieves would greatly prefer it if you can’t near the edge of any given campground or ride on top of a trail, ramp, or some other location that lets them get moving at speed while blending into the mass of humanity on the same path.

I have seen this time and time again, with bags, grills, coolers and the like going missing because people thought to save themselves a few steps and camp closer to a thoroughfare.

The farther a thief has to go to access your goods, and in particular the farther he has to go off the path or trail, the less likely he is to choose your tent to burgle, all things being equal. Think like a thief! Set yourself up for success (and them for failure) by pitching your tent well away from any easy escape routes.

Make a Secret Stash

Thieves cannot steal what they don’t know is there. One of the best ways to protect your goods is to hide them, and hide them well. Obviously, this will not always apply depending on what it is you’re trying to protect.

Good luck trying to stash a full size cooler or grill or kayak in such a way that thieves will not notice it! But concerning smaller stuff it is a simple affair to make a small bolt hole or cubby to place them for safekeeping.

Make sure you use care when you are creating and accessing your secret stash, as anybody who observes you will know the jig is up. This is often easier said than done whenever you are camping in a crowded or popular area. However, clever preppers can come up with all sorts of ingenious ways to hide their stuff.

I once had a friend who created a tiny flap in his tent floor that he could peel back, and through which he could dig a small hole in the earth while inside the tent before stashing his valuables in the hole and then covering it all back up. Pretty neat trick.

Also, take care to protect whatever you are hiding in any case, however you are hiding it. Paper money, electronics and other sensitive goods should be placed in a heavy-duty zipper locking bag at the minimum.

Also, don’t forget to dig your goods back up or retrieve them from wherever you stash them before moving on!

Take Only What You Need

This is something of a more esoteric method, but consider taking only the bare minimum equipment that you need, at least if you were going out on a pleasure hike or other outing. I’m always bemused to see how many people drag so many valuables with them out of their homes when they are ostensibly leaving their homes in order to refresh, recharge and reconnect with nature.

Expensive electronics, jewelry, designer clothing, the list goes on. People spend literal fortunes, mortgage payments worth of money, on name brand coolers and other outdoor gear that may or may not do as good a job as gear that is far cheaper.

Believe me, other people know what those status symbol items are and what they are worth, and you will attract attention you don’t want the same as anywhere else.

Try heading out with a minimalist load next time and see how much lighter your burden is, physically as well as mentally! This does not guarantee you won’t have to worry about thieves, but you’ll be a lot less upset if somebody swipes something that is easily and inexpensively replaced compared to your designer “Gucci” gear.

Keep Valuables in Your Car

If you are camping or hiking in such a way that you will be departing and returning to your vehicle, consider leaving your most valuable items in your vehicle if they are not mission essential.

Most parking lots or other areas where vehicles are stashed are typically more heavily traveled and often surveilled compared to areas where you’ll actually be camping, and this means that thieves might not chance exploratory ventures breaking into vehicles compared to breaking into tents.

Note, all rules and procedures for storing goods in your vehicle must be followed, and nothing should be left in obvious sight, nor anything that would indicate what else might be hidden in your vehicle.

Also keep in mind, at the end of the day no automobile can be considered a secure storage container, as they are all easily broken into.

YouTube Video

Technological Methods for Protecting Your Stuff

Use a Security Container

For folks who are just not willing to take “no” for an answer when it comes to securing their valuables, you can still make use of a security container to protect your goods from thieves, though you’ll have to put in a fair bit of work to do it.

After all, any security container that is actually man portable, and one small enough that you are willing to haul along on your camping trip, is by virtue going to be small and light enough that a thief can simply pick it up and carry it away to access it later at their leisure.

To counter this, your security container will need some type of hardpoint through which you can thread a bike lock, cable, chain or some other sturdy attachment system that can then be anchored to a robust tree or some other fixed point that is not easily broken away or otherwise removed.

Only then will this prevent enough of an obstacle for your typical campground raider to leave it alone.

And it must be said that the presence of any obvious security container is an immediate tell that there is something inside worth protecting, and this might actually spotlight your goods for illicit attention rather than properly protect them. I recommend you use this method only when you have no other choice.

Use Tilt / Jostle Alarm System

Depending on what you were getting up to while camping, an alarm system might be a good idea. Specifically I am referring to the type of portable alarm that functions off of a tilt switch that when activated by the slightest movement or disturbance will set off the alarm, typically a loud, screeching warble.

Alarm systems have a way of deterring most thieves because it draws attention to their deeds, attention they do not want! If you are never going to be that far from your tent, this could certainly provide you enough warning to dash back and intercept the crooks, potentially recovering your gear.

Obviously, these systems are of limited utility if you are leaving your tent behind at a great distance while on extended forays, as you might not be able to hear the alarm, but certain models can wirelessly transmit a warning.

Also, they don’t work as well in any setting or situation where they might be inadvertently disturbed. It won’t take more than a couple of false positives for you to start ignoring the alarm and talk, and that’s when you know you’ll actually get rolled for real and be none the wiser.

Motion Detectors

One great thing about the technological revolution is that personal electronics continually get more capable, more reliable and ever smaller, making them far more portable than in years past. Motion sensor technology is nothing new, but it is probably new to you in the capacity of protecting your tent or campsite.

The notion behind a small, portable motion detector is that you’ll be able to dial it in to alert you directly, either with a dedicated receiver or to an app on your phone, when it detects motion according to the metrics you have set. This can definitely provide some serious peace of mind when the system is functioning correctly.

These detectors are best implemented as part of an overall strategy, either placed inside the tent itself as a relatively foolproof sensor for intrusion or along a tightly defined and singular approach to your campsite that a crook would be likely to use.

Obviously, these systems rely on a certain amount of wiggle room when it comes to their detection radius and sensitivity, unless you want to be getting false positives left, right and center.

If every moth and every squirrel sets off the sensor you’ll be going mad while you are away from your tent. Also, this makes them an extremely poor choice for any campsite where incidental but innocent movement is likely to be a frequent occurrence.

Infrared Detectors

Compared to typical motion sensor technology, infrared detectors rely on the heat emitted by living creatures or the heat differential between an object and the background environment to trigger a notification system or alarm.

This makes them very difficult to spoof so long as they are correctly tuned, and properly placed. Good examples of these systems will allow the user to carefully calibrate them in order to prevent false positives from pets or wildlife.

Compared to motion sensors, infrared detectors typically have a shorter reliable range, and this means you probably want to set them up closer to your tent. Depending on where you are camped, properly placing the sensor while keeping it hidden and correctly covering the tent or campsite could be challenging.

Motion-Activated Lighting

If there is one thing that all bad guys hate it is having their evil deeds dragged out of the darkness and into the light. Darkness is always the friend of the villain because it affords them better concealment while they work.

Have you ever noticed how cockroaches scatter when the lights pop on? It is because they know they are vulnerable and the boot is close behind. Criminals feel the same way.

A portable motion activated lighting system that illuminates your campground can provide you a lot of convenience while you are at camp and additional security while you are away.

These systems are completely self-contained and do not require any method of communication with a separate receiver or phone to function, as they are not sending you on alert signal; the light is the alert signal so long as you are close enough to your camp to notice the bloom of illumination while you are away.

Compared to typical motion lighting systems around residential structures or businesses, these can be particularly effective at remote campsites because they are so startling.

You can imagine the nerve-racking tension that a baddie must be feeling while they are creeping up to your campsite, thinking of plundering your possessions only to wind up being spot-lighted like a deer in the headlights! That alone is probably enough to send them running.

Portable Camera System

For the ultimate in assurance campers can rely on portable, remotely accessible camera systems to surveil their campsite. These systems in particular have gotten more affordable and much smaller than most competing security systems have over the years.

These devices are capable of transmitting wirelessly to your phone over their own network, meaning that even if you are in a remote part of the backcountry, so long as you are within a certain area you’ll still be able to check in on the video feed.

The most obvious limitation with these systems is battery life and range, as long-distance forays away from your campsite might see your phone or other receiver lose signal from the base station.

But so long as you are willing to put in a little bit of work ahead of time to know the ins and outs of your system (along with its range limitations) these can be a great option for the security savvy camper.

Tripwire Alarm

As far as “technology” goes these are pretty primitive, but you do, in fact, require a few materials for the task so on to the list they go! The tripwire alarm is one that all boys surely tinkered with when they were young, and all seasoned practitioners of fieldcraft have used before.

The tripwire alarm is as versatile and adaptable as anything else, and can range from the quintessential tin cans full of pebbles to piles of noisy stones or jangly tin plating. It might even be a series of jingle bells strung from fishing line!

All that matters is that when an unwary interloper steps on or snags a tripwire it raises a big ruckus, one that you can hopefully hear whether or not you are at your campsite.

One particularly popular variation for long distance monitoring utilizes a simple “zip gun” setup comprised of an open armature with a paddle that will press a 12 gauge blank onto a fixed firing pin once the attached tripwire is touched.

They are in no way designed to function as a firearm even if you inserted the wrong shell, but this is certainly one variation that you can hear from a very long way away. Not for nothing it will also give an intruder quite a scare!

Security Equipment Must Be Concealed

One thing you must keep in mind if you’re employing any technological methods to help secure and protect your campsite is that pains should be taken to conceal or otherwise camouflage your security solution.

First, a visible security system provides actionable information to the bad guys, allowing them to circumvent or even subvert the system for their own purposes. Bad move!

Second, a visible security device raises the profile of your camp, not the opposite. This could actually make it more appealing to thieves who might have otherwise chosen someone else’s campsite or walked on by entirely.

Not for nothing, the security system itself might be the prize, as cameras, detectors and lighting systems can easily be taken down and carted off. Talk about adding insult to injury!

You can easily conceal most of these systems by carefully painting their outer casings in low profile camo colors that are environment adaptive or environment specific.

Additionally, small, homemade “gear ghillies” can easily conceal sensors, cameras and other devices against easy observation.

You can even use local foliage and other materials, just take care that you don’t contaminate or otherwise degrade the device with dirt, leaves and other detritus.

Protect The Valuables In Your Tent…

Securing your campsite is possible through the use of correct procedures and certain pieces of gear or technology. Securing the tent flap or door alone might be adequate in certain situations where the environment is generally one of high trust, but it will only keep honest people honest,

Any enterprising thief can slash or tear straight through most tent materials to get at the goodies with it in seconds and that means you’ll need to rely on other ingenious methods if you want to provide asset protection or your gear while in the field.

Make sure you review the methods we have shared with you in this article and commit them to memory.


via Modern Survival Online https://ift.tt/lJkbnHF

Tuesday, April 19, 2022

Lucid Dreaming | How to question reality?

Welcome to my third thread! Sorry if I seem annoying but I really hope y'all's advice will finally get me going with my LD practice.

Lately I've been thinking about which method I should apply to attain lucidity. I've concluded that adopting a "lucid mindset" is the way to go for DILDs. This mindset consists of frequently questioning reality and doing reality checks. The problem is, I can't seem to question anything around me at all. It's like I'm always sure of the fact that I'm awake and so my reality checks become useless.

So my question goes: how do I question reality effectively?


via Lucid Dreaming - Dream Views - Attaining Lucidity https://ift.tt/NrkTILB

Can You Really Eat Snow in Survival Situations

Cold weather survival offers many challenges compared to other environments, but one of the perks, if you want to call it that, is the abundance of fresh water to be had in the form of snow.

hand holding frozen snow

Since snow is just frozen water, it stands to reason that you could simply eat it to help rehydrate your body when in a pinch. Is the answer to the question really that simple, can you really eat snow in a survival situation?

Yes, you can eat snow in a survival situation but be sure to melt it first. Also be sure the snow is white, otherwise it may be contaminated.

Though snow consists of fresh water, its low temperature will significantly lower your body temperature when ingested, making you more vulnerable to hypothermia, and may be contaminated at the same as any other natural water source. Ideally snow will be melted and processed before consumption.

However, it isn’t all bad news and abundant snow along with a little bit of ingenuity can in fact provide you with a nearly limitless supply of fresh drinking water in cold, snowy environments. We will talk more about the issues with eating snow directly as well as what you should do to make it safe to consume below.

You Should Not Eat Snow As-Is

Bottom line, you should not eat snow directly in order to rehydrate unless you are truly desperate for water, and even then under the circumstances it might well do more harm than good.

Sure, snow is composed of fresh water and the texture lends itself to eating out of hand or using other utensils, but this is a classic survival example of “robbing Peter to pay Paul.”

Eating snow will provide you with a boost to hydration, but the deleterious effects on your body in other ways mean that it is almost certainly a bad call.

Not for nothing, taking repeated gulps of snow without warming it up is going to start numbing the tissues of your mouth and your teeth in very short order, and that will be quite painful.

What will happen to you if you decide to eat snow anyway? Keep reading to find out.

Eating Snow Lowers Your Body Temperature

The most obvious side effect of eating snow is the reduction in body temperature that will accompany it. Snow is nothing but frozen water, and turning that water from a solid back into a liquid requires a raise in temperature.

Your body is quite warm, especially near its core, so this will do the trick but the trade-off is that you will start cooling off literally from the inside out.

This is no good at all. Any place that is cold enough to produce snow or support snowfall on the ground without melting quickly is cold enough to kill you if you are unable to stay warm.

By lowering your body temperature in exchange for turning snow back into liquid water you’ll be trading one survival priority against another. Sometimes this is unavoidable, but under the circumstances when you have much better options for consuming snow it is foolish.

Also, preppers must know that exposure kills quicker than dehydration almost every time…

Exposure is a Certain Killer in Cold Environments

When discussing survival priorities, most preppers place water at the very, very top assuming they don’t include air on their list of consumables among water, food, ammo and medicine. But when you’re strictly discussing these survival priorities, shelter actually deserves a higher place than water believe it or not.

You can only be able to go a couple of minutes without any air to breathe, and a few days without any water to drink, but you might last only a couple of hours one exposed to a truly hostile environment, particularly a cold environment.

Accordingly, staying on top of regulating your body temperature is absolutely paramount whenever you are outdoors, and it is doubly important in cold environments.

Knowing that, do you really want to start chilling your body from the inside out by eating snow? You might be bundled up with the best cold weather gear that money can buy, but if you are literally putting a cold substance inside your body you’ll be confounding all of your defenses against it!

So, how do we make use of snow for drinking water in these cold areas?

YouTube Video

First Melt the Snow, then Drink

All you need to know to make your snow easier and safer to drink is to melt it first. Raising the temperature of the snow means it will turn from a solid to a liquid and, more importantly, won’t be quite so cold when you drink it.

The fastest and best way to do this is by simply packing a flameproof vessel with plenty of pristine snow and then setting it on or near your campfire to warm it up and melt it rapidly.

This will also significantly raise the temperature of the resulting water and reduce the chilling effect that you’ll experience when drinking it.

But if you are away from camp or don’t have a fire going for whatever reason, you still have options for melting snow and raising the temperature significantly, so don’t despair.

Field Expedient Methods for Melting Snow

There are several good ways to melt snow without the benefit of a fire at all. One of my favorite methods involves packing snow into a water bottle or even a gallon sized freezer bag before stashing it in an interior pocket where your body heat can melt it while keeping the cold mass off of your skin or innermost layer.

This takes time, but is reliable and easy to implement when on the move especially if you have multiple bags or bottles that you can fill.

Another good option is to place the snow in a transparent container and then set it out on a backer material off of the cold ground where it can receive full sunlight. A shiny metallic or foil surface is ideal for this since the reflected radiation will speed up the melting of the snow.

Other than this, you might look for melting ice or rivulets of melting snow anywhere in the environment when temperatures are warming for any reason. Setting up a rainwater collection system type of apparatus can easily gather and direct this melting water into any appropriate container.

No fire, no problem!

YouTube Video

Snow Melt May Be Contaminated

There’s a reason why melting the snow via fire is the ideal option, and this is because it will eventually heat up and then boil the resulting water, purifying it of any hostile microorganisms.

Yes, I am trying to say that the pristine and beautifully white snow you are collecting to convert into drinking water could be contaminated with hostile gribbly germs the same as any other natural water source.

Accordingly, boiling it for safety and then allowing it to cool before filtering it just like you normally do is a great idea. Anything that the snow has been in contact with, anything that has fallen on it, walked through it or otherwise been deposited on it can contaminate the resulting water.

These are things you might not notice when you are scooping up snow willy-nilly and you shouldn’t need me to tell you to avoid any dirty looking or nasty, slushy snow melt unless you have no other choice.

However, by taking some smart steps it is possible to get fresh water from pristine snow that will be about as safe as any natural source you are likely to find.

Look for pristine, fresh snow that has just fallen, and take care to skim this snow off of the surface without disturbing the ground or other substrate below.

Alternatively, setting up a thin, flexible ground cover when you are experiencing snowfall is a great way to prevent it from touching the ground entirely.

Conclusion

You can eat snow to rehydrate, but this is generally a poor option owing to the fact that it will significantly lower your body temperature and make you far more vulnerable to hypothermia.

Ideally snow will be melted and warmed significantly before drinking as water. With a little bit of discipline and the right knowledge, fresh snow can prove to be quite an asset when you need water in a survival situation.


via Modern Survival Online https://ift.tt/LIe7fKM

Monday, April 11, 2022

Lucid Dreaming | My progress (not)

Hello everyone! It's me again lol

I'm making this thread cuz I've been struggling with the advice I got from my previous thread, so I'm once again looking for guidance.

I was told to improve my memory skills and put into practice my critical reflective attitude by doing reality checks whenever I encounter something dreamlike. All of that Is pretty straightforward. What I can't get right is the other piece of advice I got which was to imagine I'm in a dream in order to cultivate the feeling of not knowing wheter or not I'm dreaming. Sadly I haven't found a practical way to do this. Any tips?


via Lucid Dreaming - Dream Views - Attaining Lucidity https://ift.tt/rauzIRj

Wednesday, April 6, 2022

Keeping Teeth Clean with Baking Soda

Items of a multi-purpose nature are always of great benefit. Anytime you can get more mileage out of something the better off you’ll be, because you’ll be prepared for a greater variety of problems while also saving space.

baking soda in bowl on kitchen counter

You’ll also be saving money. One of the best multi-purpose substances you can keep in your survival stash is baking soda.

Baking soda is of course useful for baking, acting as a leavening agent, but it has innumerable other uses around the house and the shop. One of the best uses for baking soda is in an oral care routine.

Baking soda is a component of many toothpastes already, and it stands to reason you could use baking soda by itself for taking care of your teeth and gums. Is this true?

Yes, it is. Although baking soda is not a perfect option for long-term oral care it is completely viable and will definitely work in a pinch if you are out of toothpaste or if conventional toothpaste aren’t a good option for you for whatever reason.

In the rest of this article we will provide you with an overview of what baking soda can do to keep your teeth healthy.

What is Baking Soda?

Baking soda is just sodium bicarbonate, a chemical compound in the salt family. It appears as a solid white crystalline powder.

Baking soda is often sold under the name baking soda (throughout the U.S.), but in various places around the world may be referred to as bicarbonate of soda, bread soda or cooking soda.

As one would expect from most salts the taste is, well, salty and alkaline.

Baking soda is used in all sorts of situations, most commonly in civilian life as a leavening ingredient for baking, as a mild scouring or cleaning agent and as a component in both fire extinguishers and fireworks. Pretty versatile for a humble compound, huh?

This versatility extends into the medical and hygiene realm also, and as we will learn today it can be an effective standalone product for your oral care routine.

YouTube Video

Baking Soda for Oral Health

Baking soda has many properties to commend it for oral hygiene, namely that it functions as a mechanical cleanser and also possesses characteristics that make it antagonistic to harmful bacteria.

It also acts as an antiseptic that can help prevent infections from cuts, sores or ulcers in the mouth.

Compared to toothpaste baking soda is a simple and remarkably pure ingredient, with no added fluoride or other components of a dubious nature.

This can make it great as a replacement toothpaste when toothpaste is unavailable or as a specialized option for oral care among people who have reservations about the state of modern toothpastes

Baking soda can be utilized both as a homemade paste, by simply mixing with a small quantity of water, or diluted further to form a rinse or irrigation agent. It must be noted, however, that baking soda is not a miracle cure for oral care.

But then again, nothing is, and you’ll find that baking soda has strengths and flaws that you will need to account for in order to give your teeth and gums the care they deserve.

We will discuss the pros and cons of baking soda in the section below.

Pros of Baking Soda for Oral Care

Clears Stains

Baking soda is a mild abrasive, and though most dentists agree that it is gentle enough to be safe for long-term use on your teeth (as it will not seriously degrade your enamel) it is abrasive enough to remove surface level stains.

The reactive properties of baking soda also help to gently lift off discoloration from hard to reach places on your teeth.

Though a bright and shiny smile is probably the last thing on your mind in the middle of a survival situation it is good to know that baking soda can help maintain those pearly whites and that winning smile all the time.

Don’t discount that, because it could come in handy for negotiations!

Disrupts Biofilm

Baking soda has properties that allow it to disrupt the formation of biofilm, which is that nasty carpet of plaque that begins to form on your teeth over time.

This scuzzy, disgusting looking carpet is actually a colony of bacteria living and swarming among the detritus of their pooping and peeing after feasting on sugars and other food debris left behind from eating.

Aside from being nauseating to think about and unpleasant to look at, these biofilms can cause major problems.

Wherever biofilm forms cavities, gingivitis and other oral maladies and diseases are not far behind.

Brushing alone, even with toothpaste, is rarely enough to get rid of these troublesome infestations.

A paste consisting purely of baking soda with a little water can turn the tide against these colonies though, especially when they are young.

It accomplishes this by killing bacteria and by mechanically roughing up the biofilm making it increasingly vulnerable to repeated treatments, repeated brushings with baking soda.

Cheap

Baking soda is remarkably inexpensive, compared even to the cheapest toothpaste. Even at major grocery stores and retailers bulk boxes of baking soda can be had for around 40 cents an ounce.

You need very, very little baking soda to effectively brush your teeth or rinse your mouth and that means even a small box can go a very long way.

This is an easy way to get prepared for a long haul survival situation when you won’t be able to replace toothpaste after it runs out, or to save some money by foregoing toothpaste entirely and using baking soda exclusively for your oral care routine.

Raises Mouth pH

Baking soda is basic, and I don’t mean commonplace.

Baking soda and water will interact with the environment of your mouth to raise the pH, lowering acidity overall.

Since many varieties of bacteria and other nasty grizzlies depend on an acidic environment to exist this starts to make your mouth less and less suitable for their survival over time.

You definitely don’t want hostile bacteria in your mouth and around your teeth so this can only be a good thing.

For oral care, baking soda brings this to the table whether it is used as a rinse or irrigation agent or as a paste for scrubbing your chompers.

Even if you use something else to brush your teeth with a rinse of baking soda solution could be all you need to lower acidity.

No Added Chemicals

Compared to modern toothpastes a baking soda and water brushing routine is incredibly clean, and wholesome.

Modern toothpastes have all sorts of chemical additives of dubious effect and quality, chief among these calls for concern being fluoride.

The subject of fluoride consumption in humans is something of a hot topic, and we will not delve deeply into it here.

Suffice it to say that fluoride is definitely toxic when it builds up in the human body, and although it is found in every kind of toothpaste, used at every dentist office and is even found in many public water supplies that does not mean we aren’t ingesting too much.

Fluoride toxicity can cause systemic muscle and joint pain, organ problems (including kidney and heart problems), diarrhea, vomiting and vertigo.

It is this concern about slow and insidious fluoride build up that has led an increasing number of people to forsake products containing it entirely.

Baking soda makes a great replacement option for toothpaste if you are worried about fluoride toxicity.

That is quite the list of advantages inherent to baking soda for oral care.

But, as I mentioned above, it is not all good news. Baking soda does have specific disadvantages that you must work around. We will examine those next.

Cons of Baking Soda for Oral Care

Only So-So Against Cavities

Despite all of the worry over it and the evidence about its toxicity when it builds up in the human body fluoride is absolutely awesome as a topical agent for teeth that serves to prevent decay and cavities.

Baking soda alone is only so-so at best, and is meager more often.

This means you’ll need to be extremely diligent about preventing cavities; easier said than done for most of us no matter how cautious we are at brushing our teeth.

It should be noted that the antiseptic qualities of baking soda in conjunction with its basic nature will kill off many germs that will eventually give way to cavities.

But, it has been proven time and time again that baking soda alone is generally only reliable for slowing the onset of said cavities.

Taste and Texture

There are no two ways about it: Baking soda alone is frankly pretty gross for brushing your teeth.

Since it is a form of sodium it naturally has a very salty taste as mentioned above, and in conjunction with its sandy, gritty texture and slight effervescent effect it can be positively disgusting.

Some people have a hard time stopping themselves from gagging when brushing with straight baking soda!

Maybe you will, or maybe you won’t, but chances are it is just not going to be as pleasant an experience as your usual toothpaste.

This poor “mouth feel” can be mitigated by DIY additives like peppermint or spearmint essential oils, but being forced to purchase and then mix these oils into your homebrew baking soda toothpaste is going to offset any cost savings you might have netted from purchasing baking soda alone.

Abrasivity May Harm Tissues

Baking soda has a crystalline structure, very much like table salt but usually a little finer.

When mixed with water it forms a paste or slurry that you can dip your toothbrush in prior to going at it and this will usually do much to soften and slightly degrade these individual crystals.

However, people with sensitive gums often find that straight baking soda paste feels very harsh on the tissues of their mouth.

This can also be an issue for certain individuals who are simply irritated by the baking soda.

You should not use baking soda for oral care if you notice that your gums, tongue or cheeks become inflamed or raw feeling after brushing.

Most users report that the baking soda paste feels very much like wet sand in their mouths, and this should inform your opinion of just how rough it can be.

Remember, listen to your body and don’t keep plugging away at it making a bad situation worse just because you read about it on the internet, even from us!

That concludes an overview of the good, the bad and the nasty with baking soda for oral care. Now, how do we use it?

How to Use Baking Soda for Oral Care

There are two ways to employ baking soda in your oral care routine, and both are simple, quick and easily performed.

You won’t be wasting any time in the bathroom when brushing your teeth with baking soda.

The two methods are:

  1. Paste, for brushing
  2. Wash, for irrigation and rinsing

Using either of these methods could not be simpler.

Paste Method Steps

  1. In a small bowl, add a tablespoon or two tablespoons of baking soda.
  2. Slowly add water and stir. Your objective is to create a thin paste or slurry that will still cling to your brush and your teeth.
  3. Once you have achieved the right consistency, dip your brush or scoop out some of the paste and then brush normally.
  4. If the paste is too clumpy or feels too abrasive simply add a little more water, stir and try again.
  5. When finished, rinse mouth with water normally.

And that’s it!

Like I said, it could not be easier and will take you scarcely more time to set up then uncapping your toothpaste before recapping it and putting it back in the morning.

Wash Method Steps

  1. In a medium sized cup add two tablespoons of baking soda.
  2. Add water and stir until the mixture reaches a consistency like skim milk.
  3. Rinse or irrigate your mouth normally as you would with mouthwash or a dental appliance irrigator.
  4. Rinse with fresh water if required.

That’s all there is to it!

Using Baking Soda in Conjunction with Toothpaste

Some folks have concerns about fluoride but don’t want to give up all the benefits for their teeth. Other people just want to cut back on the amount of expensive toothpaste they are purchasing.

If this describes you, there is no reason why you cannot use baking soda in rotation with your usual toothpaste.

You don’t necessarily want to use them together, obviously, but there is no reason why you couldn’t use fluoride toothpaste every other or every third time you brush your teeth in an effort to cut down on fluoride uptake while still providing the benefits of cavity protection to your teeth.

Alternately, you can do whatever schedule makes sense to you.

Give It a Try!

Baking soda is a marvelously multi-purpose compound and its usefulness extends all the way into your bathroom for your morning brushing and mouth care routine.

Baking soda has much to commend it for oral care and so long as you can account for a couple of shortcomings it is likely that it can go the distance for you and possibly even replace toothpaste entirely.

Review the information presented in this article and see if baking soda is right for you and your oral hygiene routine.


via Modern Survival Online https://ift.tt/ki9MU6J

Monday, April 4, 2022

How to Use a Map and Compass – an Advanced Navigation System

You are familiar with the use of a compass and a map, and their supporting roles in defining navigation.

Maps and compasses are simple to use, so don’t be overwhelmed by the huge amount of information out there.

topographic map, 2d map, notebook, pencil, and ruler

A map can only give you a relative bearing or direction, and a compass only a direction or bearing but no knowledge of the terrain and its features.

Combined, they make a formidable navigation aid, which with use will become natural and easily handled. I will outline some fundamentals and bolt on skills that you can add to your navigation tool box.

Don’t Get Lost

I recall doing a mountain rescue, when part of the party got separated and stranded on the side of the mountain. Having descended earlier that afternoon, I picked up the party’s flashlight SOS; they had a former paratrooper with them.

The next day we ascended straight up the side of the mountain to their position, it was energy sapping and drained us, never the less we stuck it out and got to them quickly.

If I had a back on, it would have been a disaster, even with minimal gear we took hug strain. Only years of fitness and mindset got us up that mountain.

This article will show you how to use a map and compass to avoid getting lost, and to get you to where you want when you don’t have modern technology at your disposal.

The Basics

Map

  • Topographic map of the area or areas you will be moving through. For USA maps your free downloads can be found at the United States Geographic Survey or USGS.
  • Map of your area in the relevant scale 1:24000 1 inch is equal to 24000 inches on the ground or 1:25000/1:50000 1 centimeter on the ground is equal to 250000 or 50000 cm on the ground.
  • Taking scale into account, the smaller the scale the more defined the Topographical Map and the more cluttered.
  • Contour lines indicate height and gradient. They never cross.
  • Store in a waterproof Ziploc bag or laminate. If you fold, reinforce the folds.
  • The Map is a representation of the ground and the ground a representation of the map
  • The top of the map is always North.
  • Maps will give you the relevant Magnetic North Declination (ensure it is up to date)
  • Familiarize yourself with the legend.

Compass

The compass can be used for accurate position determination. These are the two types of compasses that will serve you well for navigation and orienteering:

  1. The Baseplate Compass
  2. The Baseplate Mirror Compass

That being said, let’s keep these in mind about compasses:

  • Magnetic North will always draw the Compass Needle to its point of reference.
  • Check your compass regularly for accuracy.
  • The rotating bezel can be dialed in to compensate for declination and define the bearing True North.
  • Use the compass to orientate the map.
  • The Compass will have a magnification lens fitted to read map features easily.

Using the Map and Compass Together

These basics will see you right in case of a navigational emergency, what this article will do is provide you with the method to stay on course, making navigation more accurate and easier to apply the basics.

The map and compass work together in a symbiotic relationship, supporting one another in confirming position and orientation of the map to the ground and your physical position in relation to the ground and map.

Keep in mind the acronym A B C which stands for Align, Bearing, Course.

Align

  • The Compass and The Map – Place the map on a flat surface, draw a line from your position to the reference point you wish to move to.
  • Align the compass long edge along the line.

Bearing

  • Rotate the Bezel Dial until you have boxed the magnetic needle on North – Red in The Shed.
  • The Degree at the base of the Travel Arrow is your bearing.
  • You are now orientated on the point you wish to move to.

Course

  • Lift your compass, orientate your body by moving it to align with the Magnetic North or True. North if you have allowed for Magnetic Declination.
  • The Travel Arrow will show the direction you must move in, your course.

Positioning

Map Cross Reference

Take a look at the “map” below. What unique and identifiable features are immediately available to you and can you identify them?

map with 3 bearings to find your position on it

Some of the things that jump out immediately:

  • The Mountain Feature is prominent
  • The Lake
  • The Farm House

Orientate the Compass to True North using the map to identify delineation.

Take a bearing to each of the features from your position.

The three bearings are your cross-reference points. Drawing a line on your map from each point until they intersect – the point where they cross over each other. That is your position on the map.

Align. From this point you can accurately Align yourself to the ground and fix your position on the map. This is your known starting point.

Bearing. If you have to move from this point to a given reference point or rendezvous point, you can take a Bearing to this point with the compass giving you a visual queue on which to walk.

Course. Plot the Course on your map by drawing a straight line from your fix to the reference point, irrespective of topographical features. This is your map bearing to your next point.

Trigonometric Beacons, Verified Heights, and Surveyors Beacons

Maps record trigonometric surveyors’ beacons. They are identified by position numbers, and are placed on the highest land features in an area. They are used for defining a single point on the earth’s surface as referenced by the map coordinates.

These surveyors’ beacons or Trigonometrical beacons are very useful and provide accurate points of reference.

They are spread throughout the entire country and represented on your map as Spot Heights or Trigonometric Beacons representing a specific height.

The USGS topographical maps do not show Surveyors Beacons as the information cannot be verified. The National Geodetic Survey is the agency that undertakes the verification of heights and land features.

The information is detailed and can be accessed on the site, the explorer option gives you historical data and GPS verified beacons. Validated markers are pinpointed on the maps and you can cross reference using the onsite tools here.

The top of the map is always North, align the compass along the maps grid lines. This is with or without taking magnetic declination into account.

Declination will impact your bearings on the ground; however, you are working with the map only and using the compass to find or read off the map bearings using the maps declination as reference.

The triangulation to these points from your position will fix your position on the ground and on the map.

Lifting the diagram off the above map to simplify, orientate the map to ground using the features you can see. Your map will be orientated to True North.

Standing at the boat ramp, draw three lines through the three markers on the map, the point at which they intersect is your position on the map. Plot your fix using the maps grid reference.

Shooting the bearings with the compass will give you 3 points of reference to fix your position and which you can use later when you move of so write them down.

These are dominant reference points that are obvious from the ground. The road and the boat ramp are a balancing feature, it gives your fix a solid reference on the map.

Pencil in your position with a triangle, then shoot the bearings to the grid reference your position:

showing map bearing using 3 points and distance with ruler

Remember Three for Me – Three Bearings to Find your Position

3 points to find position on a map

Deciphering Topographic Contours

The topographic map shows the contours in relation to the surrounding ground layout. If you want to plan a hike or bug out through an area, knowing where you are going is paramount.

Before you start your journey, these questions require answers:

  • What you will encounter?
  • How you will traverse through the area?
  • Where are my reference points?
  • What are my catch points?
  • Features I can use as handrails?
  • Distance per Day
  • Gradients
  • Critical Features

Your questions are not limited, they are dependent on YOUR needs. A stroll down to the jetty is not the same as planning an overnight traverse of a valley or a climb up to the summit of Mt Scott.

I follow a military maxim that was drilled into my core, it is an overlay that should council your decisions and help you to tackle any eventuality and maximize your experience.

Everything you do, every decision you make will impact the quality of the experience.

Let’s take a look at how a couple of hours of map orientation and familiarity will impact what you eat, what cloths you wear, the backpack you take, the water you drink, ultimately the enjoyment you derive from taking a stroll with nature.

Orientating Yourself on A Map

You are secure in the knowledge that you know where you are, now to figure out the route to where you are going.

Using your map, you want to walk to where the road crosses the rail line, this is your reference point. The fastest route is to follow the rail line to this point, this is your route and your handrail.

If you tray from your course, you can always rely on the rail line to guide you onward and be your catch point if you wonder off to far.

You see an interesting old structure and deviate from your route to take a look. If return on the path you took to get to the structure you will walk into the rail line, it will catch you. From here its easy to re-orientate yourself and carry on to your reference point.

How far will you walk if the scale is 1 inch on the map is 24000 inches on the ground, written as 1:24000.

Using the lanyard string from the compass, lay it out along your route from your fixed position all the way along your route taking the twists and turns that can see, as in roads or paths etc.

Arriving at your first way point, this is the visual reference point that you can see from your fix. Take a bearing to this point along a straight line, so when on the move you can sight along the travel arrow of your compass to ensure you are still on track.

Using the string, lay it out along your ruler to establish the exact length then measure the distance against the maps scale.

Tip: Have some Blu Tack (also called Prestik) stored in a small lip gloss tub – place small bits along the route and press the string into it to hold it in place, especially around bends. Do not pull or stretch the string it will throw out you’re reading.

If in inches, your distance will be in feet and miles. If in centimeters the distance will be measured in meters and kilometers.

Now that you have established your distance, you can set off confidently.

Contours

Your topographic map is an aerial view of your surroundings, so how do you create a 2D view of the map for reference purposes?

The key is the topographic lines and the distance between them, the topographic interval is the guide to the slope and its degree of gradient.

Useful Tip: Even though straight up is the shortest route, it is the most difficult and will burn your bodies’ reserves to conquer the steep slope. Paths, including game paths follow the contours and ascend in a circular route, it would seem longer but will save your energy and will save you time.

contour diagram saddles and passes

The contour intervals indicate a progressive rise in 100 feet or meters, depending on the map you are using.

The contours are moving from 1100 to the top of the hill to 1500; that’s an increase of 400 feet or meters.

  • If A, is the top of the hill and B is your point below, the contour lines between are close together indicating a steep slope, not one to tackle due to the steep gradient.
  • If A, the top of the hill and C is your point below, the contour lines between are further apart indicating a gentler slope, with a steep midpoint. This could be a route taken, however the energy it will sap may count against you.
  • If A, is the top of the hill and D is your point below, the contour lines between are widely spaced indicating a gentle slope, this would be a prime route to ascend to the top of the hill as its gradient is a gentle increase gradient.

It is now possible to establish a gradient profile using a cross section of the contour intervals.

Doing this exercise will help you to establish land features as the appear on the ground, familiarizing yourself with your map using profiling will sensitize you to map features.

Circumstance may dictate you move fast, that will entail making snap decisions, your life and any with may depend on it.

establishing contour points for gradient on paper

Using a blank piece of paper, run it along the line you have drawn from point A to point C. From A mark off the index contour lines as they appear on the map.

The contour points will give you the horizontal reference points on the ground.

Use the scale of the map, 1:24000, these points as your vertical reference in inches.

gradient profile and scale diagram

Taking the profile of Point A to Point B you can see the difference in the slope; the gradient is steeper and not a safe option.

contour profiling two points

Contour profiling gives you a visual representation of what you will face on the ground.

Important Features On A Map

Rivers and Waterfalls

Rivers and waterfalls are represented on your map by the contour lines.

river and waterfall contours

V is the Key – the downward point indicates that the topographic contours are representing a River Valley.

The contours that close on each other, they are almost touching, will represent a waterfall.

The further apart the contours the gentler the slope and so the gentler the flow of the river, steep slopes give water speed.

Spurs and Ridges

A ridge is a long narrow hilltop or watershed as rain runs off its slopes It is also called the ridgeline, the long narrow outline silhouette outlined against the sky.

A spur is another ridge or hill that runs off laterally from the main feature.

ridges and spurs on contour lines map

Remember the V is Key – Inverted the V represents a ridge, a sharp top line running out from the summit of the hill of mountain.

If you need to cross a mountain range as part of an expedition or a way out of an emergency situation, you will need to find the best route possible. The most accessible and a path exposing you to the least possible risk.

Passes and Saddles

A saddle is the lowest point between two high points on a mountain range or it splits a ridge allowing access to the area beyond the ridgeline.

contours diagram saddles and passes

Looking at a Mountain Range you will easily identify the Saddle and the Mountain Pass. When planning your route, the pass may seem inviting and if unobstructed would be an option.

Water likes the easiest route and can erode the path making it steep, slippery and heavily wooded.

saddle and pass profile

On The Move

You are navigating everyday of your life, going to work, driving across town, finding the bathroom in the dark, friendships, social interactions, work and business.

Everything requires a map and compass; some things are learned like knowing your way to work, and some require an attention to detail like hiking the Grand Canyon.

As with most things, the human condition wants to know and we map our lives with an attention to detail. So it is with mapping geography.

There are “life hacks” that we can use for both:

  1. Map Orientation with Compass
  2. Map Orientation to the Land Features
  3. Catch Features
  4. Handrails
  5. Reducing the clutter – Working with the main features
  6. Shooting a Bearing
  7. Back Bearings (Safety Bearing)
  8. Negotiating Obstructions
  9. Pacing
  10. Folding and Thumbing the Map
  11. Using the Maps Symbols Effectively
  12. Advanced Dead Reckoning

Catch or Collecting Features

Moving between points on the ground to reach your destination details plotting a course. Your course will have multiple reference points that you will use to guide you on your way.

On a map it’s as simple as point A to point B…

However, on the ground with its hills and valleys, boulders and rivers and a number of other obstructions you will have to plot your course, between, over and around these.

Point A as a starting point will require navigation to various points called catch points along your route, literally visual points that you can see that you will navigate to and will “catch “you and point you the next catch point on your route.

Handrails

As with a staircase, the handrail is there to guide you on your journey, it’s a safety device you can refer to, to keep you from losing your way and ensuring you can recognize terrain features and catch points.

Plotting your route on the map provided you will find a number of land features that will help guide you on your way.

A to B Plotting a Route Navigation With Catch Points and Handrails
A to B Plotting a Route Navigation With Catch Points and Handrails (open larger version in new tab)
  • Orientate Map to the Ground
  • Use the Compass to Orientate the Map
  • Plot a straight line from A to B on the Map
  • Shoot a Bearing to Point B to get a travel bearing
  • Note the Map Features
  • Identify them on the ground

Map Features

As you can see from the map, there is a hill in the direct line to point B and a footpath is indicated on the map.

Identify the major features on the map and the ground, discard minor features, like the swamp next to the lake.

Stay focused on the main features and their orientation to your position. Look back to recognize them if you have to back track.

Using the hill as a catch point, take a bearing from your fix to the Hill, and walk in that direction. Even if you go slightly off course due to unseen obstacles, the hill will catch you if you are off course.

The lake is a visible point from most directions, you can use it as a handrail. It’s on your right side, the hill is in front of you.

Keeping your direction with the compass to the hill and the lake on the right you are now orientated to the major land features that will keep you on track.

Even without the compass you can quick reference your Lake Handrail to stay on course.

Once at the Hill, you can move towards the lake to navigate around the Hill as shown on the map, and pick up the trail that is outlined.

Another example would be if the bridge was your first reference point. You want to use it to cross the river easily, and not expose yourself to the hazards of a fast-moving water source to get to your next point.

The bridge is however hidden in the river valley and cannot be seen from your vantage point, the hill now becomes your catch point from where you can find the track that will allow you to find the bridge.

Orientate your map once you hit the catch point and mark its location, as you head off to find the track look back, if you overshoot you can always find your way back to a known point and start again.

What happens if you can’t find the trail? Well, you have a general idea of where the bridge is, it’s over the river and from the hill you take a bearing in its general direction as you take a heading from your map.

The river is an excellent catch point, but it can be confusing if you hit the river with no bridge in sight. The question is left or right, it’s an upstream, downstream thing. If you know the direction of flow.

Orientate Yourself

At this point you could move into a depression that obscures the lake, refer to your map. Its easy to take a wrong turn here, as paths or trails encourage us to take their course. If you can see the bridge, orientate yourself with your map to the ground.

Use your compass to ensure you are on the correct bearing to Point B.

You can see the river on your right, this will now become your next handrail as you navigate to your next point.

The map shows a path that runs through the forest, shoot a bearing to the forest edge, and if you keep to the path, you can orientate your self to the forest edge as a catch point.

The approach to Point B has a swamp on the left and a hill on the right, the map indicates that the path weaves its way through these two obstacles. You are still using the river as your handrail and can use it to navigate your way.

This portion of your trek could be the hardest: the swap level may have risen due to heavy rain, the path could be overgrown with lack of use or washed away. Its important to keep a bearing on Point B.

If you are completely disorientated, you can use your safe bearing or the back bearing.

Moving on the trail you are using, maintain visual contact with your major land features, if you leave the trail to negotiate an obstacle, you can use it to back track if you hit a non-navigable dead end, say a swamp hole or deep mud.

Leaving the trail, note your feature and shoot a bearing to it, if you need to back track and can’t see it, you can use your compass to orientate yourself to the last bearing you shot. Three-meter-high reeds can “blind” you, DO NOT PANIC, refer to your compass, you have got this.

On the Move Pacing

You need to set out now, its time to move, light is going and your rendezvous with the hiking club is at Point B. Plotting the course, using the string and the map scale you know its approximately 3.8 kilometers to you destination including negotiating the hill and following the paths circuitous route.

Using the track at the sports ground where you live, you have figured out your pace over a given distance, taking into account that the track is a level and even surface. Your pace rate per 100 meters is 67 right side paces per 100 meters.

You can cover 100 meters at a brisk walk in 90 seconds or 1.3 minutes – that’s 13 minutes a kilometer on the flat track. Taking terrain into account you have been able to maintain this pace over hard uneven terrain.

3.8 Kilometers x 13 minutes = 49.40 minutes

Distance (Ground distance A to B) x Speed (Time per kilometer) = Time (Total time to Point B)

Taking variance into consideration, that time that unseen obstacles can add to your initial calculation. Stops to admire the view, orientate at catch points, drink water etc.

Variance can add up to 10% to your travel time on average 49.4 minutes to destination plus 10% is 54,34 minutes.

I always round up and give myself enough time between points, minutes count but taking a wrong turn can add hours. Even if you are in a rush check your numbers, recheck bearings and land features.

That said you are now ready and there is a simple yet effective map practice that will shave time off your trip, the technique is called thumbing the map.

Folding and Thumbing the Map

You know where you are and you know where you are going, the whole map is not relevant right now, so fold it.

Fold it along the other edges parallel to your route, leaving only the relevant details of the map exposed. The land features on your route are memorized and you have had a good look around to associate the map with the ground.

Every time you change direction to follow a different leg, refold the map to parallel your next course line.

Keep your thumb on your fix, your starting point and as you move along let your thumb move along the course you plotted in relation to the land features you are familiar with. This method will save you time by reducing stops to check your position.

It will help you zoom in on your position without having to take in the whole map and realign it with the general ground features.

Handy Tip: Draw an Arrow on your thumb nail it will help you maintain direction:

Thumbing the Map
Thumbing the Map

Don’t let go of the map, even if you get distracted or fall, you will be able to quickly reorient and find your way.

It is important to practice this method in familiar surroundings to build confidence and ensure your safety.

Handy Tip: A mnemonic for you to remember: DDT Catches Flies = Distance Direction Terrain Catching Features

Using the Maps Symbols Effectively

Using the maps symbols identify the map features, mark them and memorize them. I personally draw my own map with these features on, ensure it can overlay with the original map.

This, bare bones map will be a precision tool to ensure I don’t get side tracked and helps me remember my route, even without a map.

Keys to Navigation

The best teacher is practice, its your excuse to get out, enjoy nature, explore your neighborhood, and learn new things.

Navigation is a fundamental skill; it is your security in finding your way and making life an enjoyable experience.

The Keys as outlined in this article are your map and compass, they unlock navigation and with practice will become so natural that in many cases you will automatically know which way you are going.

Familiarize yourself with the basics of both, learn the information on your maps and practice patience in your work.

Trust yourself, if you are unsure take a moment. Rather lose half an hour, see it as a rest for your body, than lose hours finding your way again or worse, getting totally lost.

  • Learn your A, B, Cs
  • Three For Me
  • Remember DDT Captures Flies

Most importantly, have patience with yourself and others, don’t panic and have fun.

using map compass Pinterest image


via Modern Survival Online https://ift.tt/aY9pM5C