Wednesday, March 11, 2020

Tinder vs. Kindling. Here’s How They Are Different

You’ll learn plenty about starting a fire in all kinds of ways when you hang around preppers. In fact, you’ll likely learn more than you wanted to know!

Building a fire always starts with a few fundamental factors: heat, oxygen and fuel. Combine the three, in the right ratio, and you have a fire.

When it comes to fuel, you’ll actually need two kinds to get your fire going: tinder, for starting the fire and fuel to keep it going. Wait, I mean kindling to start the fire. No, hang on, is that right? Aren’t tinder and kindling synonyms? No!

Tinder is small, hot burning fuel that is easily ignited, used to catch a spark, and take the flame. Kindling is smaller than the main fuel of the fire, but larger than tinder. Kindling is used to ignite your larger, main fuel evenly. Choosing and assembling suitable tinder and kindling in a correct arrangement to start and maintain a fire is crucial.

Whereas primary fuel and kindling are almost universally wood, tinder might be anything. Anything that will burn hot and fast and catch fire easily makes for good tinder, and plenty of preppers will often transport their own tinder as part of a fire-starting kit complete with various tools and aids.

Tinder can take the form of:

Wood shavings Dried bark
Fatwood Dry pine needles
Dried fungus Cotton balls soaked in Vaseline
Rubber inner tube Dryer lint
Sawdust mixed with wax Steel wool
Potato chips or cheese puffs Char cloth

Off the shelf tinder is also available in paste and block form. These are products designed in labs to ignite readily, and to burn furiously in any conditions.

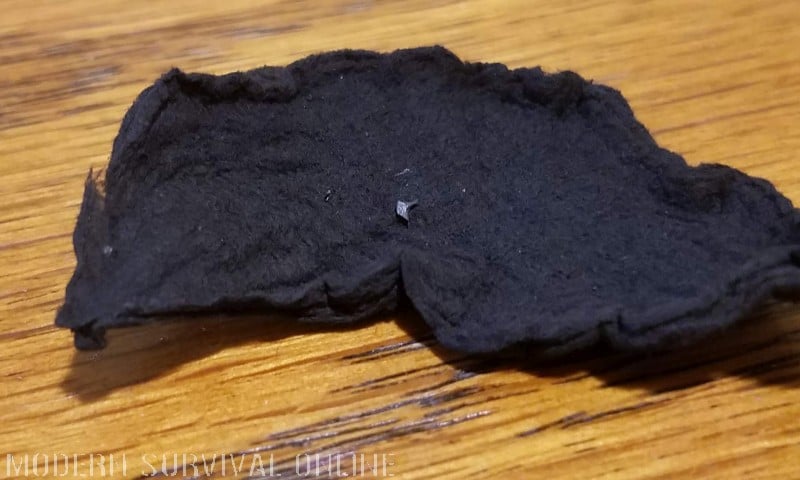
char cloth tinder
Char cloth specifically made to be used as tinder.

Tinder ignites readily, often with the slightest spark, but with the exception of “damp” tinder (like the cotton balls and Vaseline or the old sawdust and wax combo favored by some) it must be totally dry to work. Ideal tinder will catch a spark instantly when loosely packed.

Kindling is your “pre-fuel” intended to burn longer and more steadily than tinder in order to “channel” the fire to your larger fuel consisting of logs and branches.

Kindling, on the other hand, is almost always natural material but could be man-made. Things like:

  • Small sticks
  • Twigs
  • Chunks of wood
  • Weed stalks
  • Dried grass bundles
  • Pinecones
  • Cardboard
  • Toilet paper
  • Cloth
  • Newspaper “logs”

Kindling must also be dry to work, but not completely dry like tinder. If you have any trouble finding dry kindling in a damp environment, get creative! Look under rocks, logs and overhangs.

Dig to the bottom of leaf piles. Reach for the lowest branches of trees. Try to find animal nests or dens. Any sheltered place will likely produce some dry and usable kindling!

Conclusion

Tinder and kindling are often used interchangeably, but the two are very different in material and performance for fire-starting.

Learning the nuances and differences between each will give you a higher chance of success for starting a fire, and greater control over the size and intensity of the fire you want.

tinder versus kindling Pinterest


via Modern Survival Online https://ift.tt/3cStydq

Monday, March 9, 2020

5 Survival Standard Operating Procedures (SOPs)

Survival is rarely a matter of having the perfect plan that will magically make all of your problems go away, but planning is nonetheless an essential factor in surviving the complexities of major crisis events.

One element of planning that you can lift directly from military planning and tactics is the implementation in your own life of SOPs: Standard Operating Procedures.

Using standard operating procedures in your life will reduce your mental workload, ease more intricate planning and boost your confidence.

Well designed SOPs by themselves will help you stay perpetually ready for a variety of lesser emergencies with seemingly no extra effort on your part.

In this article, I’ll offer several SOP’s that I use in my own life for maintaining a high state of general preparedness that I am sure will be of use to you no matter who you are, where you live and what you are already planning for.

What is a Standard Operating Procedure?

While commonly thought to be the province of military and police operations, a Standard Operating Procedure, abbreviated SOP, is simply a “set in stone” set of instructions that allow a person to execute complex operations or intricate tasks more efficiently and uniformly.

In short, you might say an SOP is the “way we always do it” minus any unusual circumstances. Think of an SOP as your default method of execution or preparation.

SOP’s are not standardized, however. An SOP for the exact same operation or task might be different, even drastically so depending on a person’s capabilities, where they live and a dozen other factors.

You can use SOP preventatively to reduce the likelihood of something happening or actively to reduce the chances of a negative outcome when an event has already occurred or is in progress.

Think of SOP’s as a sort of “If this, then that” logic system that will save you valuable mental bandwidth when it comes to dealing with all kinds of tasks and problems great and small.

A Concrete SOP Example

While “standard operating procedure” sounds very official, even a little ominous, it does not have to be. You can have SOP’s for literally anything!

Big problems, small problems, all can have SOP’s applied to them. SOP after using the bathroom is washing your hands.

SOP when driving a car is to keep both hands on the wheel, your eyes down the road a ways, and check your mirrors regularly. SOP when flying a plane… Well, I’m not a pilot but you take my meaning.

Further, each of those SOP’s is broken down into small, discrete steps. It is here that an SOP looks like a huge mess of instructions.

But the beauty of an SOP is that with practice and application you just “live it”: you won’t need to walk through the steps mentally, since you’ll have so thoroughly ingrained them and created habits of them that it will happen seemingly on autopilot.

Here is an example I will break down in detail. Let’s take getting your car ready for a long trip. This is not a hop-and-pop down to the corner store or into town for a burger and milkshake.

It pays to fine-tooth comb the vehicle over to ensure you head off any particular problems before they strike when you are at highway speed and far from home.

First, you give the vehicle a walk around inspection. Missing parts? Leaking fluids? Rust?

Check the tires next. Inflated? Plenty of tread? Lug nuts tight? Bulbs next. Headlights, taillights, break lights, side lights, turn signals. Check wipers.

Check all fluids- oil, brake, transmission, wiper, etc. Next, go fill up gas tank. Reset mile tracker if applicable. Ensure tires are inflated properly. Clean windshields/windows.

Check supply kit and contents- emergency medical, recovery gear, food, water, blankets, etc. Finally, ensure GHB is intact and in vehicle. Done.

Whew! If I wanted to, I could break down each of those discrete steps into a “how-to” and this article would be ten times longer.

But since, I’m guessing, 90% of you know how to perform all of the above operations I will spare you all that.

And that is the point of having SOP’s: once practiced to a “second-nature” you won’t have to think your way through what you are doing.

You have done it a hundred times a hundred times over, it’s standard procedure. SOP’s let you mentally “compress” complex, intricate lists of steps into tiny, easy to remember and easy to execute steps.

In the next section, we’ll dig into the real nuts and bolts of my favorite SOPs for preparedness.

Practical S.O.P.s You Should Have

If you get down to it, you can say almost anything is a survival SOP so I want to take a moment to define what they mean to me. A survival SOP is one that I use to mitigate a threat, preemptively or actively.

A threat could be a hostile human, a disaster, or just an emergency situation with serious risk of loss of life or limb, my own or someone else’s. My own SOP’s will either be in place and active to preclude such an occurrence or will activate to reduce the severity of such an occurrence.

So on my list you won’t find any SOP’s about how many, what color and what kinds of marks to make on a bug-out map; instead I will reference actually having a bug-out map as SOP for bugging out. Does that make sense? Good.

Another note: you may not be able to implement an SOP exactly the same way I do, nor should you want to out of hand! Your situation, skills, condition and even something like the laws where you live will all have an effect on both the “why” and “how” of your own SOPs.

While I believe you’ll find this list quite universal and applicable for almost anyone, anywhere, you should definitely feel free to add, remove or ditch entirely any of these depending on your needs.

Onward to the list, presented in no particular order!

SOP #1 – Always Go Forth Armed

Threats from human predators are a constant, in times of peace or crisis. If you leave the house, and you are travelling in a place where you can be armed, you should be armed!

If you have access to weapons, have the training to use them and don’t carry them, you are not doing what you should be doing to keep you and yours safe against any eventuality.

SOP for defense against two- and some four-legged creatures is the carry of weapons, lethal and ideally a less-lethal weapon as well. Not every threat that needs solving is solved with lethal force.

Pepper spray is a chronically neglected and under-used tool in a civilian’s arsenal, and affords both range and excellent “stopping power” against most assailants.

Of course, a lethal solution is also mandatory when the situation turns grim and you face a lethal threat against you.

A pistol, almost any kind of pistol, is adequate for halting an attack and neutralizing or driving off an attacker, but for long-term survival purposes a proper fighting handgun should be sought.

Lastly, and more of an emergency tool than a go-to weapon, a small knife should be carried. I say tool rather than a dedicated weapon, because I predominately carry a dedicated knife for such emergency tasks as slashing away stuck seat-belts, laces, cord and webbing, and so forth.

But in a pinch, it will serve just as well in a defensive capacity if I cannot access or lose my pistol.

My SOP for carrying weapons:

  1. Pistol, carried IWB at 3 o’clock (strongside) or 1 o’clock (appendix).
  2. Pistol reload, carried appropriately depending on pistol (pocket, carrier, etc.)
  3. Knife, small fixed blade, carried opposite pistol for support hand access.
  4. Pepper spray, clipped on pocket shield in front left pants pocket or in jacket as appropriate.

SOP #2 – Always Carry Medical Gear

Far and away the most glaring failure point in your average prepared civilian’s readiness plan is the total lack of both training in the use of and carry of medical equipment.

An average Joe will carry no less than two or three ways to make holes in people, but nary a band-aid for the patching thereof.

This is a failure to prioritize or a frame of reference failure and nothing else; you are orders of magnitude more likely to need medical training and equipment to reduce a bad outcome from any source than you are to need weapons for the same.

The reason is that injury can come from so, so many places out in the world, not the least of which is your own weapons!

As sad as it is to say, accidents do happen, and complacency works its way into the minds of even the dedicated.

You are more likely to need your med gear to fix a self-inflicted wound from one of your own weapons than to render aid on someone injured by someone else’s.

This is also not intended to discount the carnage resulting from incredibly common car crashes and workplace accidents.

Med gear does no good if it is not at hand. You should carry at least the bare minimum on your person to treat a gunshot wound if you carry a gun, and should further carry as much as you can reasonably.

Additionally, a comprehensive kit should be in your pack whether or not you carry it with you or it rides in your car as a “go bag” or GHB.

My SOP for carrying medical gear:

  1. Maintain skill level through continual improvement and implementation of best practices.
  2. Minimum First Line Gear:
    • Tourniquet – carried in pocket or in carrier on belt.
    • Hemostatic gauze – typically carried in pocket or jacket
  3. Enhanced Kit Includes:
    • Additional gauze
    • Additional TQ
    • Chest seals
    • Nasal airway
    • Decompression needle
    • Gloves
  4. Enhanced kit carried on person, in pack or in vehicle, situation dictating

SOP #3 – Keep Your Bug-Out Plans Updated

One of the easiest sins to commit as a person living a life of preparation is to assume.

In this instance, going to all the trouble of concocting a proper bug-out plan (figuring destinations, bug-out locations, mapping, hazards, contingency plans, etc.), and then dusting your hands off, patting yourself on the back and then consigning it to your “just in case” drawer is problematic.

Those plans are not set in stone. They will change, whether you want them to or not and more vitally whether you know about it or not. Routes can be closed or shift due to construction, seasonal changes or other factors.

Your bug-out locations may likewise be compromised due to new activity, a changing landscape, urban or suburban fill-on or new intel revealing that your location may just be a choice for plenty of other folks you’d rather not have as neighbors in a crisis.

Be they drivable, walkable or hikeable routes, you have a duty to yourself and the people you care about to verify the status, conditions and ongoing viability of your bug-out routes in all seasons.

This is typically accomplished by periodic inspections. That means you need to get out there and do it on the regular.

In general, routes that are more heavily traveled, like highways and roads in or near major population centers need more frequent inspection than those that are remote or even hidden from your typical passersby.

My SOP for keeping my bug-out plans up to date:

  1. Quarterly: Check all BOLs for continuing viability; inspect immediate surroundings, rotate and refresh any emplaced supplies and check on region to ensure no surprises.
  2. Biannually: Travel entire length of all vehicular paths; pay close attention to any potential hazards, obstacles and choke points; take proactive measures to reduce any of the above that you can.
  3. Annually: Travel entire length of all foot paths; pay attention to seasonal and weather effects that might impede mobility or increase risk of transit.
  4. On Demand: Amend all maps with new pathing information and notes; remove old routes if erasable or print new maps and apply new markup if not.

SOP #4 – Maintain Prep-Related PERSEC at all times.

This might seem a little disingenuous since I write often and at length about survival and readiness related issues, but hear me out.

PERSEC is another term handily borrowed from the military and stands for “PERsonal SECurity,” meaning protecting any and all personal information pertaining to your activities, equipage, whereabouts and plans.

Information like this is ammunition to be used against you in the wrong hands.

Now, before you tell your neighbor, your pal, a workplace acquaintance or anyone else you don’t truly have real trust established with about you interest in survival and preparation, including your elaborate underground hideout, six month food supply and so forth, consider how far and how fast seemingly innocuous information can travel.

You might not think there any harm in telling this or that person about your interests, and indeed they might not care at all or intend you any harm.

But someone they tell might care, or know someone who does, and it is an easy thing to run down the rest of the details on you in this day and age.

“Loose lips sink ships” is how it was said back in our grandparents’ day, in wartime, and that wisdom certainly applies here. If you are a trusty, chatty sort, stop.

Tell no one else about these activities unless you have real trust with them and they are within your “circle” of fellow minutemen who you can put your back up against.

My SOP for maintaining PERSEC looks like this:

  1. No discussion of any readiness related activities with those outside your circle of trust. Period!
  2. Never post or talk about travel plans- vacation, work related, or otherwise- with anyone outside the circle of trust.
  3. Minimize posting of personal details on social media. Anything on the internet will stay there forever, and seemingly innocuous personal details can be used against you with social engineering techniques.
  4. Make a note of anyone who seems a little too interested in your plans, especially concerning work and play; a fairly detailed construction of your schedule can be ascertained with very little work
  5. Sanitize all clothing and personal vehicles: no bumper stickers, window decals or vanity plates that are 2nd Amendment, survivor or similarly related. Again, such things can easily get you targeted for robbery or your home or vehicle for theft.

SOP #5 – Always Have an Immediate Escape Plan

An immediate escape plan will save you from the majority of events that might harm you, if you can react and implement it in time.

An immediate escape plan is distinctly different from your bug-out plan, since a bug-out plan covers an in-depth response to an ongoing persistent threat.

An immediate escape plan is a fast, “knee jerk” reaction to an emergency situation or emergent threat.

For instance, you are driving down the road and the loaded dump truck a few lengths ahead of you spills its load. Think fast and execute!

If you didn’t have a plan, you might react, you might not, and if you reacted, you might have implemented the wrong fix.

Slamming on the brakes, might have worked, but if you failed to account for the tractor truck tailgating you you might be in a worse situation- run over or pushed into the debris ahead.

If you were planning presently, and that includes your immediate escape plan, moment to moment, you’d know you could have easily swerved hard to the right, the generous shoulder and flat, level ground beyond it providing you plenty of wiggle room for safely maneuvering around the debris tumbling toward you.

Another situation might be a trip to the mall or going out to eat. If someone walked in and started shooting, do you have a plan for that? Will you grab you and yours and escape?

Where’s the nearest exit? Is it likely to be overwhelmed with people? What if the threat is very close? What if you or your loved ones or companions are wounded?

Having even a coarsely rehearsed plan will give your reactions a jump and prevent you from freezing. As the circumstances and surroundings change you need to update this immediate escape plan accordingly.

It is actually the immediate escape plan methodology that will help keep you on your toes, and furnish action when everyone else is staring in slack-mouthed horror.

My immediate escape plan SOP

  1. Always be aware of and verify your nearest “exit”: this could be an open slot or path in traffic, or one of several doors you can or cannot see when out in public.
  2. Be aware of the most likely threat and where it will come from: travelling by vehicle, this is usually something ahead of you that you’ll slam into. On foot, it could be an environmental hazard or a person bent on causing mayhem or committing a crime.
  3. Constantly update your plan. As you move about, your exit will change. Keep in mind the best exit may not be the nearest or might be out of sight.
  4. Think two steps ahead: a move that puts you in greater danger for temporary avoidance or safety is rarely worth it. You may need to go with an alternate exit or even opt to “take the hit” if your plan leads to a potentially worse outcome.

Conclusion

Standard Operating Procedure is your baseline, default level of readiness. It should never diminish or change so long as circumstances permit it.

If you set your SOP’s against the most common threats you are likely to face, you can achieve a sort of zen-state where you are venturing forth in a high state of overall readiness that does not require much in the way of extra thought and mental bandwidth.

Take the time to really think through your SOP’s and implement them in a way that makes sense for your life and overall SHTF plan.

sops pinterest


via Modern Survival Online https://ift.tt/2PZdfSe

Friday, March 6, 2020

How to Prep if You Don’t Have Any Money

There are some obstacles to prepping that are not commonly discussed. If they aren’t being ducked entirely, they are at least being sidestepped. The most common among these, and certainly the most pertinent for quite a few folks, is how expensive prepping can be.

An awful lot of prepping articles, including those written by yours truly, revolve around lists of things you “have” to buy, and often by in great quantity.

Even one-off items and singular purchases are often expensive gear or personal electronics that can really put a dent in your budget. Some people just do not have the discretionary funds to invest in a lot of surplus goods or additional equipment.

Does that make them less than serious about prepping? Is it just a case of tough nuts, they don’t get to prepare for hard times?

No. In this article, I’ll be discussing ways to prep effectively even if you have very little or even no money.

The Cost of Prepping

There are no two ways about: prepping can be expensive, and even if it’s not “prepping done right” it will cost a certain amount of extra money. An investment in your safety and continued well-being is still an investment and investments require capital.

It is an easy thing to say in an article or to tell someone inquiring they should just buy a little bit extra here or buy a little bit extra there, when they can, with what they can and that it is good enough. But is it really?

For preppers that are on a seriously constrained budget, what preps they are able to afford may feel inconsequential at best. Some people, frankly, cannot afford anything beyond the absolute bare necessities to make it to the next payday.

If someone is only able to save pennies to put against the mountain of needed purchases to get ready for a major disaster or crisis, does it really do any good to keep telling them to save and save against a seemingly never ending list of “required” purchases?

Besides material acquisitions, skill-building exercises and specialized training are big-ticket items for most people.

Even a 1-day class on something like land navigation or austere environment survival will run several hundred dollars and intensive week-long courses will easily cost over a thousand.

Making use of and learning from expertise is always expensive.

And none of this takes into account the really high-dollar purchases. You’ll rarely read through a prepping-centric article without seeing a mention of a bug-out vehicle or a bug-out location.

A bug-out vehicle is typically a purpose-bought or specially modified personal vehicle optimized to help you escape and travel through a world turned upside down.

News flash: there is nothing inexpensive about buying or modifying an automobile. A bug-out location is the place you’re typically planning to flee to in the face of or the aftermath of a disaster.

Generally, you want unfettered access to your bug-out location, and that means you should probably own it. So now we’re talking about the purchase of plots of land and the attendant (read “exorbitant”) costs…

All in all, prepping the way you are “supposed to” is an expensive proposition on paper.

Are You Out of Luck If You Don’t Have Money?

If you lack the considerable resources required to purchase and store mountains of provisions and racks of specialized gear should you just take whatever hand Fate deals out to you in the event of a crisis? Absolutely not.

It might sound cliché but the notion that “where there is a will, there is a way” is foundational to prepping. What is needed if you lack the stacks of cash necessary to go crazy at your local outdoor superstore is a change in mindset and a change in priorities.

We already established it does no good to keep flogging you over the head with the same tired advice.

You’re going to need to get a little creative, perhaps think a little bit out of the box, but just like there are multiple solutions to any given practical problem that a prepper might face in a disaster, there are multiple solutions to the problem of having an empty piggy bank in the face of a looming threat.

In the sections below, I’ll provide you with several strategies for prepping even on the thinnest of budgets. You might have to put in a little more time and effort than someone with a bulging wallet, but it is entirely achievable to increase your personal capability while spending very, very little cash.

Skill Up on the Cheap

Prepping is not about having mountains of gear. Prepping is about problem-solving, specifically by being prepared for potential problems. It’s all in the name, right?

One thing I notice a lot of well-informed prepping experts and survival gurus say that, to me, seems sort of inconsistent in intent.

In the same sentence, you’ll be admonished to be prepared materially (specifically by buying this, that or the other thing) and also reminded that skills pay the bills, not equipment.

While having the right equipment definitely helps, it is skill and experience that separates the prepping superstars from the also-rans. Don’t get me wrong, the equipment definitely helps, but the point I’m trying to drive home is if you have the skills you can get everything else.

The legend of the old mountain man that can head off into deep woods with nothing more than a bush knife and survive, even thrive, is, at its core, true.

Theoretically, you can become this person with enough grit, determination and practice.

When you know how to do everything that you need to do as efficiently as possible, and just as importantly when you know everything that you shouldn’t do in a given situation, you’ll need less effort and expend less energy than someone else in the same circumstances.

All the classic survival skills like building a fire, constructing shelter and locating food to signaling for help, finding your way and purifying water can all be practiced, for real, in your local environment for essentially zero cost.

At no other time in human history has becoming an expert all on your own volition been more feasible or possible. You have access to vast stores of information and expertise thanks to the internet.

Experts in dozens of fields of survival freely give their information away on YouTube, on blogs and various websites. You’ll find plenty of it on this website right here. What you must do is take this information, study it, learn it and then go apply it.

You can practice the skills you learn using nothing more than things found in your backyard, or along a hiking trail in a public park. If you run into trouble, answers are just a few clicks of a mouse away.

But let’s say you don’t even have the internet. What do you do then? Well, in most places you can get a library card for just a couple of bucks or even for free.

I can assure you that any local library has a huge repository of all kinds of survival lore on dozens of subjects.

You’ll be able to find everything from Boy Scout guides to military field manuals and how-to books on everything from shelter construction to identifying edible and poisonous plants in your region.

Make use of these books; mine them to the marrow for all the information they contain and then go out into the world and actually apply and practice it.

If you can resist the siren song of buying bright and shiny new gear and if you will instead apply your efforts and energies to learning the real skills of survival you may actually be better off than the person who has more money than sense when it comes to survival.

Barter and Trade

No matter how skilled you get, there are definitely a few essential items and provisions you’ll want to have in order to be truly prepared.

There’s not much of a substitute for having several weeks of stored food and water, for instance, and no prepper worth their salt would dream of taking to a survival situation without one solid knife on their belt.

But if even these rudimentary items are beyond your reach financially, you need to get creative in order to obtain them.

One skill you can practice now that will help you get what you want and also help you in the aftermath of a society altering event is that of barter and trade.

No matter what you want, I can assure you there is someone out there, somewhere, who has it and furthermore who wants something that you have, even if it is labor or a special set of skills that you possess. The trick, as you might imagine, is finding this person and then making a deal.

To get started on this endeavor, you first need to take stock of what you have that you can trade. Some of this will be material items, even if you think it’s junk.

That old hobby trailer that has weeds growing all around it in your backyard may be just the thing someone’s looking for, and they’ll be willing to trade for it. Perhaps a set of hand tools that you would like to have..?

Remember that your skills are valuable. If you do woodworking as a hobby, that might be very valuable to someone who wants a new set of steps built off their back porch, or a piece of furniture repaired. Be creative in your deal-making!

To find people to barter with, you can start by looking in the classified ads in print and online for your area. Make sure you beat the bushes of your existing social network as well.

Tell friends, tell family members, tell co-workers what you are looking for, and ask them if they have the item in question and are willing to part with it or if they know anyone who does.

You can also search for local swap meets where people bring their unwanted items and are willing to trade for them. You never know what might pop up at these meets.

It might feel strange or uncomfortable proposing a trade instead of cash on the barrelhead to get what you want, but overcome this social inertia and you’ll find that most people are more than amicable to it.

Coupons, Rebates and Closeouts

For those with a sharp eye and who take the time, coupons, rebates and closeouts can help you get the things you need for literal pennies-on-the-dollar, a huge boon if you’re on extremely tight budget.

Perhaps the most impressive example of this strategy is employed by the so-called extreme couponers.

Chances are you have seen these folks on various reality TV shows where they get cart upon cart full of groceries and other household goods for just a few dollars.

Pulling off the strategy can require a lot of homework and reading of fine print, but it is entirely achievable and people do it every day. Try to think of it like a puzzle, one where you have to make all the pieces fit together just so.

Even if it takes you a couple of weeks, or even a month, to find the right combination of coupons and retailer to pull off your big score, the savings will more than make up for the investment of energy and time.

Manufacturers’ rebates are another avenue for massive cost savings, especially for bigger ticket purchases. A manufacturer’s rebate can be had on everything from tools to firearms and even vehicles, and you can save half or even more off the sticker price of any given item.

All that is required to take advantage of them is to keep an eye out for them; you won’t see these advertised as readily or as often as weekly coupons.

It is often most beneficial to reach out to a manufacturer directly and see if they have any special promotions or rebates in effect for their products.

Lastly, you can keep an eye out online and in-store for closeouts on items that just didn’t sell as well as a retailer had hoped. Call it clearance shopping or Bargain Bin diving, it makes no difference.

All that matters is you can get wickedly good deals and immense savings on all kinds of things if you’re quick enough to take advantage of them before another shopper snaps them up.

If you have access to the internet, this can be easier than ever with price-watching plugins and extensions for your favorite browser that will alert you when a price drops below a certain threshold.

Using all three of these strategies together will save you a literal fortune on a pile of needed prepping gear and provisions.

Get Fit

Physical fitness is essential to survival, as it will afford you the strength, speed, stamina and flexibility to endure the trials and intense situations you’ll face.

Strong people are more helpful in a wide variety of circumstances and all around harder to kill.

You might have all the high-end survival gear in the world, but if you cannot sprint flat-out for a quarter mile or hustle down a flight of stairs carrying an injured person your chances of surviving mayhem start shrinking.

And you needn’t concern yourself with the cost of purchasing  exercise equipment or joining a gym, either.

Using nothing more than your own body weight and calisthenics routines you can get shockingly fit so long as you are dedicated, and can do so with nothing more than a level place with enough room to do some exercises.

There are dozens upon dozens of bodyweight-only workout routines available for free on the internet and in print if you care to peruse your local news stand.

What is most important is that you pick one with a goal in mind and then stick to it. As with any fitness routine discipline is the key absolute. You won’t see any improvement if you aren’t regimented and dedicated.

Gather Free Materials and Supplies

There are all kinds of useful and free materials available for those who know where to look.

Cardboard boxes, for instance, are useful not only for packing and organizing on moving day, but they make great cheap insulation and will readily burn if you need to build a fire.

You can go to almost any business in town and they will gladly give away cardboard boxes in all shapes and sizes if you’ll haul them off.

If you’re really in a jam for some essential clothing, something like a jacket, boots or gloves, you can check in with local churches as they will often have a supply room for people who are in need and cannot afford such things.

Make DIY Tasks Opportunities

If you’re on a super tight budget you can use DIY tasks and chores as opportunities to expand your horizons and learn new skills.

A great example of this is working on your own vehicle. Instead of shelling out the cash to take it to a mechanic when there is a problem, make use of some of the sources I recommended above, like the internet or your local library, and try to at least tackle the problem yourself.

A great many repairs are surprisingly easy with just a little bit of guidance.

Then you can go get the parts, borrow the tools if you have to, and then enact the repairs. Aside from the satisfaction and savings of doing a job well yourself, you’ll be getting more intimately acquainted with a vital piece of equipment, one that is central to many preppers bug-out plans.

In the future if something happens while you’re on the road trying to escape a disaster or crisis, you won’t be completely overwhelmed and in over your head.

The complexity and mystery of the engine compartment won’t be quite so scary or threatening anymore.

Of course, there are some things that are too complex for the layman or the shade tree mechanic to handle on their own, and knowing when to throw in the towel and call for help is important.

But, generally, there’s nothing you’ll do to your car on your own that will break it beyond repair so long as you use a little bit of common sense.

Conclusion

Prepping when you have a tiny or even no budget for it seems like a fool’s errand, but it isn’t. It is entirely possible to become well prepared without spending a significant fraction of your yearly income on survival goodies.

You’ll need to change the way you think and reprioritize your efforts, but you don’t need to be shelling out big money just to be prepared for the next natural or man-made disaster.

no money prepping Pinterest


via Modern Survival Online https://ift.tt/2PQbCXi

Wednesday, March 4, 2020

Lucid Dreaming | Endorphin lucid dream-mi research proyect

I'm researching/practicing a hard but potentially powerful lucid dreaming method;HIT workout sessions troughout the day,for lucidity at night. I dont have the links now but I once saw studies linking endorphins with melatonin(and melatonin is linked endogenous DMT,according to strassman),ive been lazy this week but when I Did workout a lot during the day I had intense vivid dreams at night.
Anyone can confirm or add info to this?
any science papers?


via Lucid Dreaming - Dream Views - Attaining Lucidity https://ift.tt/2IiSfll

Raising the Titanic’s Radio Room

For some reason, of all the ships that have sailed the oceans, it’s the unlucky ones that capture our imagination. Few ships have been as unlucky as the RMS Titanic, sinking as she did on the night of April 15, 1912 after raking across an iceberg on her maiden voyage, and no ship has grabbed as much popular attention as she has.

During her brief life, Titanic was not only the most elegant ship afloat but also the most technologically advanced. She boasted the latest in propulsion and navigation technology and an innovation that had only recently available: a Marconi wireless room, used both for ship-to-shore and ship-to-ship communications.

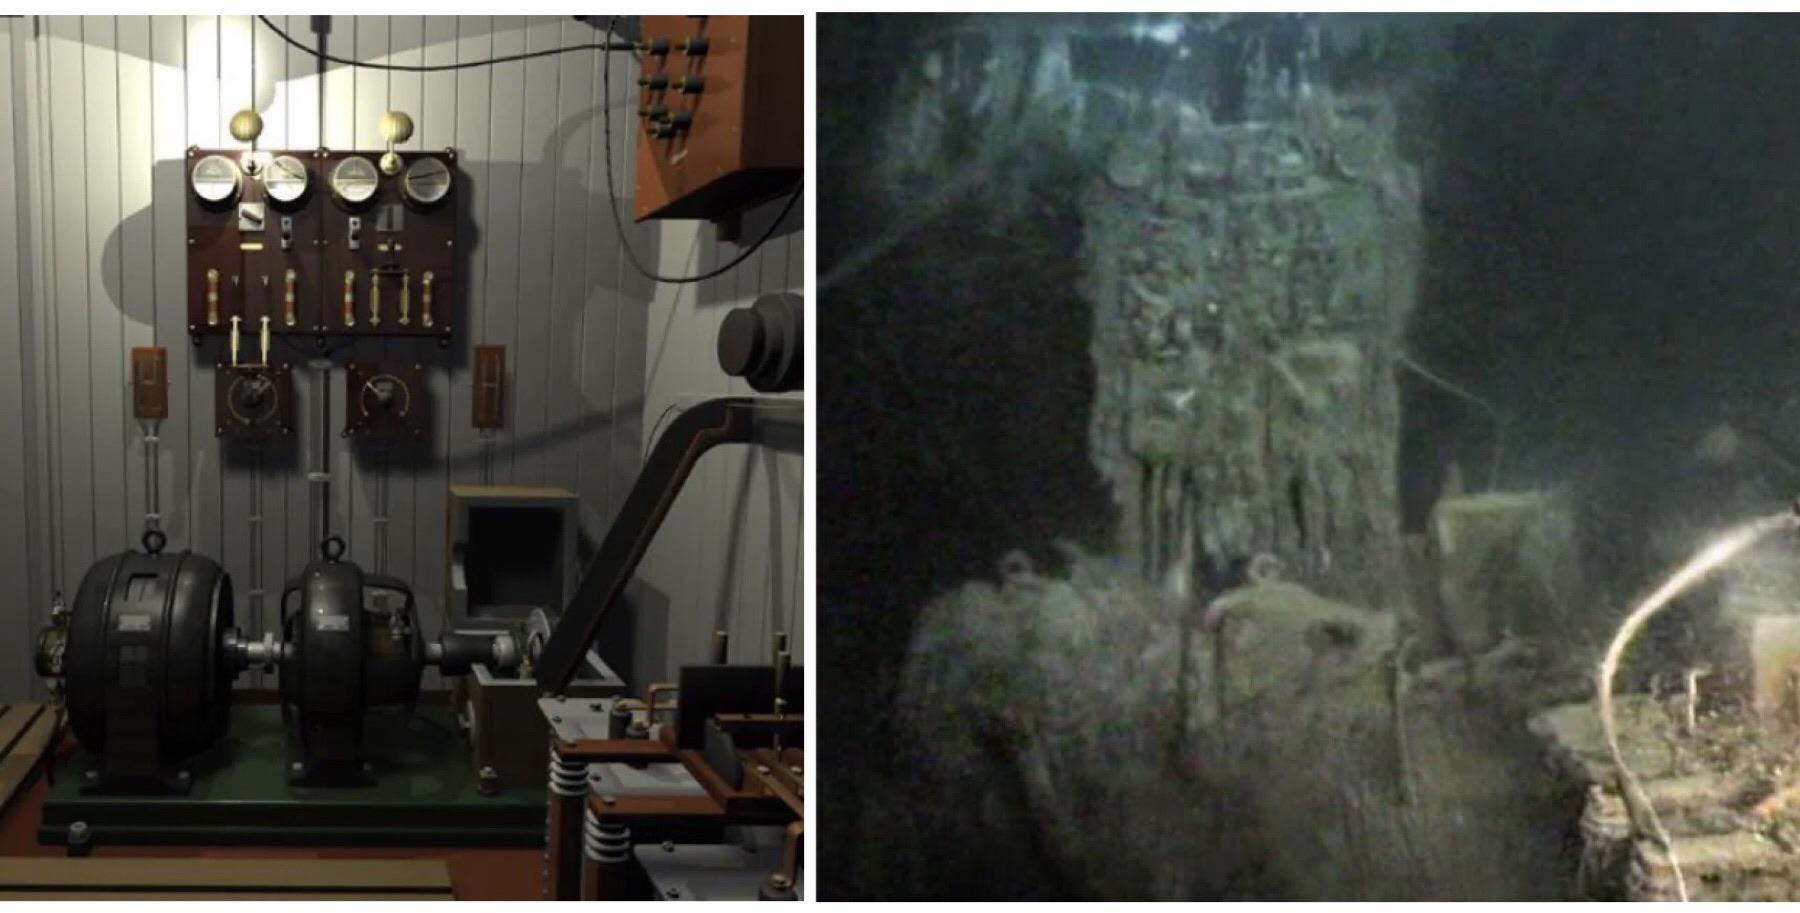
The radio room of the Titanic landed on the ocean floor with the bow section of the great vessel. The 2.5-mile slow-motion free fall destroyed the structure of the room, but the gear survived relatively intact. And now, more than a century later, there’s an effort afoot to salvage that gear, with an eye toward perhaps restoring it to working condition. It’s a controversial plan, of course, but it is technologically intriguing, and it’s worth taking a look at what’s down there and why we should even bother after all these years.

Wireless as a Service

When Titanic‘s keel was laid down in 1909, commercial radio was in its infancy. The Wireless Telegraph and Signal Company, popularly known as the Marconi Company after its founder, Guglielmo Marconi, was established mainly to provide wireless telegraphy services to ships at sea. It had only been in business for twelve years at that point, and had only been installing “Marconi Rooms” in ocean liners since 1903. Before Marconi, once a ship was beyond sight of land, it may as well not have existed. Radio changed all that, and the lifesaving potential of being able to send a distress signal was used by shipping lines to justify the expense of adding a Marconi system to a ship.

In practice, though, safety of life at sea was a secondary consideration in including wireless telegraphy into the design of ocean liners. The Marconi Company was a commercial venture, and as such needed to monetize their service to the greatest extent possible. Sending messages back and forth to other ships or using the system to contact shipping agents on shore to arrange berthings were important use cases, but not terribly profitable. Catering to the whims of well-heeled passengers, however, many with the desire to flaunt their wealth by sending a “Marconigram” from the middle of the Atlantic was very profitable. It cost 12 shillings and 6 pence for the first 10 words, the equivalent of $63 dollars in 2017.

Titanic‘s Marconi radio. Source: The Telegraph Room

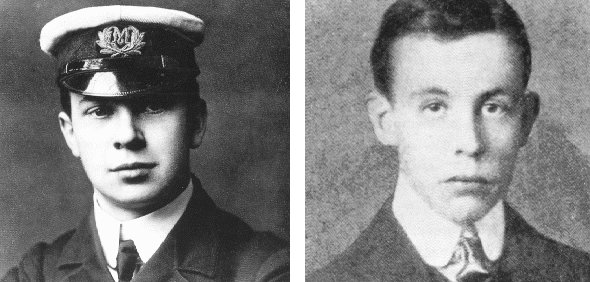
The Marconi service proved so popular that in the first 36 hours of the crossing that Titanic‘s two radio officers, Harold Bride and Jack Phillips, sent approximately 250 Marconigrams to shore stations in the Marconi network. The young men, 22 and 24 respectively, worked long hours to service the demand, made worse by a failure of the brand new radio gear – it had only been installed a week before sailing – the day before the collision. The two stayed up all night diagnosing and repairing the problem, which was a violation of Marconi Company policy, but showed considerable dedication to their employer.

State of the Art

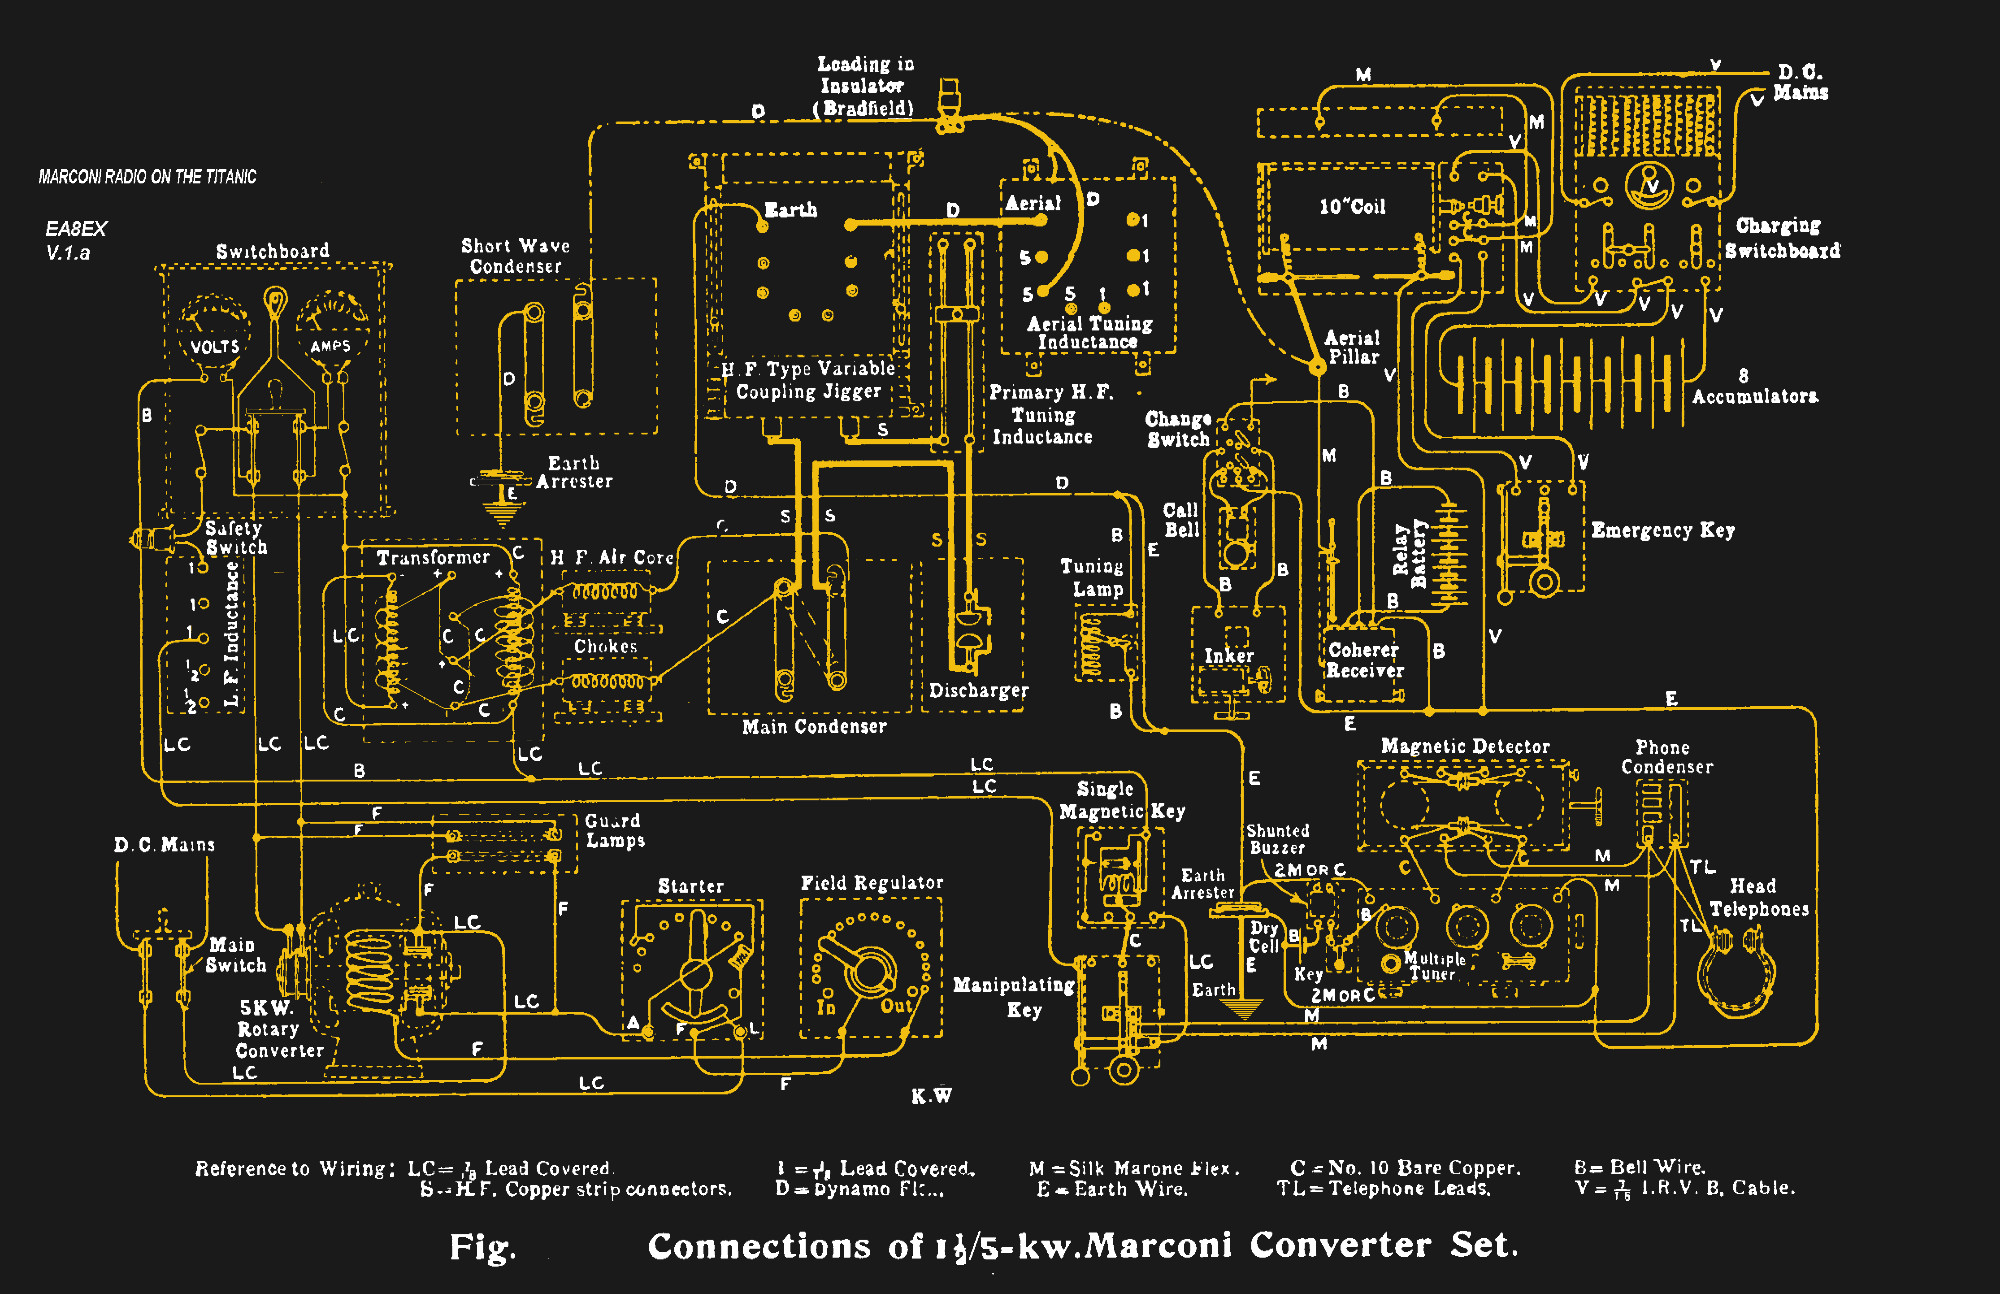
The Marconi suite on the Titanic was relatively spacious. It consisted of three rooms: the main room for the operator, a “Silent Room” with soundproof walls to house the loud spark-gap radio gear, and a small bunk room for the Marconi operators. The suite was located on the boat deck between the bridge and the Grand Staircase of the First Class entry. It was located as close to the top of the ship as possible to keep the feedline run to the antenna as short as possible.

The radio gear consisted of a motor-dynamo generator that boosted the ship’s DC electrical supply to high voltage AC to power the synchronous rotary spark-gap transmitter. At 5 kilowatts, the transmitter was the most powerful on the sea, and capable of reaching New York or London from the middle of the Atlantic. International convention called the use of the 600-meter band for ship-to-shore communications, and the 300-meter band for ship-to-ship work.

Left is a CG render of the Marconi room on Titanic, compared on the right to its current state. Source: r/Titanic; render appears to be the work of Parks Stephenson, underwater shot appears to be a screengrab from a James Cameron expedition.

A Night to Remember

Beginning on April 14, ships in the area off Newfoundland began spotting icebergs. As was common practice, radio-equipped ships would broadcast warnings of the floating mountains, to warn other vessels of the danger ahead. No fewer than six messages warning of icebergs were received by the Titanic‘s Marconi operators. The first two of these messages were relayed to Captain Edward Smith; the last four, however, were never brought to his attention. It is speculated that Bride and Phillips were so busy servicing the backlog of Marconigrams caused by the outage that they never relayed the messages to the bridge. That’s supported by Bride’s response to the last warning from the SS Californian: “Shut up, I am working Cape Race,” referring to the Marconi relay station at the southern tip of Newfoundland. That final warning was received at 23:30 ship’s time, a mere nine minutes before Titanic‘s death blow.

Jack Phillips and Harold Bride. Source: Amateur Radio from Scotland

Whatever role Bride and Phillips’ deference to their employer’s business played in causing the disaster, their response to it and the raw power of their gear and their skills as telegraphists made up for it. Without the wireless, there’s little doubt that the loss of life would have been even greater than it was. Titanic stayed on the air for almost all of the two and a half hours it took for her to finally go under, and Bride later testified that Phillips was still transmitting as they heard water flowing up the deck outside the Marconi suite. Both Bride and Phillips made it into the frigid North Atlantic before the bow section slid under and got into the last lifeboat; Bride survived with only minor injuries, but Phillips died of exposure during the long wait for RMS Carpathia, responding to the distress call that he himself had hammered out only hours before. The 705 lives that were saved that night were saved because they stayed on the job, despite being relieved by Captain Smith.

It’s Not a Ship. It’s a Tomb

Titanic‘s secrets, and her dead, lay hidden beneath the Atlantic for almost three-quarters of a century. Once Robert Ballard found the wreck in 1985, it stirred something in the collective imagination, and spawned an entire industry of Titanica. Subsequent explorations of the wreck have mapped out in exquisite detail the location of every inch of the ship and every artifact’s location, and multiple items have been recovered by remotely operated vehicles (ROVs) over the years.

The Marconi suite’s location at the top of the ship was fortuitous, as the bow section of the great ship settled to the seafloor in essentially an upright position. This makes salvage of the gear, which can be seen in the video below, technically possible. RMS Titanic, Inc, an Atlanta-based company that has the sole right of salvage over the wreck, has recently received permission in US District Court in Virginia for the “surgical removal and retrieval” of the Marconi gear from Titanic.

The wreck is protected by a treaty between the US and the UK, which has so far limited salvage to items in the debris field surrounding the wreck. The retrieval of the radio, which will require cutting away a section of the suite’s roof, will mark the first time the wreck has been plunged for its treasure. The argument put forth is a sensible one; that the steadily deteriorating structure of the ship will soon lead to a complete collapse, burying the Marconi gear under tons of corroded metal and rendering it lost to the ages. Others argue that this will be an act of grave robbery, a desecration of the final resting place of 1,527 victims of that fateful night.

Whatever your position, it’s hard to deny that the recovery of such an important artifact, one that both cost so many lives and saved many too, is a tantalizing idea, and one that should prove very interesting to watch unfold.


via Radio Hacks – Hackaday https://ift.tt/2Tpk6GV

Dog-Harnessing the Power of Walkie Talkies

[javier.borquez] likes to take his dog to the hang out at the dog park around dusk. But once the sun goes down and [Rusio]’s off the leash, running amok with the other dogs, it’s almost impossible to keep track of him.

Sure, there are probably glow-in-the-dark or lighted collars out there, but if you go commercial, chances are good that someone else’s dog will be wearing the same thing. Besides, what’s the fun in buying something that you can do a better job making yourself? With this dog distance indicator harness, you don’t even have to program anything. Instead, it uses a cheap pair of modified walkie talkies to show green LEDs on the harness while the dog is in range, and red when it isn’t.

Although [javier]’s pupper is the best pupper yes he is, [Rusio] can’t be expected to hold down the button and bark his location. His walkie talkie uses a 555-based frequency generator and a glued-down button to speak at 1 kHz.

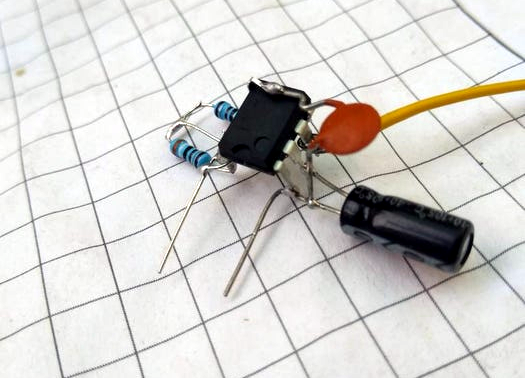
Over in [javier]’s walkie, there’s a resistor in place of the speaker to keep the talkie parts working. There’s also a half-wave bridge rectifier that charges a capacitor when [Rusio] is within range, and a resistor that drains it when he’s outside the 6-8 meter range. The rectifier’s output goes to a second 555 set up as a Schmitt trigger, which tells a transistor to turn the red LEDs on instead.

If you got stuck on the idea of hearing your dog talk to you over distances, here’s a Bluetooth Babelfish collar.


via Radio Hacks – Hackaday https://ift.tt/2uStmtL

Monday, March 2, 2020

Multi-Band Receiver On A Chip Controlled By Arduino

The Silicon Labs Si4735 is a single-chip solution for receiving AM, FM, and shortwave radio. With a bit of hacking, it even supports single sideband (SSB). All you’ve got to do is provide it with a suitable control interface, which [Ricardo Lima Caratti] has done with his recent project.

Using an Arduino Pro Mini, a handful of buttons, and a standard TFT display, [Ricardo] has put together a serviceable little receiver with a fairly impressive user interface. We especially like the horizontal bars indicating the signal to noise ratio and received signal strength. The next evolution would be to put this whole rig into some kind of enclosure, but for now he seems content to control the action with a handful of unlabeled buttons on a piece of perfboard.

Of course, the presentation of this receiver isn’t really the point; it’s more of a proof of concept. You see, [Ricardo] is the person who’s actually developed the library that allows you to control the Si4735 from your microcontroller of choice over I2C. He’s currently tested it with several members of the official (and not so official) Arduino family, as well as the ESP32.

The documentation [Ricardo] has put together for his MIT licensed Arduino Si4735 library is nothing short of phenomenal. Seriously, if all open source projects were documented even half as well as this one is, we’d all be a few notches closer to world peace. Even if you aren’t terribly interested in adding shortwave radio reception to your next project, you’ve got to browse his documentation just to see where the high water mark is.

We actually first heard about this library a few days ago when we covered another receiver using the Si4735 and [Ricardo] popped into the comments to share some of the work he’d been doing to push the state-of-the-art forward for this promising chip.


via Radio Hacks – Hackaday https://ift.tt/39dp52V