Monday, September 30, 2019

Take a Break From Arduinos, And Build A Radio Transmitter

When you start watching [learnelectronic’s] two-part series about making a radio transmitter, you might not agree with some of his history lessons. After all, the origin of radio is a pretty controversial topic. Luckily, you don’t need to know who invented radio to enjoy it.

The first transmitter uses a canned oscillator, to which it applies AM modulation. Of course, those oscillators are usually not optimized for that service, but it sort of works. In part two he reduces the frequency to 1 MHz at which point it can be listened to on a standard AM radio, before adding an amplifier so any audio source can modulate the oscillator. There’s a lot of noise, but the audio is clearly there.

This is far from practical of course, but combined with a crystal radio it could make an awesome weekend project for a kid you want to hook on electronics. The idea that a few simple parts could send and receive audio is a pretty powerful thing. If you get ready to graduate to a better design, we have our collection.


via Radio Hacks – Hackaday https://ift.tt/2oDGsr9

Trucker’s Hitch Knot – Easy Step by Steps

The Trucker’s Hitch is a mechanically advantageous block and tackle (pulley) system made only of one piece of rope. This has hundreds of uses. It’s great for guy lines for tents and tarps, it makes hoisting weights vertically significantly easier, it can produce some of the tightest tie-downs for lashing things onto a truck, cart or sled… the list goes on.

Contrary to its name, the trucker’s hitch is not really a hitch. It’s a composite knot (a structure made of multiple knots) for tensioning a line between two anchor points, though to achieve this one must normally use a hitch.

In theory the arrangement of lines and loops should produce a 3:1 mechanical advantage. In practice the friction of the rope against itself probably reduces this to more like 2:1.

Even this can be much stronger than you might guess though so be careful if tying out tarps and tents with it that they don’t rip.

Trucker’s Hitch Step by Step

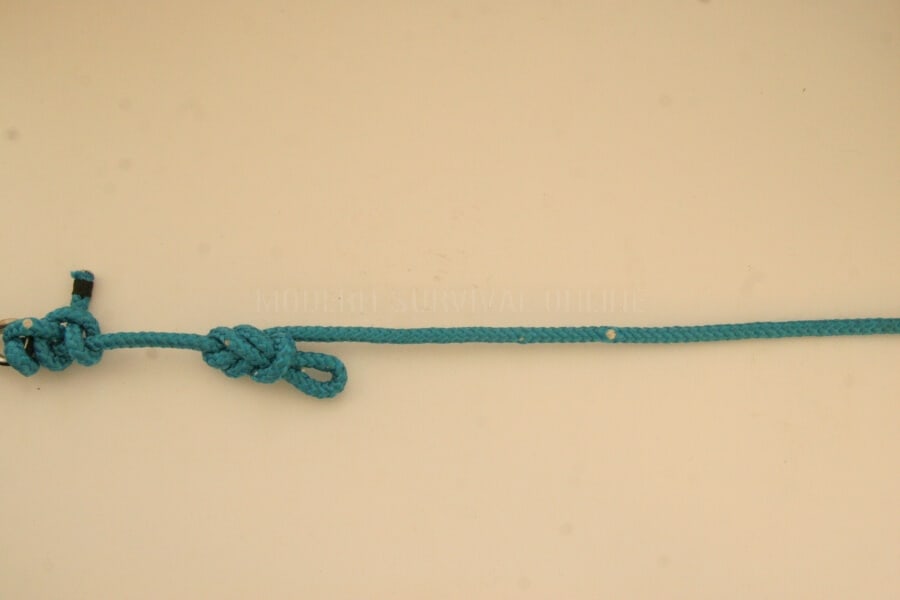
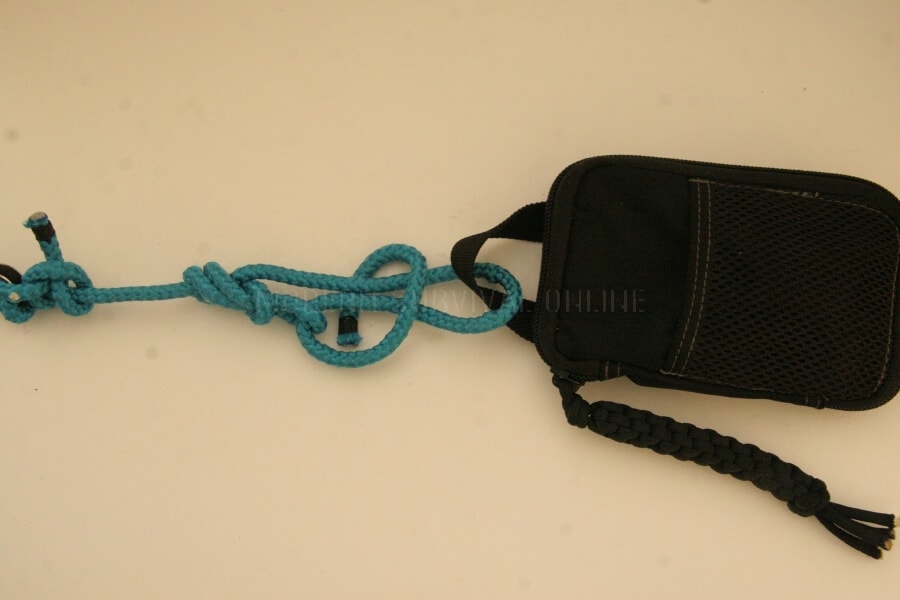
trucker hitch knot 1

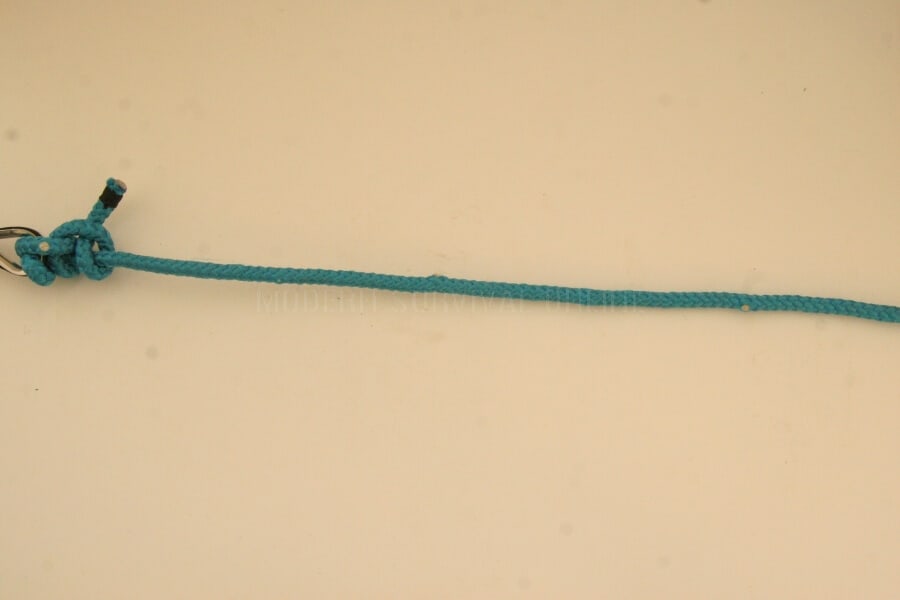
1. First attach the line to the anchor. A round turn and two half hitches has been used in the picture, but any strong knot (a hitch or a loop) will do.

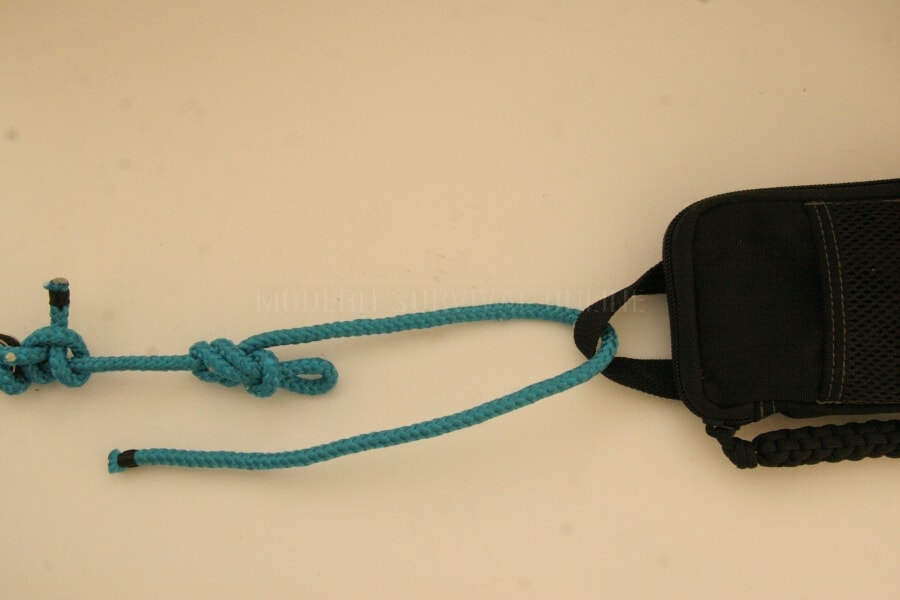
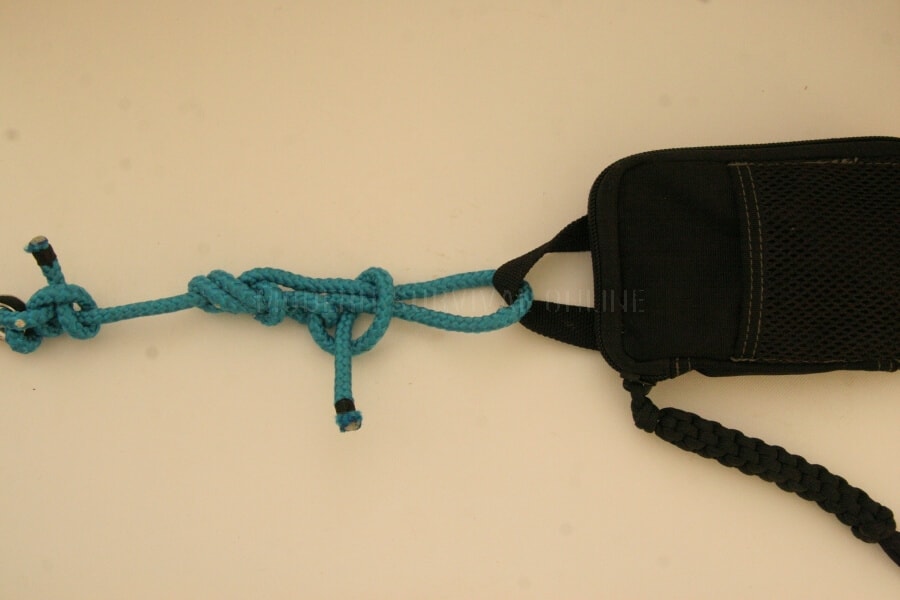
trucker hitch knot 2

2. Make a loop in the line, fairly close to the anchor point. If the loop is directional (like a Span loop or a Directional Figure of Eight), then the loop should face away from the anchor point, as in the photograph.

Any loop knot can be used for the pulley loop, although a Directional Figure of Eight is used here because the load will always be in the same direction along the line, so it is very appropriate.

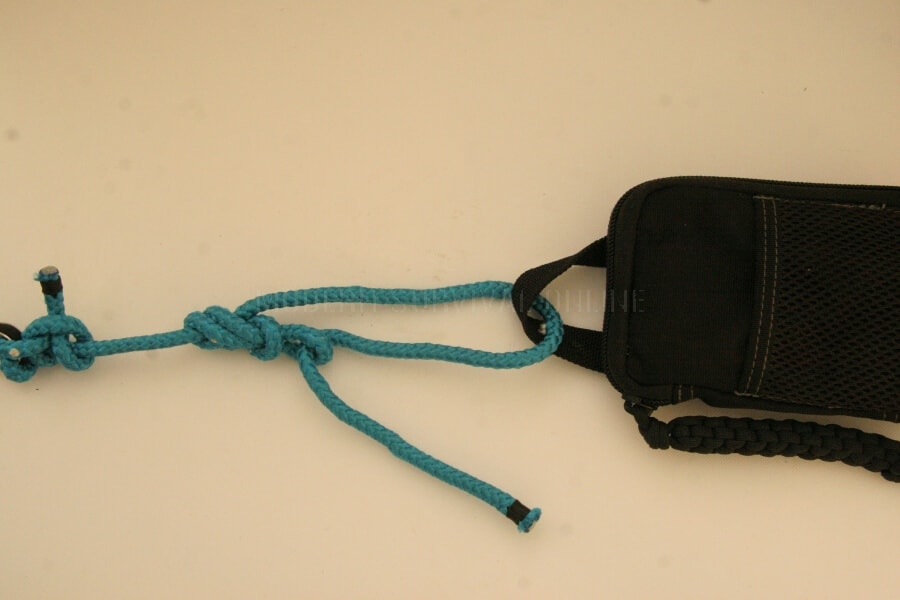
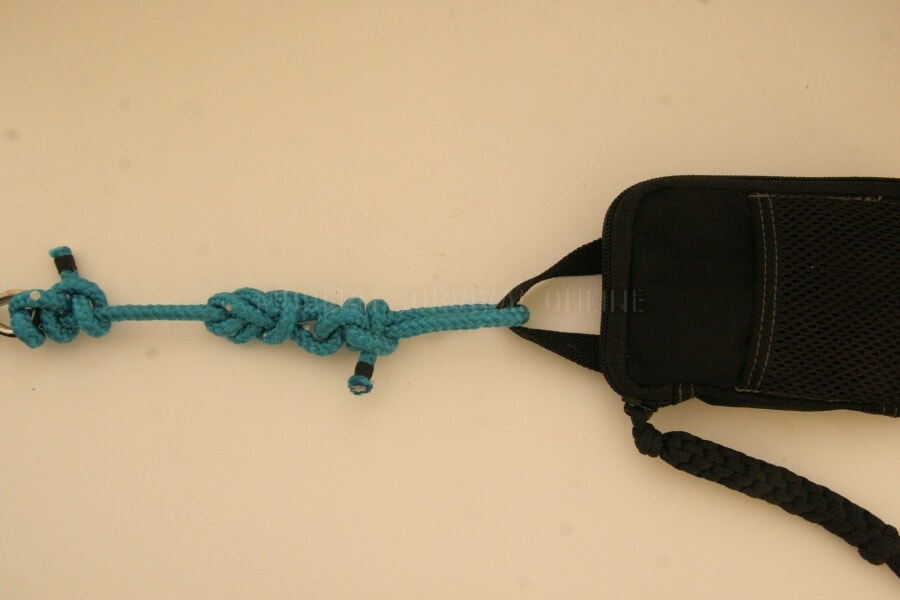
trucker hitch knot 3

3. Lead the working end through the attachment point on the load.

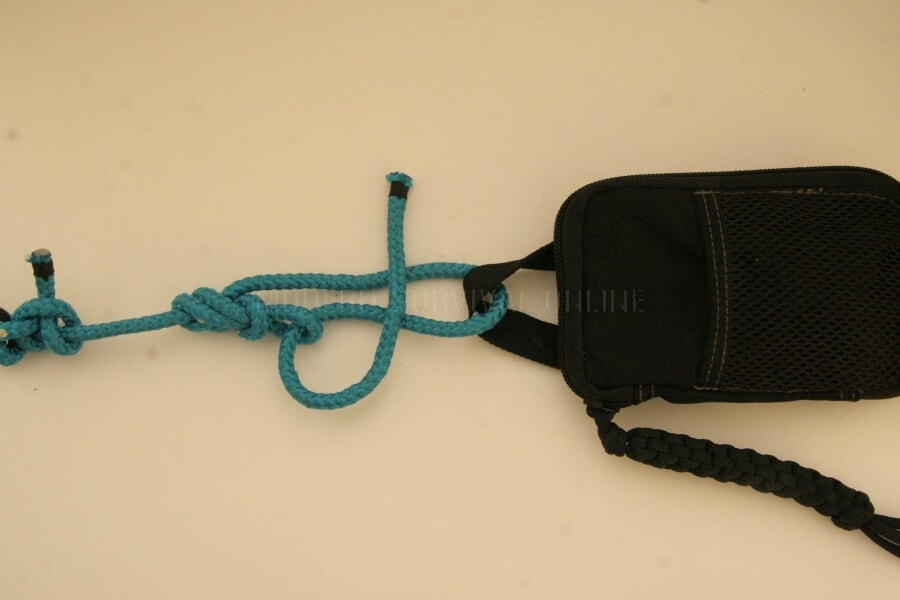
trucker hitch knot 4

4. Now lead the working end through the loop knot, and back towards the load. The Trcuker’s Hitch itself is now finished. Pulling (towards the load) on the working end will tension the system, and bring the load closer to the anchor.

trucker hitch knot 5

5. Once the desired tension is reached, you can secure the knot with a few half hitches. You can hold it temporarily (while you do this) by pinching the three strands together just underneath the pulley knot.

First lay the working end across the two strands supporting the load. See how this forms a loop.

trucker hitch knot 6

6. Bring the working end down underneath the two strands.

trucker hitch knot 7

7. Thread the working end through the loop it has created, and pull on it to snug up the half hitch.

trucker hitch knot 8

8. Repeat the last three steps at least once to produce more hitches. More will be more secure, but each extra hitch adds progressively less security, so in reality two or three is enough.

For greater control, the Trucker’s Hitch can be finished with a slide-and-grip hitch instead of the standard half hitches.

Related Knots

  • The Versatackle is a similar mechanical advantage system, but uses two loops and many more turns. This gives it a significantly higher mechanical advantage, but also higher friction. This isn’t necessarily a bad thing though because very high friction means the system self-locks when pulled tight.
  • The Quick Trucker’s Hitch is a quicker-to-make version of the same concept as the standard version taught here. It is made without the use of the ends, so many can be be tied along the length of a line to lash down different parts of a long load (like logs on the back of a truck).
  • The Poldo Tackle is a two-loop system which uses the whole length of the line (both ends, with no useable tail) for drawing together two loads.

There is a great youtube video which investigates empirically (with two force scales) just how effective the Trucker’s Hitch actually is. (short answer: very effective!)

Because part of its fundamental mechanics rely on rope sliding over rope and tension being applied, the Trucker’s Hitch is most effective in slippery, high modulus (non-stretchy) line, like HMPE (‘dyneema’) braids.

Conclusion

The Trucker’s Hitch is famous in bushcraft and ropework circles, and for good reason. You would be stupid to learn to tie any knots at all and miss this one out, it’s uses are so vast and it is so versatile and customisable to purpose.

If you only learn two or three knots from all the articles I’ve written, make this one of them!

truckers hitch pin


via Modern Survival Online https://ift.tt/2naZAMX

Sunday, September 29, 2019

Probe the Galaxy on a Shoestring with this DIY Hydrogen-Line Telescope

Foil-lined foam insulation board, scraps of lumber, and a paint-thinner can hardly sound like the tools of a radio astronomer. But when coupled with an SDR, a couple of amplifiers, and a fair amount of trial-and-error tweaking, it’s possible to build your own hydrogen-line radio telescope and use it to image the galaxy.

As the wonderfully named [ArtichokeHeartAttack] explains in the remarkably thorough project documentation, the characteristic 1420.4-MHz signal emitted when the spins of a hydrogen atom’s proton and electron flip relative to each other is a vital tool for exploring the universe. It lets you see not only where the hydrogen is, but which way it’s moving if you analyze the Doppler shift of the signal.

But to do any of this, you need a receiver, and that starts with a horn antenna to collect the weak signal. In collaboration with a former student, high school teacher [ArtichokeHeartAttack] built a pyramidal horn antenna of insulation board and foil tape. This collects RF signals and directs them to the waveguide, built from a rectangular paint thinner can with a quarter-wavelength stub antenna protruding into it. The signal from the antenna is then piped into an inexpensive low-noise amplifier (LNA) specifically designed for the hydrogen line, some preamps, a bandpass filter, and finally into an AirSpy SDR. GNURadio was used to build the spectrometer needed to determine the galactic rotation curve, or the speed of rotation of the Milky Way galaxy relative to distance from its center.

We’ve seen other budget H-line SDR receiver builds before, but this one sets itself apart by the quality of the documentation alone, not to mention the infectious spirit that it captures. Here’s hoping that it finds its way into a STEM lesson plan and shows some students what’s possible on a limited budget.


via Radio Hacks – Hackaday https://ift.tt/2nFxFob

Saturday, September 28, 2019

Chinese Radio Telescope Hopes to Find Exoplanets FAST

People who enjoy radio are constantly struggling to find a place to erect a bigger and better antenna. Of course it’s a different story and the most hardcore end of the spectrum: radio astronomers. The Chinese are ready to open up a new radio telescope called FAST (Five-hundred-meter Aperture Spherical Radio Telescope). As the name implies, it is 500 meters in diameter which is about 1,600 feet — that five and a half American football fields or about four and half of the other kind of football field.

The new telescope will be the largest single-dish observatory in the world and will offer about twice the area of the next-largest single-dish instrument at Arecibo. The project is in a very remote location, presumably to reduce the level of local radio interference — it’s hard to find radio quiet zones in heavily populated areas.

Scientists hope the huge antenna will help solve the mystery of fast radio bursts and may even study exoplanets. In fact, earlier this year, the instrument detected hundreds of fast radio bursts from a source, many of which were too faint to be heard by lesser antennas. There are also plans to examine pulsars in an attempt to discover ripples in space-time. The location in the Dawodang depression of the Guizhou province uses about 4,400 panels and 2,000 mechanical winches to focus radio energy.

Other telescopes that use multiple dishes have more resolution and, in fact, FAST adds 3 dozen 5 meter commercial dishes to get an increase in resolution of 100 times. Of course, you could build your own, although to get up to 500 meters might be a stretch. If your backyard isn’t that big, you can build a tiny radio telescope too.


via Radio Hacks – Hackaday https://ift.tt/2nCPEvG

Tuesday, September 24, 2019

Survival Fitness Training Series: Jogging

Howdy and welcome back to our survival fitness series, where we take the fitness aspect and apply it to prepping, so you can be physically prepared for disasters and emergencies big and small.

No matter how much you walk each day, you can’t really build up stamina for survival purposes unless you start doing something more challenging, such as running.

I love jogging, but as you may already know or experienced, it can have a big impact on our joints. I know people who’ve had leg surgery three times and they’re not even 30 years old. They love to run but, because they didn’t do it right, they are now paying the price.

I’m not going to go all scientific on you about what aerobic exercising is. Suffices to say that, in our case, it will manifest itself in:

  • Short-distance running;
  • Long-distance running;
  • …and certain aerobic exercises such as running in place or the boxer shuffle.

The #1 problem for runners are the knees. 40% of injuries happen there and, even those who get lucky still suffer from knee pains every once in a while.

Now, a lot of times, these injuries aren’t serious (mostly annoying) but consider our prepping goals: we might have to do a combination of walking and running when bugging out, right? Then, at some point, we’ll have to make a run for it, maybe even jump. It takes one such move to permanently damage our knees and get left behind.

Yes, when you’re doing your jogging on the track, you can stop at the first sign of discomfort, but that won’t be the case when you’ve got bad guys chasing you. In such cases, not only should you be trained to run as fast as you, can but your knees should be able to support it.

So before I give you the exercises, I encourage you to go to your physician and do a thorough examination of your body. If you’re over 45, you should probably be doing these every year, anyway. If you’ve skipped them until now, that’s all the more reason to do them right now, before you begin any type of training.

You need to check everything, from glycaemia (the level of blood glucose) to hernia to your knees, spine and on and on. You should definitely tell your physician the types of exercises you intend to do so they can tell you what you can and cannot do and, most importantly, what you should avoid at all costs.

Yes, that’s unfortunately true. Your doctor may strongly advise against some of these exercises and, I suggest you listen to her… but do ask what kind of exercises you can do. Otherwise you risk injury and that could potentially mean you need to stop training altogether!

OK, let’s get back to the health issues pertaining to running because that’s what we’re discussing in this chapter.

The most common problem is the so-called “runner’s knee”, when you feel mild pains in your knees, mostly when you’re running, but even when you’re not. If this is the case, your doctor might ask you to do an X-ray on both knees to find out what’s going on.

It may be because you pushed yourself too hard during training. It could be because you jumped and landed on your foot the wrong way or you might be simply overweight. That extra weight is affecting your knees more than you think.

If the pain is not that big, you can do your training, however, if you’ve pushed yourself too far, you should probably take a few days off. It’s better to take a week off now than 5 months later, right?

Besides a bad knee, there are other issues runners have, such as Achilles tendinitis, shin splints and even stress fractures. Whatever they are, you need to deal with them before you begin, particularly if you’re over 40.

Where Should You Jog?

Run anywhere you want! I’ve had no problem running even in crowded streets if that’s what I felt like doing. If you don’t have a track near where you live, any road will do, however there’s a big caveat here.

Professional running tracks are made to protect your joints and knees by acting as a cushion. On the other hand, running outside the track, whether it’s on a park or on the side of the road will increase the chances of injuries long term.

How to Protect Yourself While Jogging

Of course, if you have the proper equipment, you can minimize these problems. A solid pair of running shoes is a must, but there are other things you can do. For example, you can wear straps just below the knees in order to spread the pressure across a larger area.

Next, you have the knee sleeve and the patella sleeve, the latter having a hole in it right around the knee cap. You should definitely talk about these options with your doctor to ensure you properly protect yourself.

Warming-Up for Jogging

I cannot stress enough the importance of warm-ups before each and every session. If you’ve had past injuries, your warm-ups you need to be extra careful and do even longer work-outs.

A basic workout should be just like the one you used to do during gym class in high-school. Nothing fancy. Warming up has already been covered here, but warming up for jogging and sprinting requires you do some things in particular…

You should start by rotating your hands (not too fast, though!), then your head with the arms on your hips.

Then, continue with a few leg stretches. Take your time with these, and make sure you don’t stretch them too hard. Since your legs are not warmed up yet a too long a stretch could cause injury.

After the light stretch comes an easy jog of about 100 meters (that’s 110 yards). Up to you if you want to do jog for a little longer.

Next, let’s do some toe walking. Simply walk on your toes for 30 to 60 feet (that’s 10-20 meters) – but don’t push yourself if you can’t do it – and really feel those calves working.

The second one is heel walking where you walk on your heels for the same distance.

So to recap, your warm-up should look like this:

  • Light stretching and movement of body, arms, legs and head;
  • A light jog for about 100 meters;
  • Toe walking and heel walking for 10-20 meters.

We’re going to start, of course, with low-speed jogging. I’m assuming you haven’t done this in a while so I’m talking it easy, but we’re going to gradually increase intensity with each workout.

For your first one, I don’t want to give you a specific distance to cover because I don’t know you. If you’re a 30 year old guy who’s in pretty good shape, you’re going to run longer and faster than a 55 year old woman who’s a little overweight.

Here’s how I suggest you do this:

  1. Start running.
  2. If you feel “bad pain”, stop.
  3. Run until you feel exhausted but don’t stop; run for 50 more yards.
  4. Stop.
  5. Repeat 2 times.

The big takeaway here is that you need to find your own running sweet spot. That moment where you feel you can’t run anymore and you push your limit by just a little bit. That extra 10% is what’s going to help you make progress from workout to workout.

By now, you should have run 3 X 100 yards, that’s at least 300 yards or 275 meters. I suggest you write these down somewhere because this is your personal best and you’re going to try to beat the next time you run.

Now that you broke the ice and you successfully ran for a certain distance, it’s time to make a plan that will help you run not just long distances but also with your sprints. As a prepper, you’re gonna need to do sprints every now and then. One of them may be right when SHTF, when you need to grab your bug-out bag and just go (assuming taking your car is out of the question).

The big problem I see with doing this is that when SHTF, you won’t have time to warm up. Disaster won’t wait for you to finish your stretching. When it hits, you’re going to have to be in the best shape of your life if you don’t want your knee to fail you when you have a tornado on your back.

Ideally, you’ll want to be able to run a mile (or 2 kilometers) without spitting your lungs out. You get to this point by always pushing yourself just a little bit, and always stopping when you feel bad pain.

Now, if you can’t run that mile without stopping, that’s not a problem. Stop for a few seconds, breathe in and out, then continue running until you cross the finish line.

Breathing

Speaking of which, breathing is an important part of running and you need to do it right if you want maximum performance. The way most people do it is, you guessed it, the wrong way. They breathe “in their chest” as opposed to “inside their bellies” and this gets them tired a lot sooner. (This is also called diaphragmatic breathing.)

Since right now we’re more concerned with doing this right than with breaking a world record, let’s try and focus on your breathing, specifically on breathing inside your belly. How? Simply focus on filling your belly with air.

Next, let’s try and run for 100 yards (or meters) and focus on this kind of breathing. Forget anything else, focus on this one thing until you get it right. If you don’t seem to get it, keep running until you do. Slow down your pace if you have to and focus on breathing from the belly – you can do it!

Once you do get it, I suggest you focus your entire session on breathing this way, until it becomes natural. It’s a little tough to master but you’ll get it eventually. By the way, did you know that breathing from your belly as opposed to your chest cavity also helps you have a deeper voice? Just a fun fact.

Ok, let’s talk a little bit about how to breathe during running. As you start to run, your breathing becomes more rapid, so it’s harder to control breathing from the stomach and not the chest. But since you practiced this beforehand, it should be easier.

The way you breathe once you start running is in patterns. The easiest way to do it is to coordinate your inhales and exhales with your steps. For example, as you step left and right, you breathe in twice then, for the following two steps, you exhale twice.

Something like: left-foot-inhale, right-foot-inhale, left-foot-exhale, right-foot-exhale.

Of course, as you become more experienced and you start increasing the pace, you can take three small inhales or exhales for each 2 steps you take… but let’s do that later.

By the way do you want to know the very best advice to improve your breathing? Simply stop smoking.

Dynamic Stretching while Running

Although stretching has its own chapter, it’s worth mentioning here an interesting way of doing it… right in the middle of your running workouts. What I’m about to show you are called dynamic stretches because you’re not really holding the position.

As you’re running, do one of the following:

  • bring your knees as high up to your chest as possible (not too high, though, your focus should still be running),
  • bring your toes as close as possible to your buttocks.

You can even do 100 yards (or meters) of each as part of your running warm-up routine.

The Workout

OK, we’re finally getting into the good stuff! You’re healthy and able to run, you know how to breathe, you have the proper equipment and you’re a warm-up master. Now what?

Well, we need to train ourselves for two things: long distance and sprints (a.k.a. bugging out and running for your life).

The first one is easy, you just run for as long as you can, making sure to increase either the distance or the pace from workout to workout. Before each workout, set a goal. You either want to run longer than last time, or you want to run the exact same distance only faster. This is why having a workout diary and a stopwatch will help.

So, let’s say you ran no more than 100 meters on your first workout. The second time, after a proper warm-up of course, go ahead and run as long as you can without stopping. Really push yourself unless there’s “bad pain” somewhere in your body.

Measure the distance and how long it took you to cover it, then write it down (some apps keep all this data in your phone’s memory). If you want, you can take a break, maybe do some walking, then run a little bit more.

But on your next workout, your goal should be to be better than on your previous one. If you ran a mile in 15 minutes last time, your goal should be either to run more than a mile or to finish that mile, say, 14 minutes and 40 seconds.

Notice that I’m keeping things simple and easy for you. You’re not getting ready to run a marathon or to join the Olympics, but it’s important to have a goal, something to strive for. That’s one of the keys to keeping yourself motivated long-term and not quitting, which is the last thing I want to see happen.

So let’s say you managed to run 1.2 miles on your second workout. Then you went for 1.5 miles. Should you go for two? How about you spice things up by trying to run at an increased pace for a mile? Check the time it took you to finish on your second workout and try to beat that.

And on your next workout, you can try and beat the 2 miles mark but also focus on your breathing. Do you think you can do that?

At-Home Aerobic Exercises

I’m giving you a couple of quick aerobic starter running exercises to incorporate in our home workouts.

Running in place is, as you probably guessed, is a way to simulate running while standing in place. This is less stressful for your knees but not as effective as actual jogging. Nevertheless, it’s a good place to start if running is not an option.

Boxer shuffle is similar to running in place, except that you need to alternatively move your feet to the front and to the back. As you’re doing this, allow your body to move to the right of the room and then back to the left as much as you can (you will need at least 7-8 feet of space both to your left and right for this).

Off-Road and Trail Running

While jogging on the track will make you better at it consider that, as a prepper, you’re going to have to walk and run on difficult terrain. Running through the woods, for example, is extremely difficult. And what if you decide to bug out on the rail tracks, have you ever tried running on them? I have, and it is not easy…

A quick way to start trail running is to simply run around the block… if it’s possible, of course, and keep in mind what we talked about protecting your knees. These surfaces are not designed to do that.

The most important thing to watch out for when running on uneven terrain is… your step. Depending on how bad the terrain is, you may fracture your ankle or even fall. Unlike sports tracks where you don’t have to look where you’re going unless there’s another runner right in front of you, off-road running is all about watching your step. This is why it’s probably a good idea to not do this alone.

Another word of advice: do your off road running while there’s still daylight (for obvious reasons)

A Quick Aerobic Exercise for Urban Preppers

I just wanted to throw this one out there for two reasons: one, very few people think about it and two, it’s actually going to make a world of difference. The amazing part is, no one will think you’re crazy for doing it.

I’m talking about practicing running down the stairs. If you’re a city dweller, you probably climb a lot of stairs every day. In case of an emergency (a fire, a terrorist attack and so on), you need to evacuate outside as fast as possible.

So how about you increase your speed the next time you use them? No one will ever suspect you are in fact prepping, they’ll just think you’re in a hurry.

Let’s do this!

“Coach” Dan
jogging for survival pin


via Modern Survival Online https://ift.tt/2mXWETq

Friday, September 20, 2019

Lucid Dreaming | Getting stuck in Dream Recall

I have been trying to lucid dream on and off for the past 5 years. Throughout these 5 years, I have never been able to bring my dream recall up past remembering three dreams max per night. Three dreams is the absolute max I have achieved in one night. I have never gone beyond that number, and I am lucky if I remember 2 dreams in one night.

This 3 dream count is also incredibly dodgy. It always has been. I will go from one night remembering 3 dreams to the next night remembering 1 to the next 3 nights remembering zero and so on and so forth. I get consistent amounts of sleep as well.

I keep a dream journal that is a bit inconsistent I will admit, but even after keeping a consistent dream journal for the past month I am still having inconsistent recall.

My question is: How do I go about improving this number and making it so I consistently remember my dreams?


via Lucid Dreaming - Dream Views - Attaining Lucidity https://ift.tt/2Qk07Kg

Wednesday, September 18, 2019

Hackable Ham Radio Multitool Contributes To Long Term Survival Of The Hobby

Ham radio, especially the HF bands, can be intimidating for aspiring operators, many being put off by the cost of equipment. The transceiver itself is only part of the equation and proper test and measurement equipment can easily add hundreds of dollars to the bill. However, such equipment goes a long way to ease the frustrations of setting up a usable station. Fortunately [Ashhar Farhan, VU2ESE] has been at it again, and recently released the Antuino, an affordable, hackable test instrument for ham radio and general lab for use.
As you can probably guess from the name, it is primarily intended for testing antennas, and uses an Arduino Nano as a controller. It has quite a list of measurement functions including SWR, field strength, cable loss, RF cable velocity, modulation, and frequency response plotting. It also provides a signal source for testing. Its frequency range includes the HF and VHF bands, and it can even work in the UHF bands (435Mhz) if you are willing to sacrifice some sensitivity. The software is open source and available with the schematics on Github.
Most of the active ham radio operators today are of the grey haired, retired variety. If the hobby is to stand any chance of outliving them, it needs to find a way to be attractive to the younger generations who grew up with the internet. The availability of affordable and hackable equipment can go long way to making this happen, and [Ashhar Farhan] has been one of the biggest contributors in this regard. His $129 μBITX HF SSB/CW transceiver kit is by far the best value for money general coverage HF radio available.
See a short demonstration of the Antuino video after the break

[Jenny List] previously covered the μBITX, as well as its predecessors, the Minima and BITX transceivers. [Dan Maloney] also did a good job of summing up the frustrations of new operators trying to get into the hobby.


via Radio Hacks – Hackaday https://ift.tt/2AvCmEi

Tuesday, September 17, 2019

Lucid Dreaming | My method for attaining Lucidity, as well as increasing the duration and pleasure of dream sex

To attain lucidity, I refrain from masturbating and let the sexual energy build up in me over a few days. The sexual energy builds up in my dreams and they become more and more sexual until lucidity is achieved. To avoid the problem of wet dreams, I put a fleshlight over my genitalia the night before going to bed, and enclose the end with some elastic bands so no semen leaks out. Alternatively a condom could be used, but the fleshlight makes sex within the dreams more pleasurable as it simulates a vagina.

When I used to have sexual dreams, they would be cut short because of the fear of having a wet dream and wouldn't want to make a mess. This method has made my dreams 100x more pleasurable. Having an orgasm in a lucid dream has got to be the most pleasurable thing in existence as the time dilation of the dream extends the feeling of the orgasm to unimaginable lengths.

I've been away from this forum for years so let me know if you've heard of this method before. Enjoy! :bedtime:


via Lucid Dreaming - Dream Views - Attaining Lucidity https://ift.tt/2V5ziIn

Tuesday, September 10, 2019

Learn Morse Code, Clockwork Orange Style

You might have to provide your own wrist straps and eye clamps, but if you want to learn Morse code, [Seth] has a web site for you. You can get code practice using the Farnsworth method and each letter is flashed before you as it is sent, which we assume will burn it into your brain.

Why learn Morse code now? Just about all countries now have at least some no code ham licenses and many have taken code off the tests completely. However, there are still many hams that use the code even today. Why? The personal challenge is part of it and perhaps nostalgia. However, it is also true that Morse code transmitters and receivers are dead simple to build and can get through where other simple radios can’t.

While it is true that some new digital modes can work near the noise floor, those require sophisticated computers or FPGAs which might be hard to cobble together in a foxhole.

If you haven’t run into the Farnsworth method before, it is simple but effective. If you learn to copy code at a relatively slow speed — say 5 words per minute — you can succeed rather quickly, but it becomes harder to progress to a faster speed. Trying to learn at a higher speed is frustrating because you won’t have much success until you’ve had a lot of practice.

The Farnsworth method sends characters at high speed but varies the spaces between letters to reduce the average speed of the message. This gives you time to think about what you hear. But when you increase the speed — that is, reduce the spaces between letters — the characters sound the same which makes it easier to learn. They just come faster.

Morse code training has come a long way since the 1930s. Still need motivation to learn the code? What if you get taken hostage?


via Radio Hacks – Hackaday https://ift.tt/2LLQAGc

Seeds Stockpile: How to Plan and Start It

Saturday, September 7, 2019

Complex Impedences Without The Pain

Any grizzled electronic engineer will tell you that RF work is hard. Maintaining impedance matching may be a case of cutting wires to length at lower frequencies, but into the low centimetre and millimetre wavelengths it becomes a Dark Art aided by mysterious and hugely expensive test equipment beyond the reach of mere mortals. A vector network analyser or VNA may be beyond the reach of many, but [Tomasz WÄ…torowski] is here to tell us about how with some resistors, mathematics, and a bit of lateral thinking its functions may be replicated with a more modestly equipped bench.

It’s not a method for the faint-hearted as the mathematics are of the variety that you probably learned as an undergraduate but let slip from your memory with thanks after the course ended. The method involves measuring the return loss both with and without a resistor of known value in series with the antenna, these figures allow the real and imaginary components of the antenna’s impedance to be calculated. There is a further piece of work though, this method doesn’t determine whether the antenna is capacitive or inductive. Repeating the measurement with either a capacitive or inductive matching network allows this to be determined, and the value of the appropriate matching component to be calculated.

If you are interested in this kind of work, start with a primer on RF design.

Complex impedance matching using scalar measurements, math and resistors


via Radio Hacks – Hackaday https://ift.tt/2ZLN2g5

Thursday, September 5, 2019

Ham Radio Company Wins Big

It is sort of the American dream: start a company in your garage and have it get crazy big. After all, Steve Jobs, Bill Gates, and even Bill Hewlett and Dave Packard did it. Seems hard to do these days, though. However, one ham radio company that has been pushing the edge of software defined radio appears to be well on the way to becoming more than its roots. FlexRadio has teamed with Raytheon to undertake a major project for the United States Air Force.

The Air Force has given Raytheon and FlexRadio $36 million to develop an HF radio based on the existing SmartSDR/Flex-6000. ARRL news reports quote FlexRadio’s CEO as saying that the investment in the military radios will pay dividends to the firm’s ham radio customers.

Honestly, that would not surprise us, as ham radio has always gained a lot both from military technology and surplus. In addition, military radio makers such as Collins have a long history of also making amateur gear. We would imagine the potential market for an SDR would be far larger for the military so this could make more powerful gear available at a lower price.

The Flex6000 appears in the video below. The receiver uses a digital direct sampling technique on receive and a direct upconversion on transmit. Different members of the family have different ranges, but typically the radios can go from 300 kHz to 77 MHz and sometimes also 135 to 165 Mhz.

FlexRadio has a lot of competition lately in the ham radio SDR space with players ranging from big manufacturers to small businesses all taking a piece of the pie. The military connection for FlexRadio may let them give individual hams a better product.

As you might expect at this price point, this gear isn’t quite an RTL-SDR. If you want to roll your own or just understand things better, don’t miss [Mike Ossmann’s] workshop on RF design.


via Radio Hacks – Hackaday https://ift.tt/2UASU7c

Tuesday, September 3, 2019

Ham Radio Gets Embedded RTL-SDR

We usually think of the RTL-SDR as a low-cost alternative to a “real” radio, but this incredible project spearheaded by [Rodrigo Freire] shows that the two classes of devices don’t have to be mutually exclusive. After nearly 6 months of work, he’s developed and documented a method to integrate a RTL-SDR Blog V3 receiver directly into the Yaesu FT-991 transceiver.

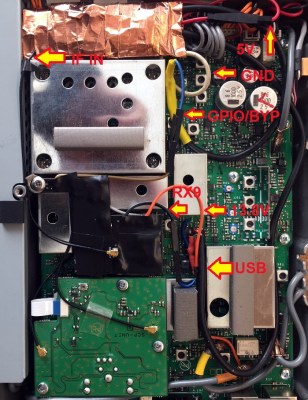
The professional results of the hack are made possible by the fact that the FT-991 already had USB capability to begin with. More specifically, it had an internal USB hub that allowed multiple internal devices to appear to the computer as a sort of composite device.

Unfortunately, the internal USB hub only supported two devices, so the first order of business for [Rodrigo] was swapping out the original USB2512BI hub IC with a USB2514BI that offered four ports. With the swap complete, he was able to hang the RTL-SDR device right on the new chip’s pins.

Of course, that was only half of the battle. He had a nicely integrated RTL-SDR from an external standpoint, but to actually be useful, the SDR would need to tap into the radio’s signal. To do this, [Rodrigo] designed a custom PCB that pulls the IF signal from the radio, feed it into an amplifier, and ultimately pass it to the SDR. The board uses onboard switches, controlled by the GPIO ports on the RTL-SDR Blog V3, for enabling the tap and preamplifier.

In the video after the break, you can see [Rodrigo] demonstrate his modified FT-991. This actually isn’t the first time somebody has tapped into their Yaesu with a software defined radio, though this is surely the cleanest install we’ve ever seen.


via Radio Hacks – Hackaday https://ift.tt/2ZJGej6